From Blocks to Code, Part II
In this tutorial, we are going to explore functions, understand the limitations of block coding, and how to "multitask" your SSTuino.
Table of Contents
Functions
Here are the 3 basic parts that you would have in the code.
However, you can separate code into functions, which create modular pieces of code that perform a defined task. Here are some advantages when you standardise code fragments into functions:
- Functions help the programmer to stay organised and help to conceptualise the program.
- Functions codify one function in one place so that it only has to be thought out and debugged once.
- If the code has to be changed, functions also reduce the errors in modification.
Functions can also help to have smaller code, especially if particular lines of code are used repeatedly in the program. Although functions have many advantages, do take note that Arduino still requires void setup() and void loop() for the program to work. You can place your additional functions outside of them. Now let’s make some functions with the previous examples!
Ultrasonic Distance Sensor Example
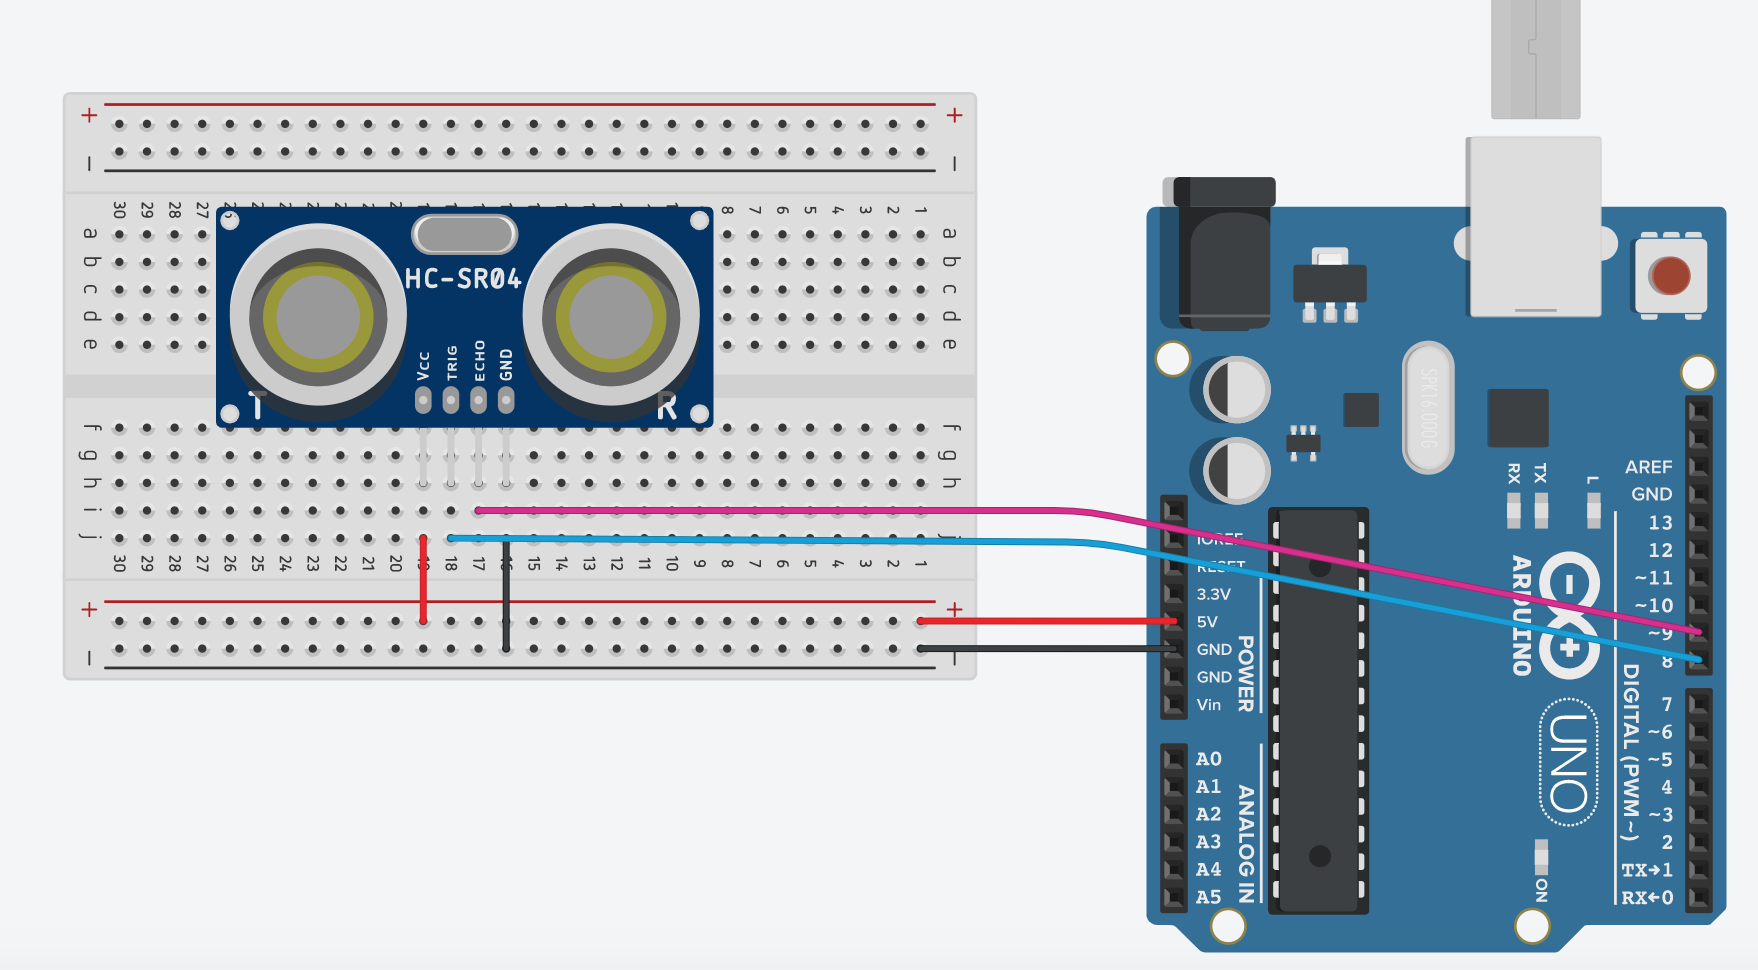
We are going to continue to use this circuit from our previous example.
Warning: To prevent damage to your Learning Device or your components, please do not connect the SSTuino to your LD or power supply when you are wiring up your circuit.
Here is an edited text version of the blocks code from TinkerCAD. Firstly the device initialises the Serial Monitor. Note that it does not declare the pins inside setup(). We will cover that in the function! 😁
void setup()
{
  Serial.begin(9600);
}
Now we will do up the code in loop(). We will make the serial monitor print the time taken for the sound wave to bounce back using the function readUltrasonicDistance(5,6) in microseconds and multiply that by half the speed of sound to display the distance in cm.
Tip: The speed of sound is 0.0343 centimetre/microsecond. We half that to 0.01723 because the time taken for the sound to bounce back is 2x the total distance (time taken to the object + time taken from the object)
void loop()
{
  Serial.println(0.01723 * readUltrasonicDistance(5, 6));
}
And finally the function! We declare it so that we can use it in the calculation in loop(). The function essentially tells the sensor to "fire" the ultrasonic wave and read the time taken for it to travel to and fro.
long readUltrasonicDistance(int triggerPin, int echoPin)
{
  pinMode(triggerPin, OUTPUT);  // Clear the trigger
  digitalWrite(triggerPin, LOW);
  delayMicroseconds(2);
  // Sets the trigger pin to HIGH state for 10 microseconds
  digitalWrite(triggerPin, HIGH);
  delayMicroseconds(10);
  digitalWrite(triggerPin, LOW);
  pinMode(echoPin, INPUT);
  // Reads the echo pin, and returns the sound wave travel time in microseconds
  return pulseIn(echoPin, HIGH);
}
Let's try this out in the Arduino IDE! What other functions would you like to add to this code?
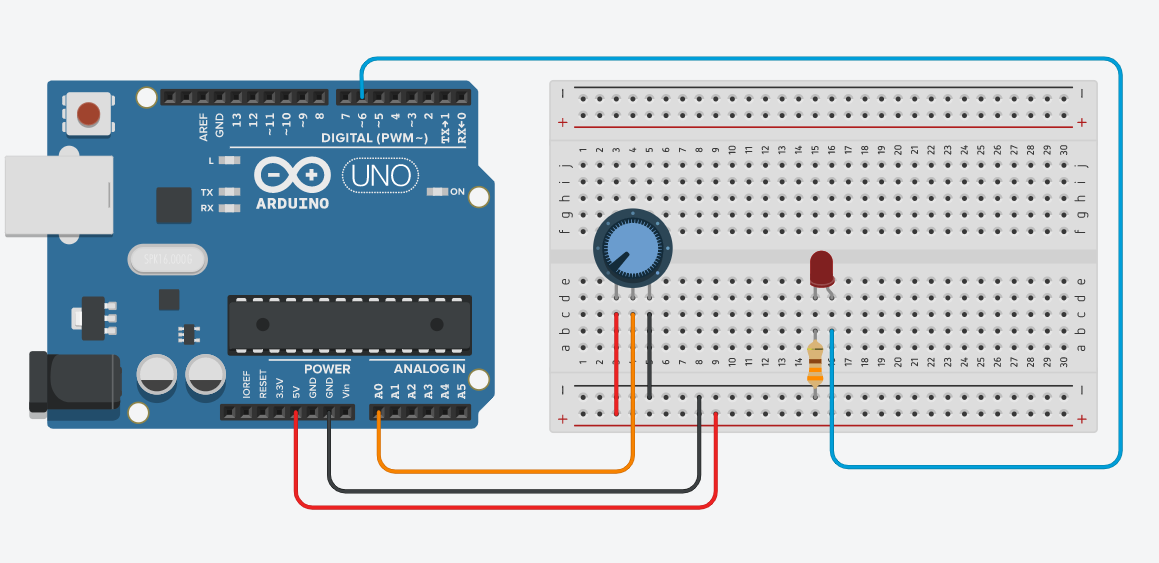
Potentiometer Example
Let's try out another simple example with the Potentiometer! Set up the circuit as shown:
Warning: To prevent damage to your Learning Device or your components, please do not connect the SSTuino to your LD or power supply when you are wiring up your circuit.
Head over to the Arduino IDE and set up the code. First, let’s open the serial port, input and output pins:
void setup()
{
    Serial.begin(9600);
    pinMode(A0, INPUT);
    pinMode(6, OUTPUT);
}
Next, let's leave void loop() alone for a bit 😆 and set up functions! You can name your functions whatever you want, as long as it’s a single word and does not start with numbers.
void pwmLed()
{
    analogWrite(6, (analogRead(A0) / 4));
}

void helloWorld()
{
    Serial.println("Hello, World!");
}
With this, we have just created 2 functions! Let us place them inside void loop()
void loop()
{
  helloWorld();
  pwmLed();
}
The advantage of using functions in this scenario is that if I would like to not make a section of code run, I do not need to comment out all the lines inside void loop(). Instead, I just have to comment out the function like this!
void loop()
{
  //helloWorld(); // This code will not be run.
  pwmLed();
}
Limitations of Block Code
Programming with blocks is super simple! Just plop them in and you are good to go! Block coding is a great tool to get people started with little to no programming knowledge. However, as we move to more advanced tutorials like the Internet of Things, there are many functions not available to us in block coding. While we love introductory tools such as TinkerCAD's block coding functionality, we would like our students to move on to text-based programming languages too!
Here are some limitations of block code:
- Cannot use code that other people wrote (aka libraries)
- Inability to use sensors that are not supported by the platform
- Block coding uses delays, which is no good if you want to do multiple things at once
"Multitasking" your SSTuino
Let's make the device "multitask"! For the examples that we have covered so far, we have always used delay() to say light up an LED for 1 second. However, although delay() is handy and works for basic examples, it shouldn't be used in the real world...
Wait, what? 🤯
Why shouldn't we use delay()? That is because delay is a blocking function. For example, when you do delay(1000), the Arduino stops on that line for one second. Blocking functions prevent a program from doing anything else until that particular task has been completed. If you need multiple tasks to occur at the same time, you simply cannot use delay(). If your program requires you to constantly read data (e.g. Ultrasonic Sensor), you should avoid using the delay function.
millis() instead of delay()
Here comes millis() to the rescue! 🥳 When called, it returns the number of milliseconds that have passed since the program first started. By doing some simple math and comparison, you can verify how much time has passed without blocking your code! Let’s take a look at the Blink sketch that does not use the delay() function:
// constants won't change. Used here to set a pin number :
const int ledPin = 13; // the number of the LED pin

// Variables will change :
int ledState = LOW; // ledState used to set the LED

// Generally, you should use "unsigned long" for variables that hold time
// The value will quickly become too large for an int to store
unsigned long previousMillis = 0; // will store last time LED was updated

// constants won't change :
const long interval = 1000; // interval at which to blink (milliseconds)

void setup()
{
    // set the digital pin as output:
    pinMode(ledPin, OUTPUT);
}

void loop()
{
    // here is where you'd put code that needs to be running all the time.

    // check to see if it's time to blink the LED; that is, if the
    // difference between the current time and the last time you blinked
    // the LED is bigger than the interval at which you want to
    // blink the LED.
    unsigned long currentMillis = millis();

    if (currentMillis - previousMillis >= interval)
    {
        // save the last time you blinked the LED
        previousMillis = currentMillis;

        // if the LED is off turn it on and vice-versa:
        if (ledState == LOW)
        {
            ledState = HIGH;
        }
        else
        {
            ledState = LOW;
        }

        // set the LED with the ledState of the variable:
        digitalWrite(ledPin, ledState);
    }
}
How the code works is that it subtracts the previously recorded time (previousMillis) from the current time (currentMillis). If the remainder is greater than the interval (1000 milliseconds), the program updates the previousMillis variable to the current time, and either turns the LED on or off.
As the program is non-blocking, any code that is added outside of the first if statement should work correctly. You can now add other tasks and your LED will blink every second!
Using the millis() function does take a bit more work than using the delay() function but will be worth it if the program needs to multitask.
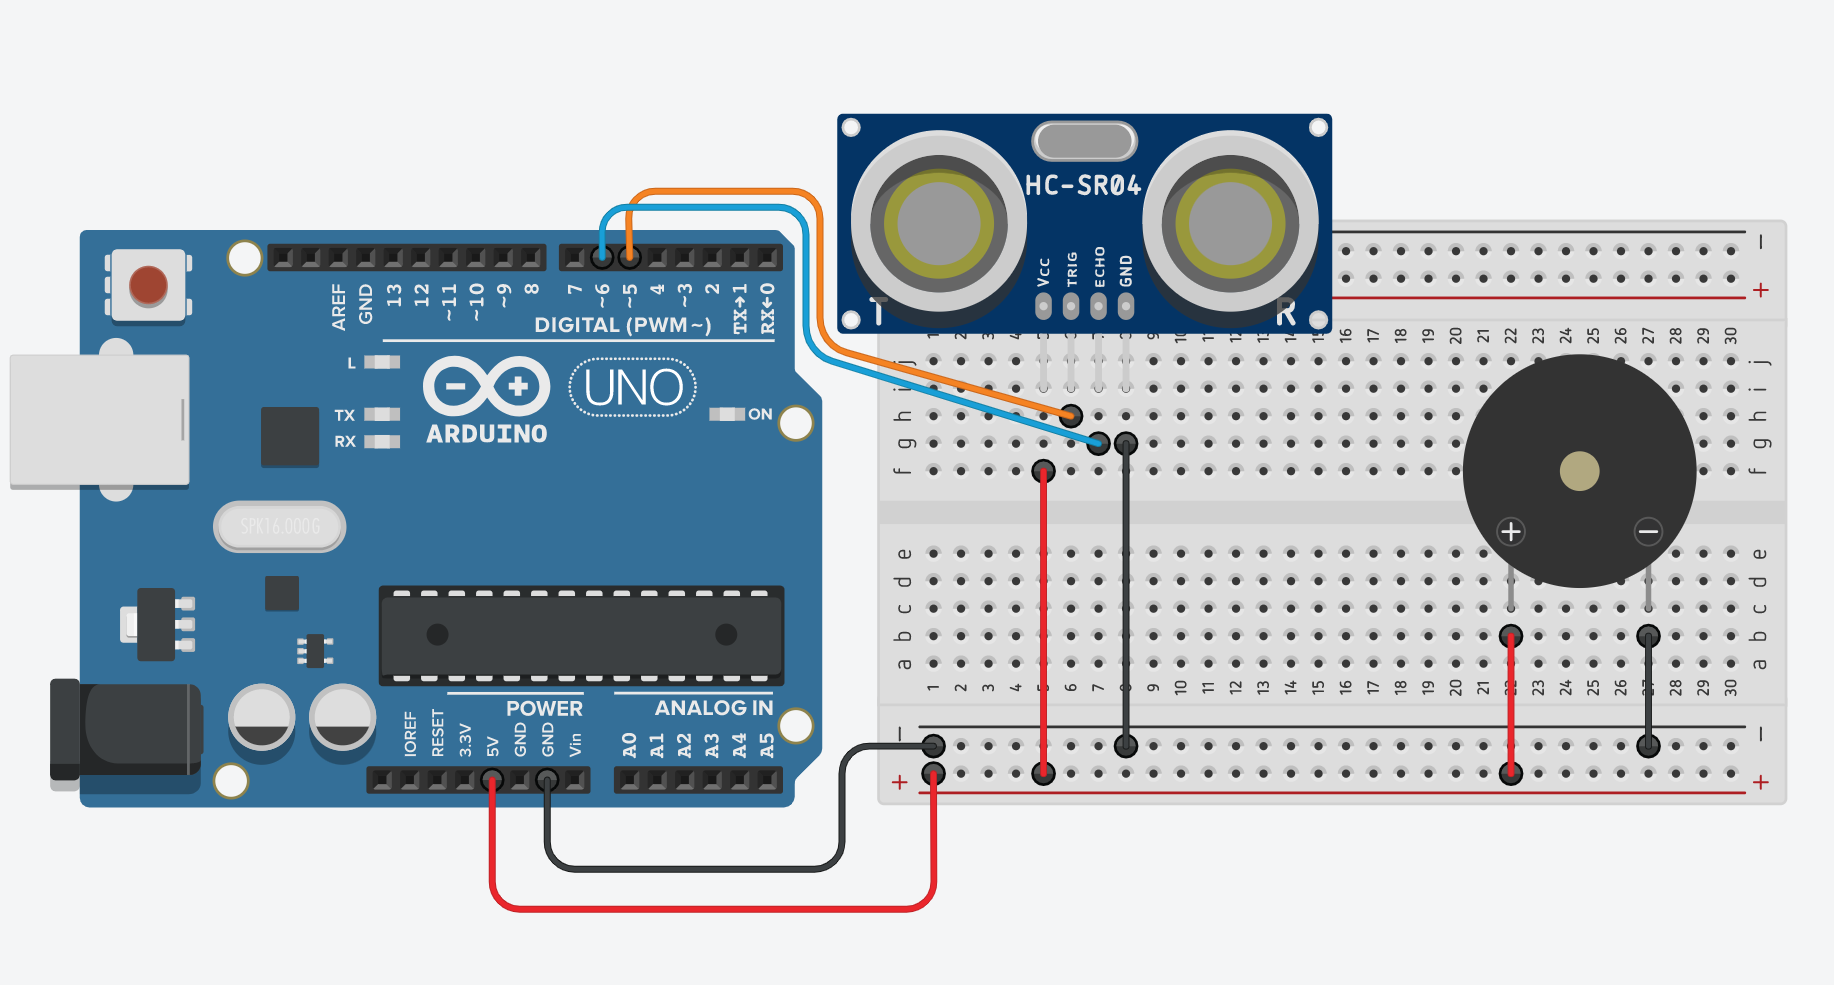
Ultrasonic Sensor and Buzzer Example
Let's wire up your circuit as so!
Warning: To prevent damage to your Learning Device or your components, please do not connect the SSTuino to your LD or power supply when you are wiring up your circuit.
Next, head over to the Arduino IDE where we will program the ultrasonic sensor to:
- trigger the ultrasonic wave every 1 millisecond
- print the distance to the serial monitor every 1 second
- turn on and off a buzzer every second if the distance is less than 30cm
const int trigPin = 5; // set pin variables
const int echoPin = 6;
const int buzzerPin = 13;

int trigState = LOW;              // state of trigPin
int interval = 1;                 // interval in milliseconds at which trigPin turns on
int interval2 = 1000;             // time in milliseconds at which the distance is printed in serial monitors
int printState = LOW;             // whether or not to print distance
int buzzer = LOW;                 // whether or not buzzer is on
unsigned long previousMillis = 0; // microsecond at which the pin was last writen

void setup()
{
    Serial.begin(9600);       // begin serial communication
    pinMode(trigPin, OUTPUT); // set pinmodes
    pinMode(echoPin, INPUT);
    pinMode(buzzerPin, OUTPUT);
}

void loop()
{
    unsigned long currentMillis = millis(); // time in milliseconds from which the code was started
    if (currentMillis - previousMillis >= interval)
    {                                   // check "blink without delay" code
        previousMillis = currentMillis; //
        if (trigState == LOW)
        {
            trigState = HIGH;
        }
        else
        {
            trigState = LOW;
        }
    }
    // printing speed in serial monitor at an interval of 1s
    if (currentMillis - previousMillis >= interval2)
    { // check "blink without delay" code
        previousMillis = currentMillis;
        if (printState == LOW)
        {
            printState = HIGH;
        }
        else
        {
            printState = LOW;
        }
    }
    digitalWrite(trigPin, trigState);  // Fire the pulse to measure distance
    int duration, distance;            // variables
    duration = pulseIn(echoPin, HIGH); // Measure the time taken for the pulse
    distance = duration * 0.01723;     // Calculate speed
    if (printState = HIGH)
    { // print the data to the serial monitor
        Serial.print(distance);
        Serial.println("cm");
    }

    if (distance < = 30)
    { // If distance <30cm, buzzer will sound at an interval of 1s.
        if (currentMillis - previousMillis >= interval2)
        { // check "blink without delay" code
            previousMillis = currentMillis;
            if (buzzer == LOW)
            {
                buzzer = HIGH;
                digitalWrite(buzzerPin, HIGH);
            }
            else
            {
                buzzer = LOW;
                digitalWrite(buzzerPin, LOW);
            }
        }
    }
    else
    {
        digitalWrite(buzzerPin, LOW);
    }
}
Resources and Going Further
If you want to know more about how to use functions, and how to avoid using delay() to control timing on an Arduino, check out the articles below.