Getting Started with IoT
Table of Contents
What is the Internet of Things (IoT) all about?
A lot of people have been talking about the Internet of Things (IoT), and Industry 4.0, but what does all of this mean for you?
Internet of Things is a key component of Industry 4.0 and provides companies with the ability to collect and analyse live data from their devices.
With the SSTuino II, you are empowered to create your own IoT devices and innovations. For students, IoT coupled with devices like the SSTuino allows you to collect data about your surroundings and stream them directly to the Internet, giving you the flexibility to conduct scientific inquiry without the need to hold a datalogger there and wait for data to come in. Or, create your own small automations around your household to make life easier! The sky’s the limit.
What is MQTT, and why use it?
MQTT stands for Message Queuing Telemetry Transport, and it is a “language” that your SSTuino uses to talk to the IoT server, just like how your web browser talks to websites to retrieve them, but spends even less data!
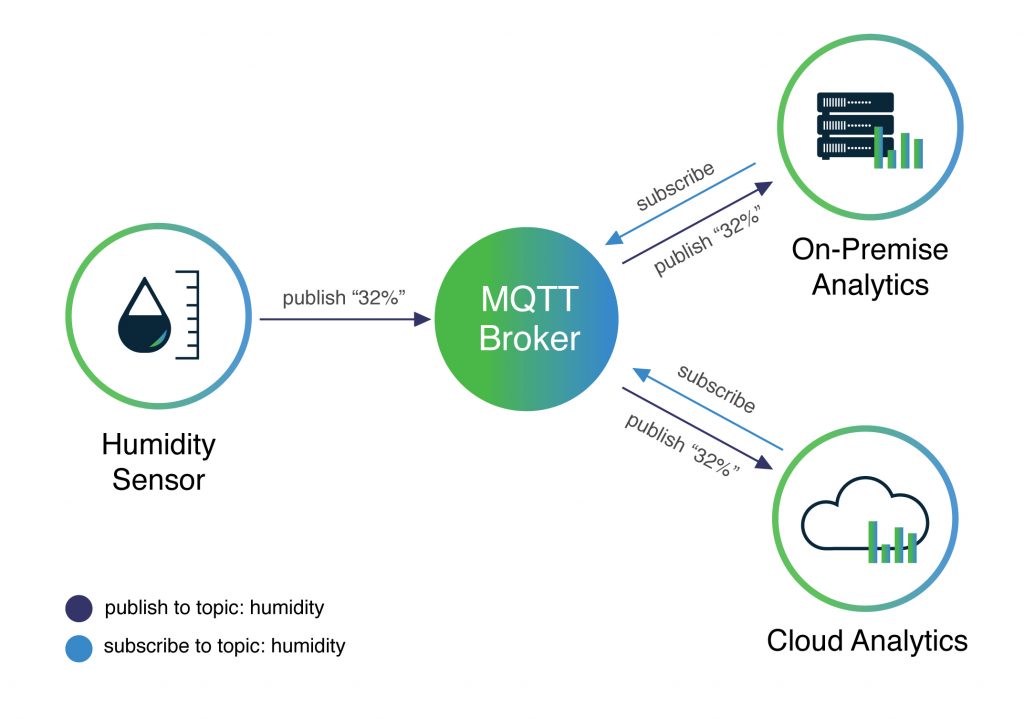
MQTT has 3 important concepts to understand: “Publish”, “Subscribe” and “topics”.
- Topics are like the address of a website, allowing you to specify a certain device and its resources. For example, you could have a topic that looks like
sstuino-ii/temperature, which would mean that you want to access the ‘temperature’ Variable within the ‘sstuino-ii’ Device. - To Publish data means that you are transmitting data from your device to the server, with a given topic. It is a bit like submitting a form on a website.
- To Subscribe to a topic is to receive data from the server to your device. If you ever subscribed to a YouTube channel and clicked the bell icon, you would be notified whenever the channel posts something new. The same applies here when you subscribe to an MQTT topic and have new data pushed to your device the moment it appears.
MQTT is lightweight and fault-tolerant, making it perfect for use with our IoT devices.
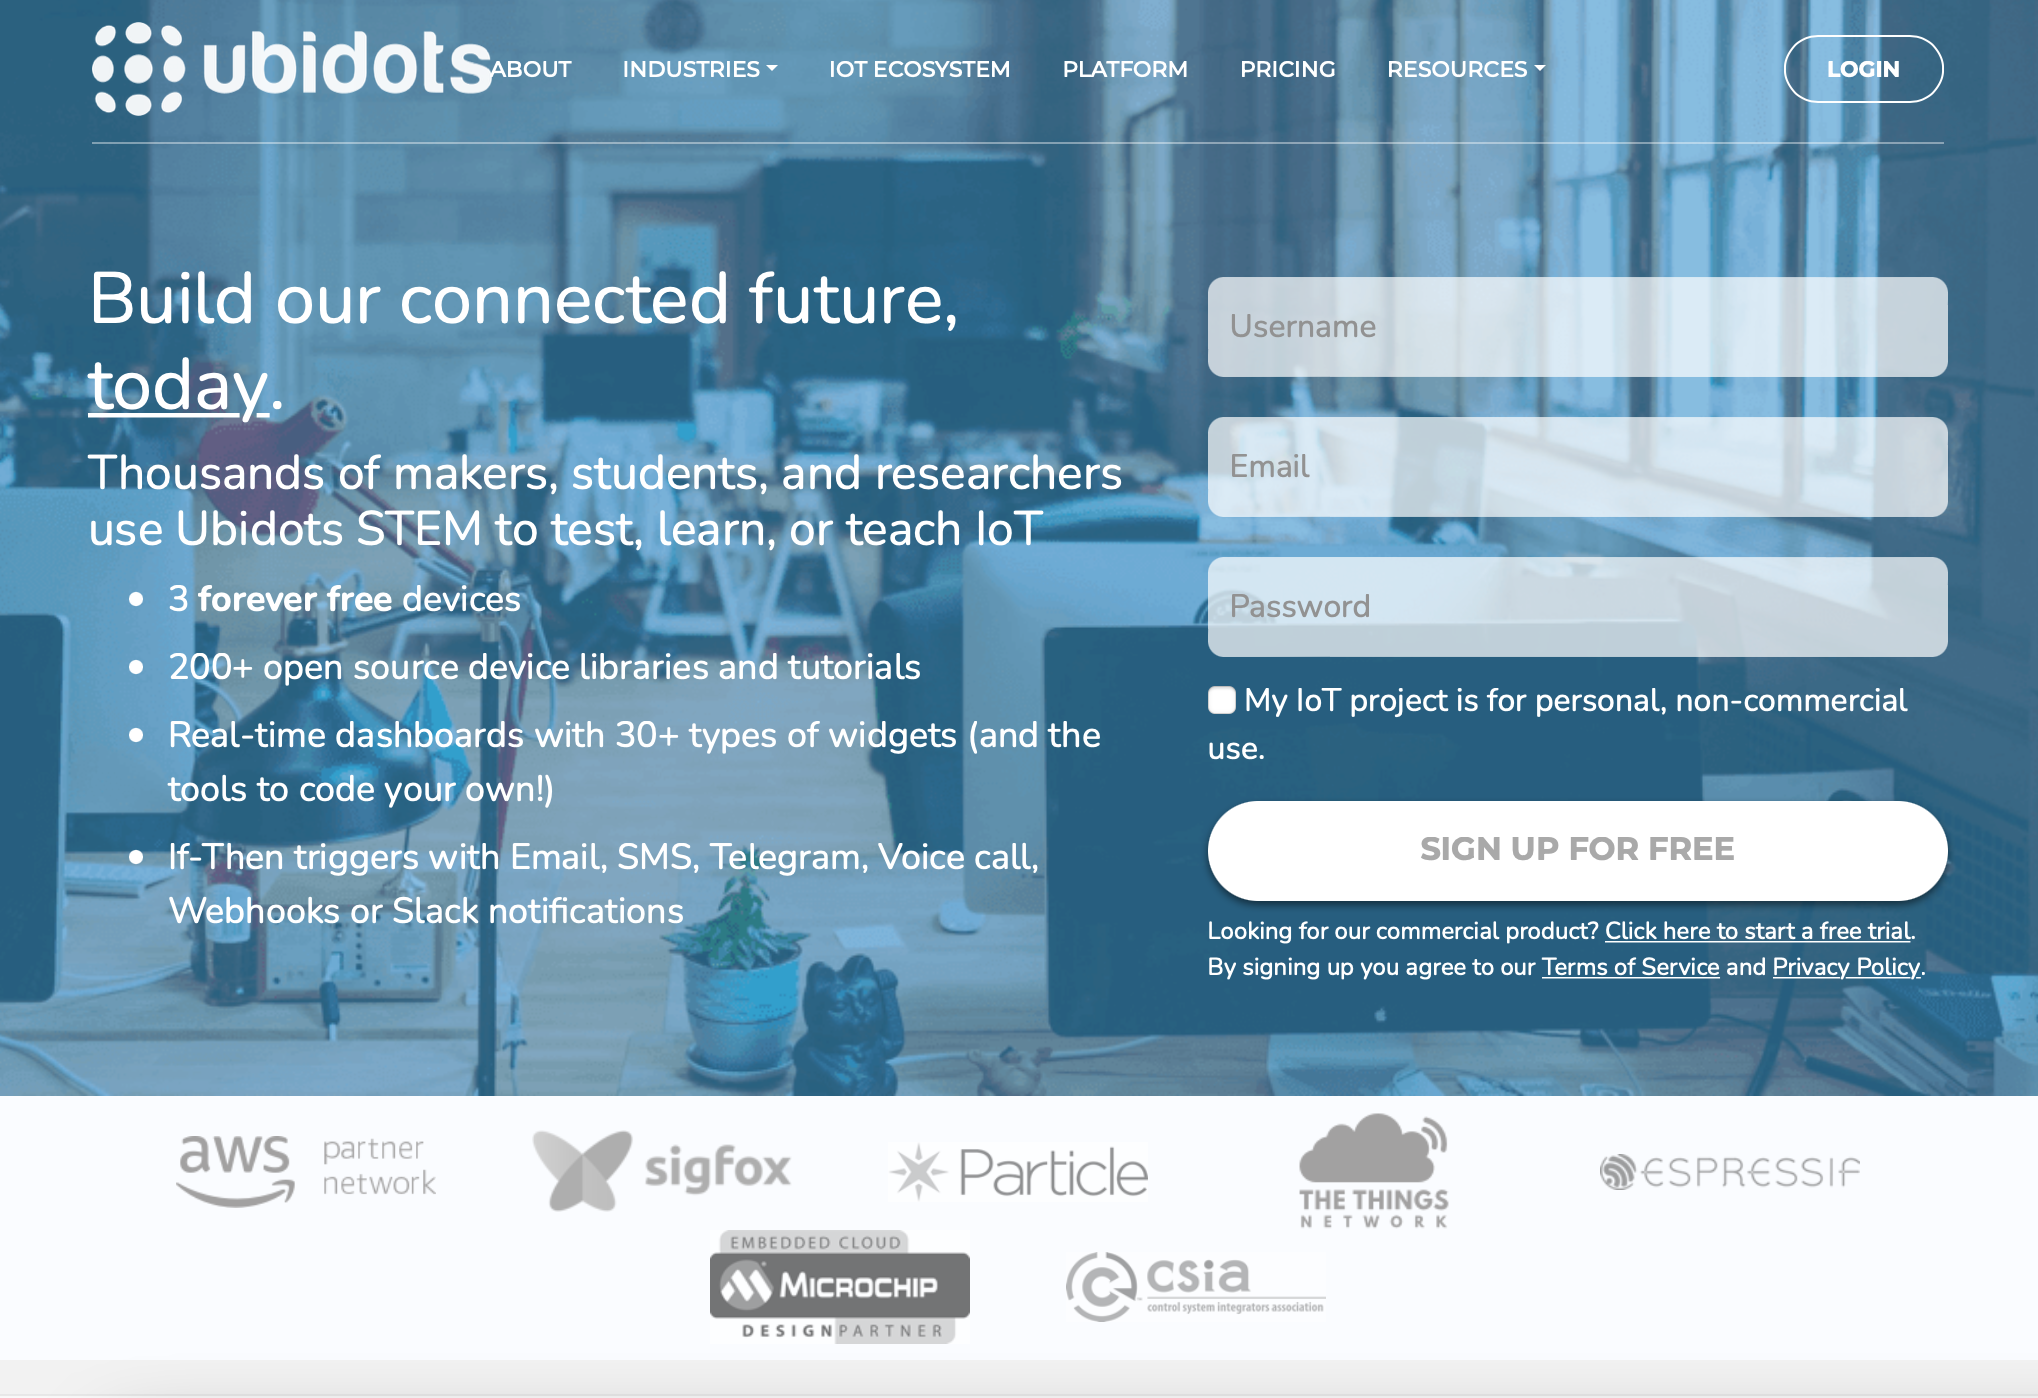
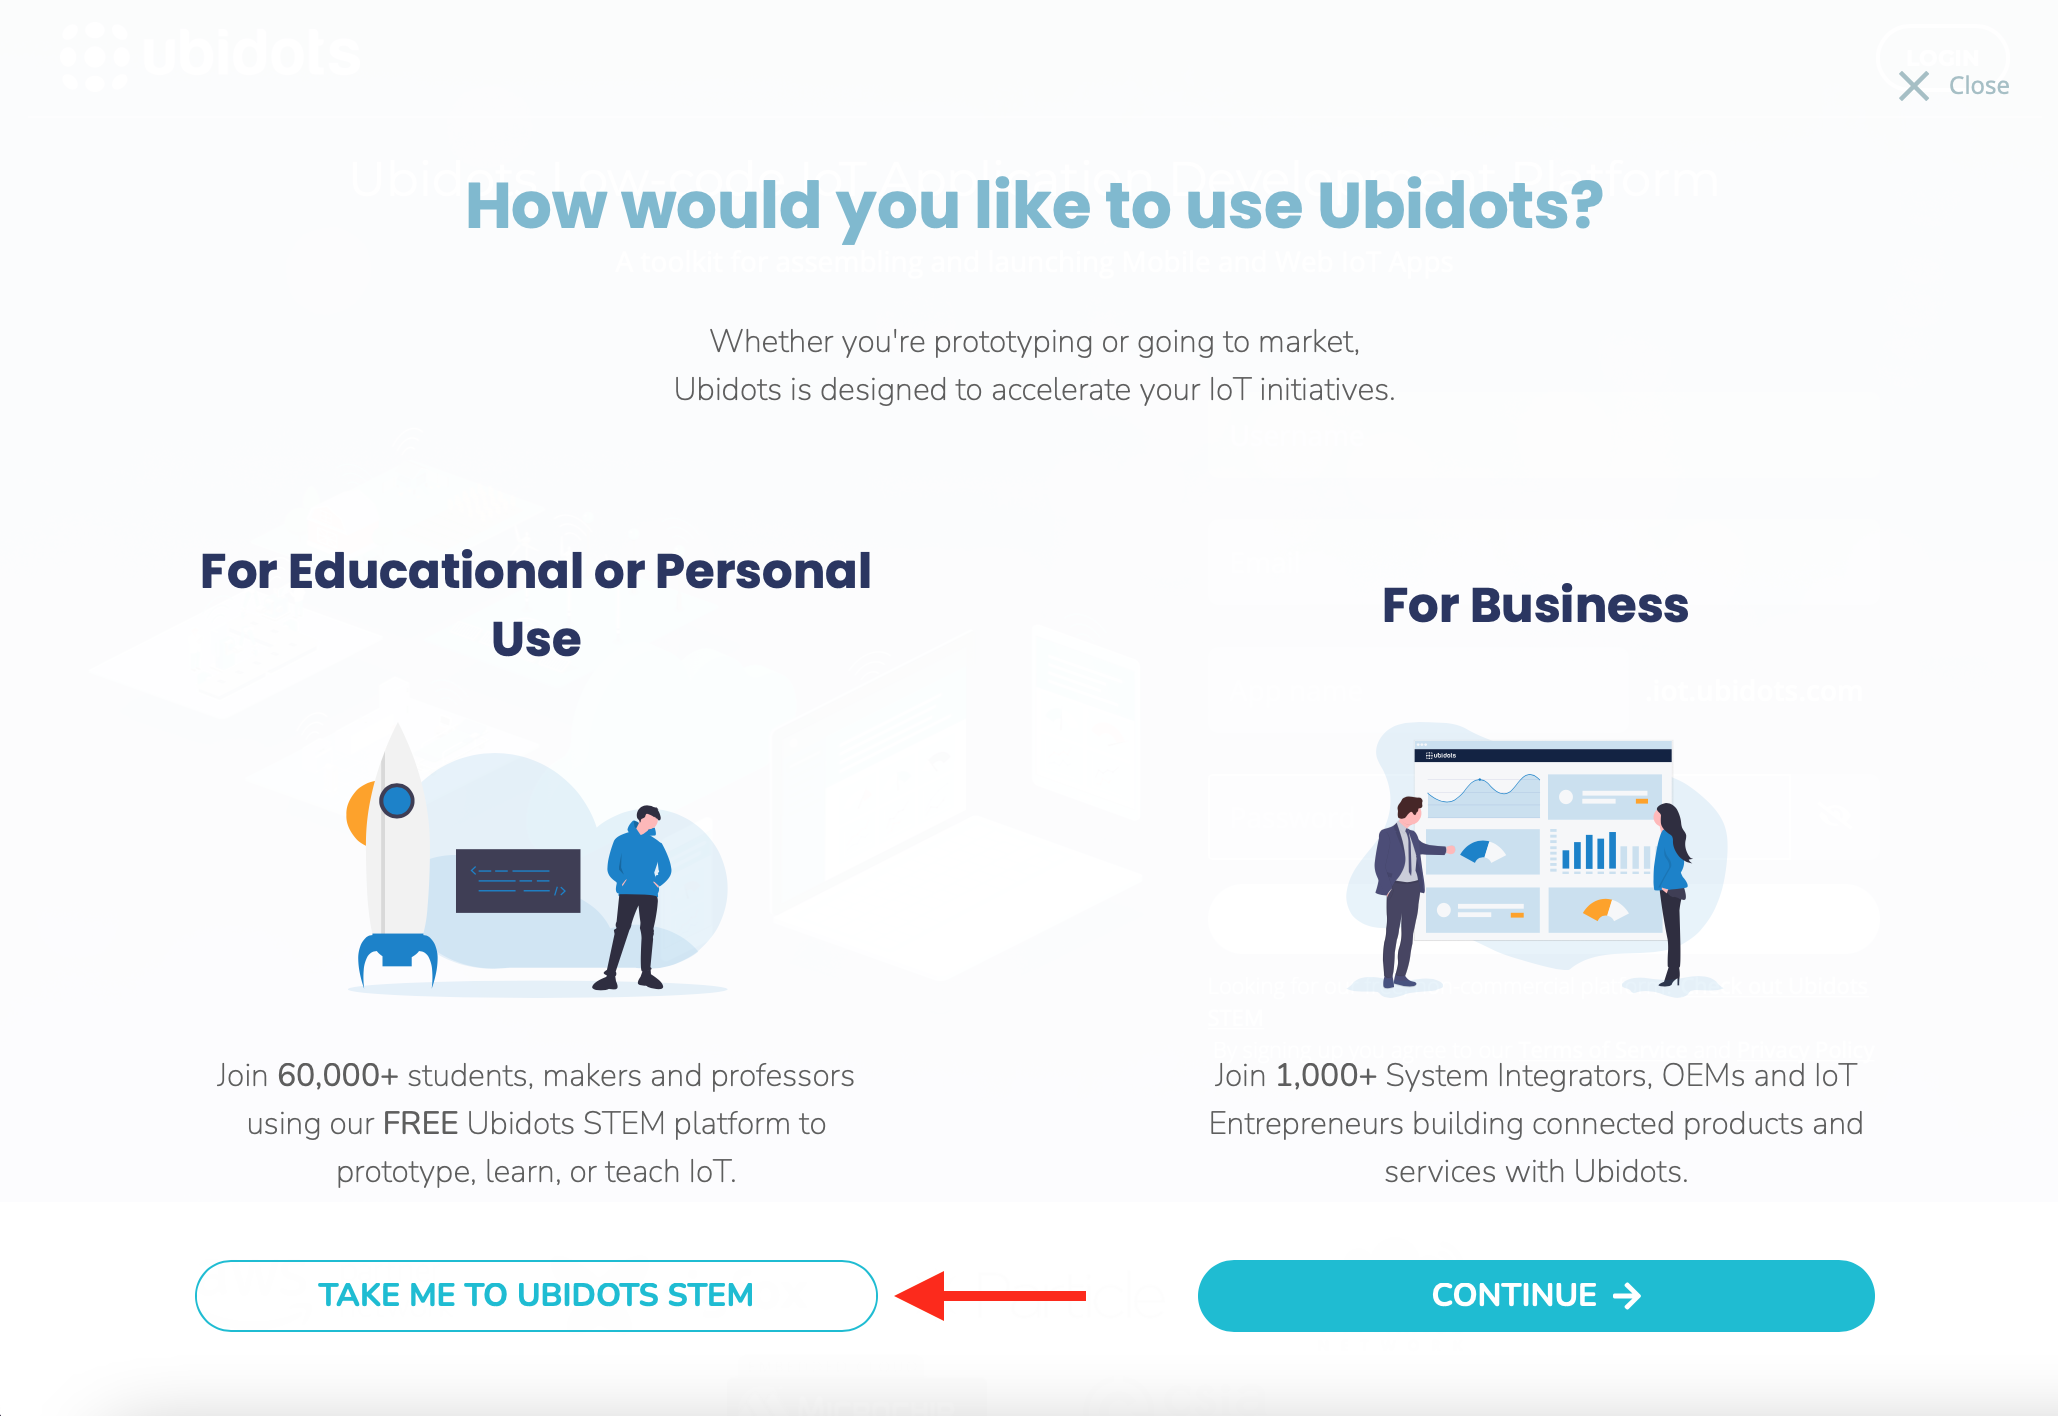
Creating an Ubidots STEM account
You will need to create an account with Ubidots for this exercise. Ubidots is an IoT service that provides you with the ability to connect IoT devices, and display beautiful dashboards with data from your devices.
We will be using Ubidots STEM, which is a special educational only version of Ubidots.
Please sign up with Ubidots STEM using your SST email.
Note that Ubidots STEM has a few limitations that you have to take note of when deploying your IoT devices and applications:
- Can only be used in educational settings
- Can only create up to 3 devices, each device with 10 variables (sometimes also called channels)
- Up to 4,000 data points per day (2-3 data points per minute) across all devices, so if your device sends data 24/7, please make sure to not exceed this limit
- Maximum rate of 1 data point per second, no faster than that
- Up to 3 dashboards, each with 10 widgets max
- For the full list of limitations, please refer to this link
How Ubidots works
Each device that you connect to Ubidots is simply called a “Device”, which can have many “Variables”. These “Variables” are data sets that you can send. For example, you can have a Variable for temperature, another Variable for distance, and another Variable for a light switch. Within a Variable, there can be “Dots”, which is Ubidot’s way of describing a single data point at a certain time. If your temperature sensor sends “25.6” to the temperature Variable at 10:30 am, that counts as a single “Dot”.
Ubidots only allows you to send numbers, which means you cannot send texts through their service. To represent a light switch, you would have to send a number of either 1 or 0. If you need to represent a fading light with analogWrite, you may have to use numbers from 0 to 255.
Setting up Ubidots
Please login with the details you used to sign up just now at:
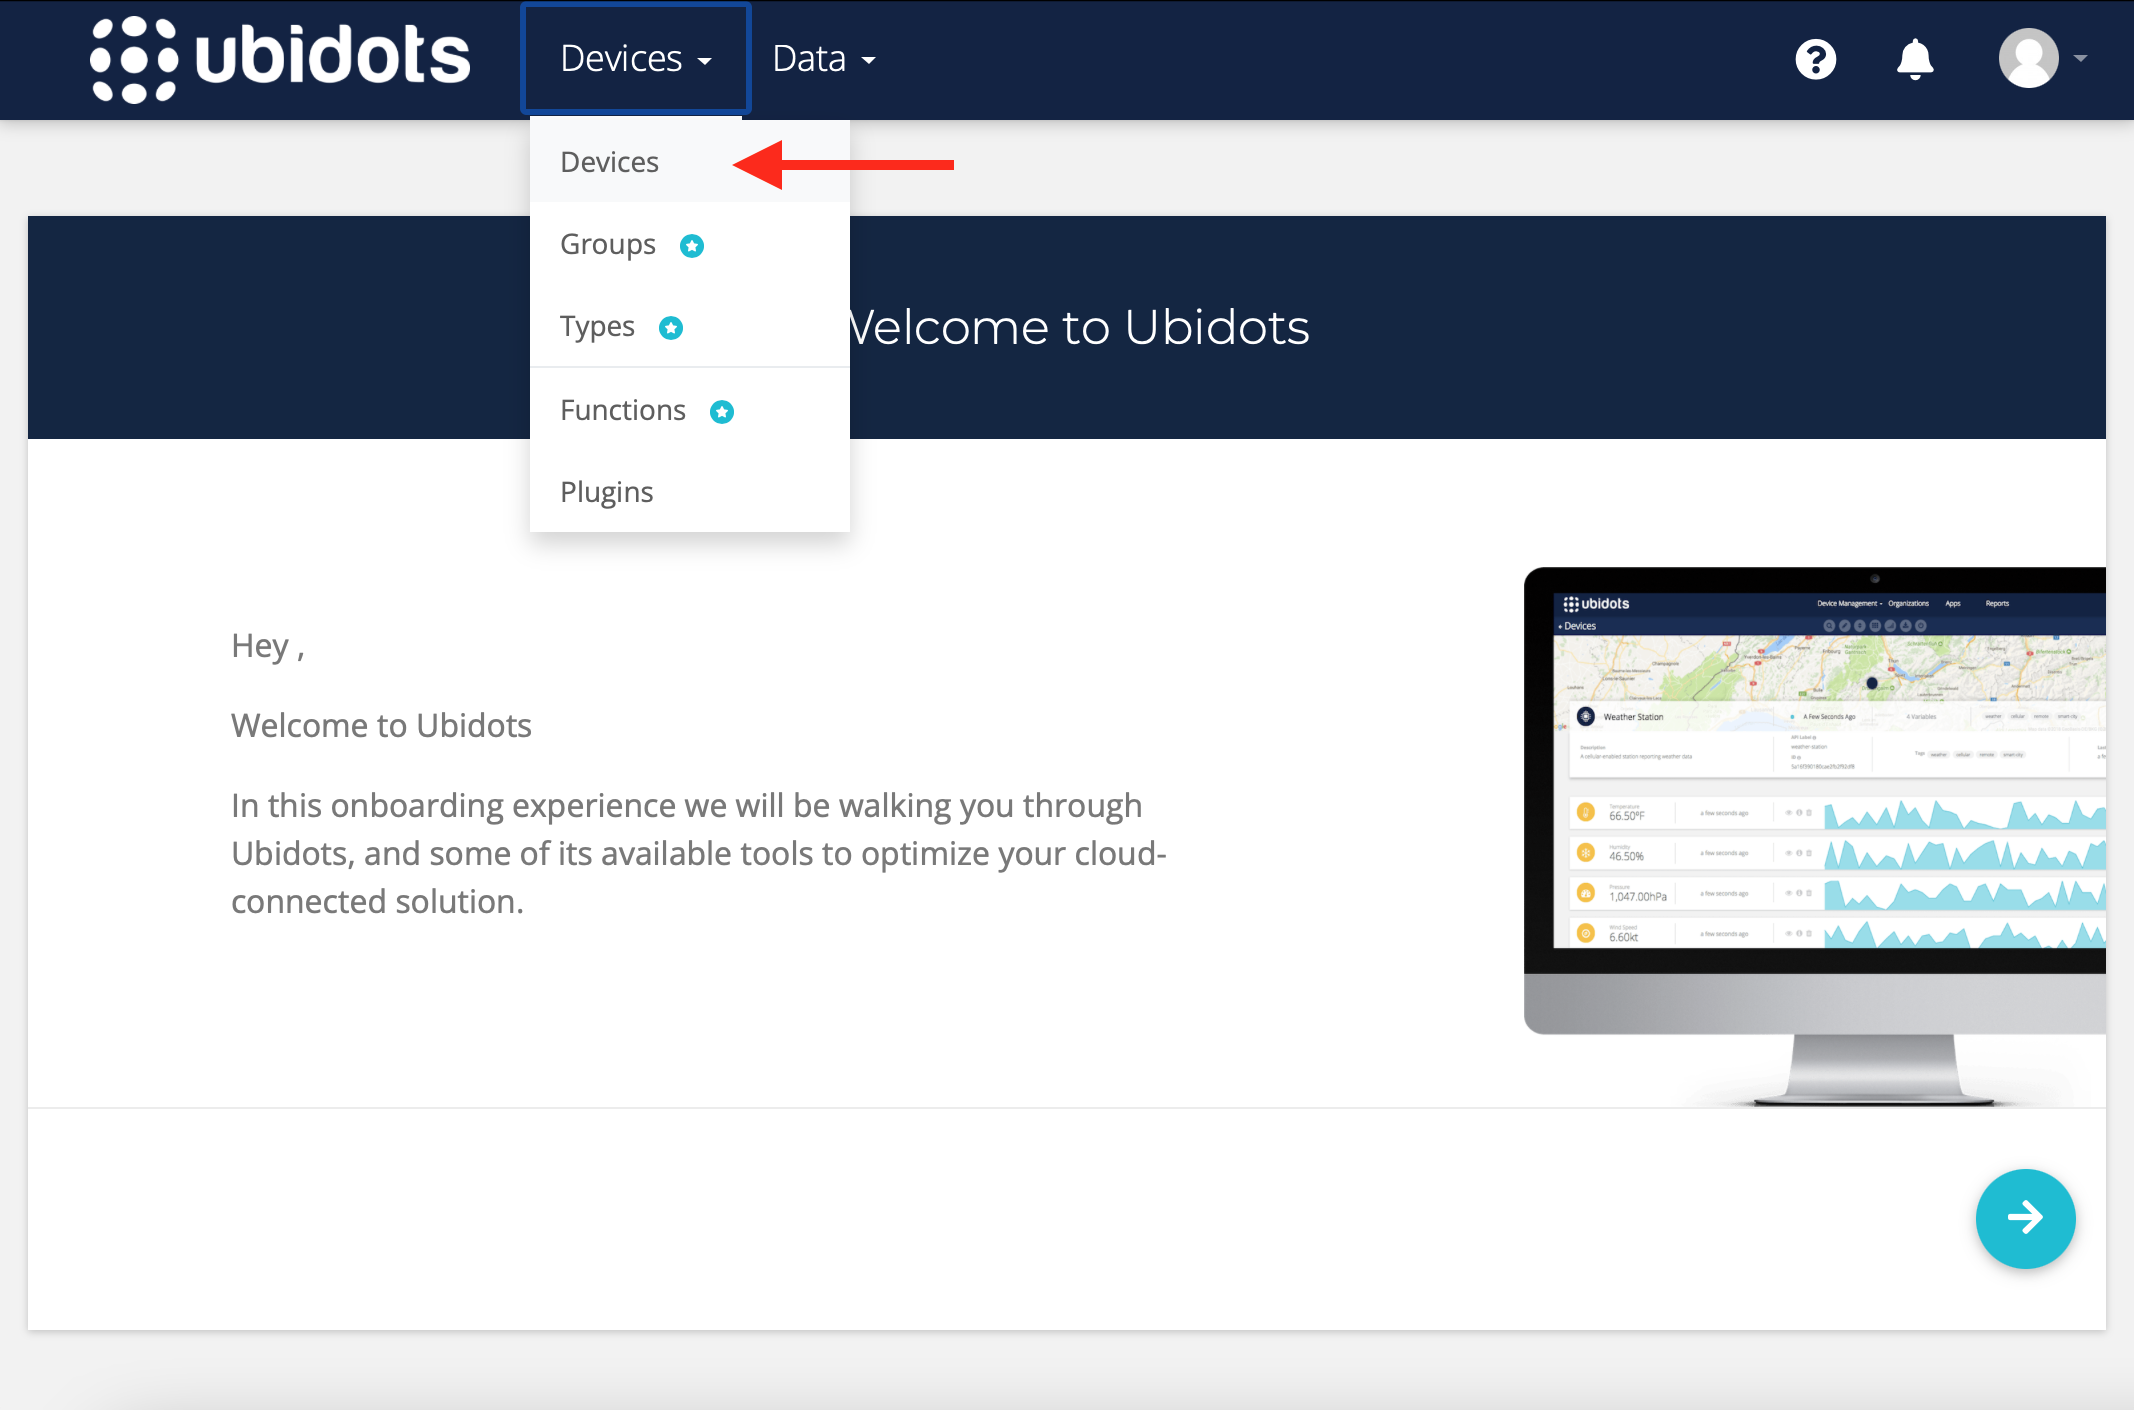
Creating a new Device
We are going to create a Device first. Click on the topbar “Devices > Devices” to go to the Devices menu.

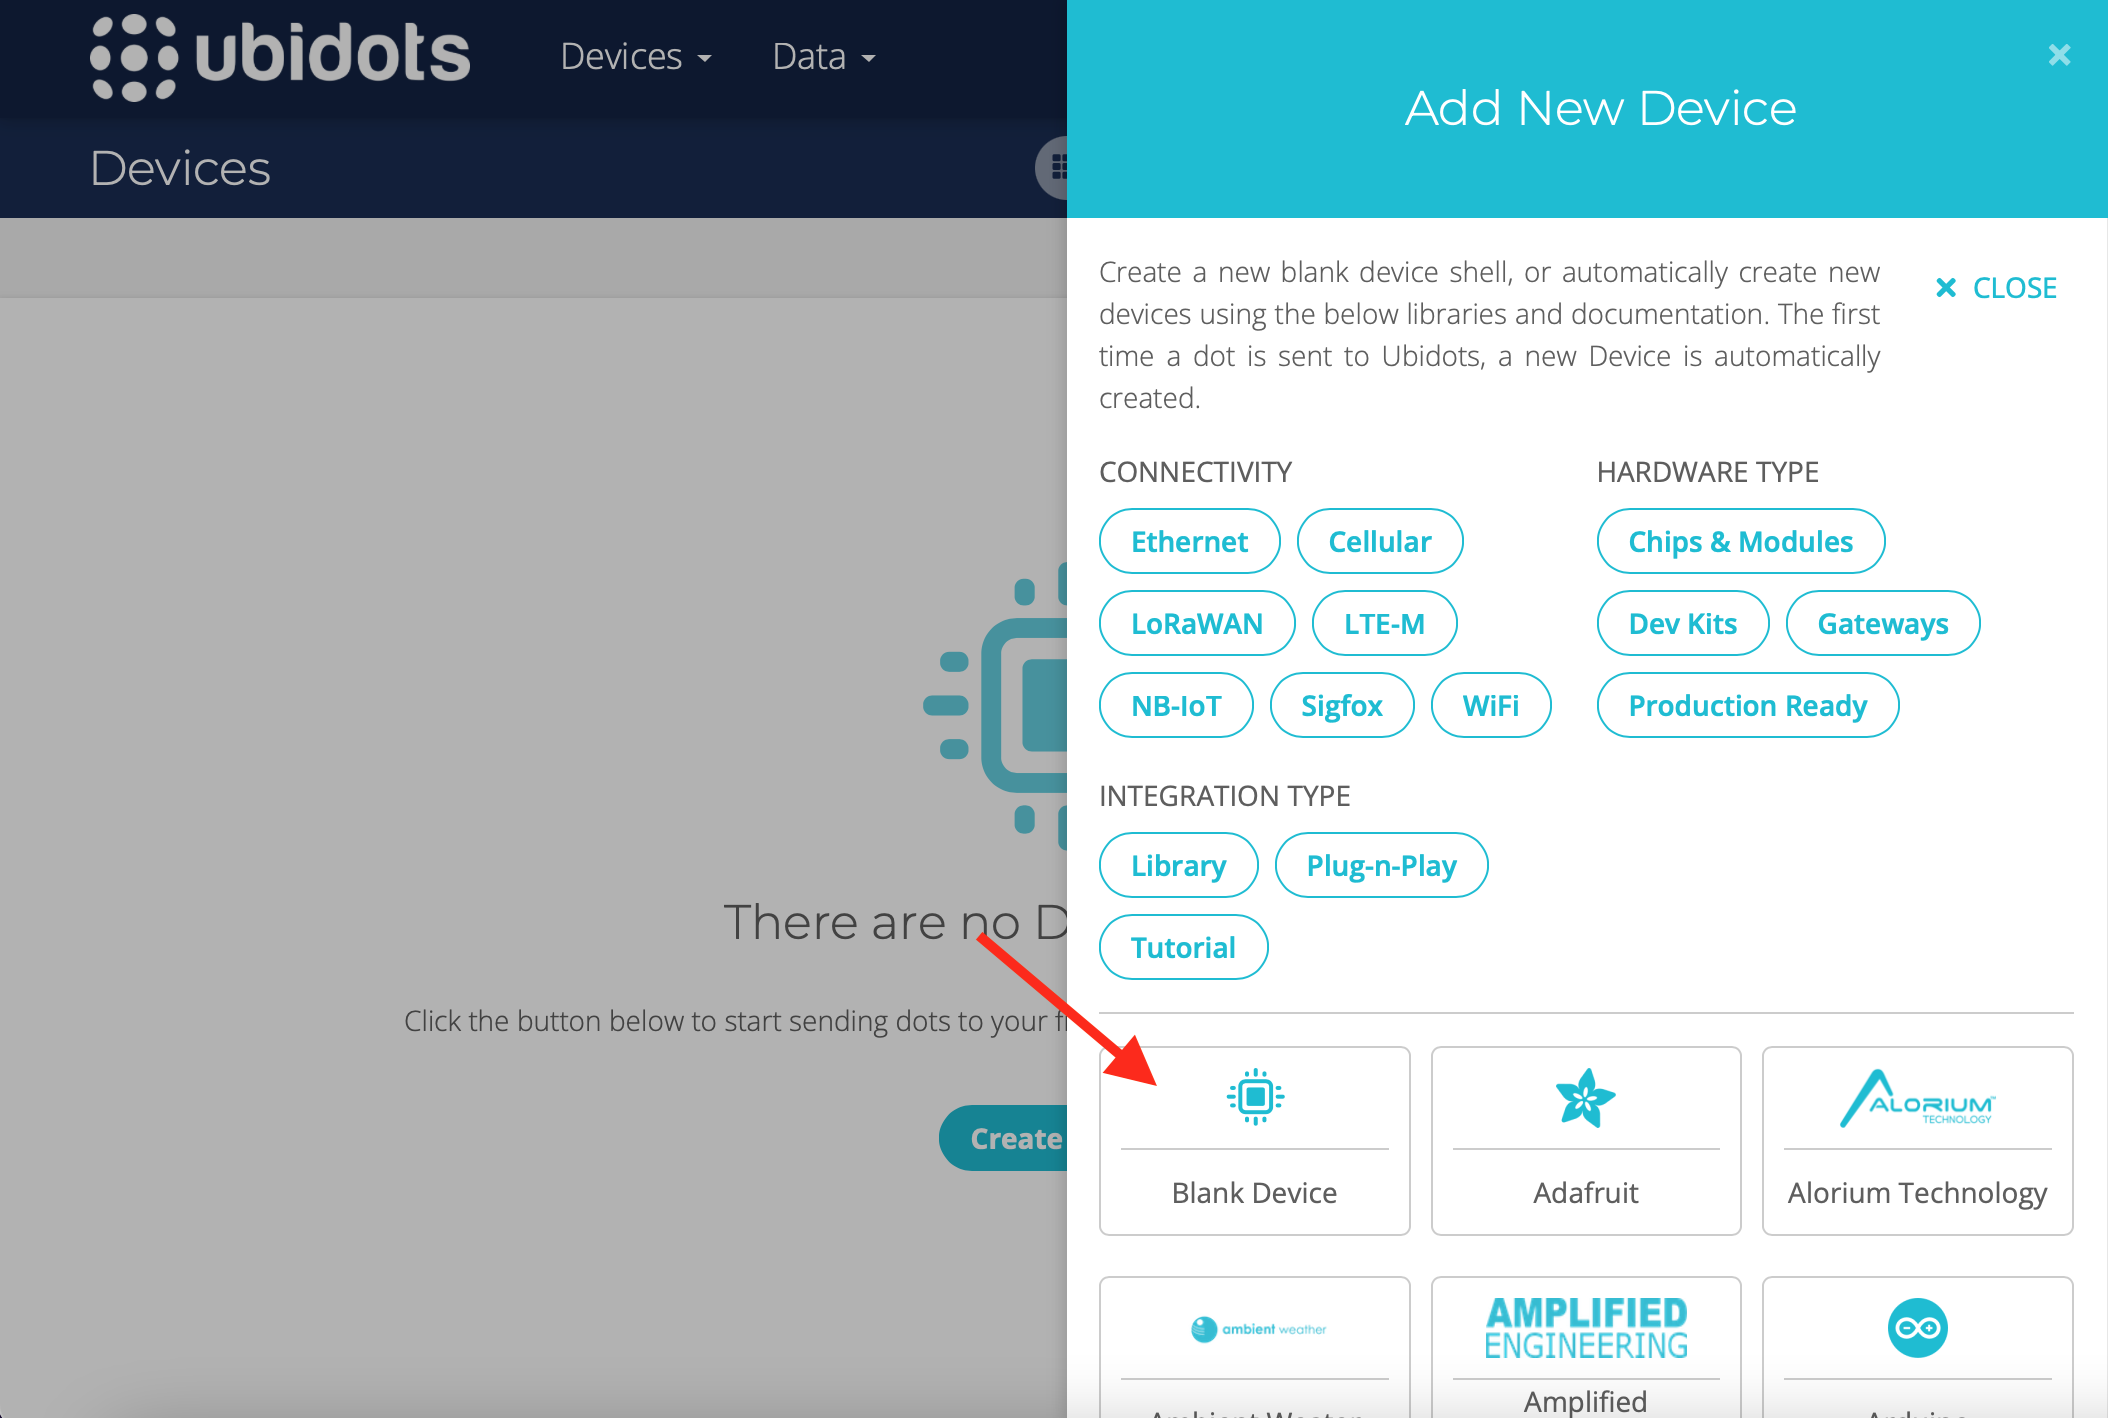
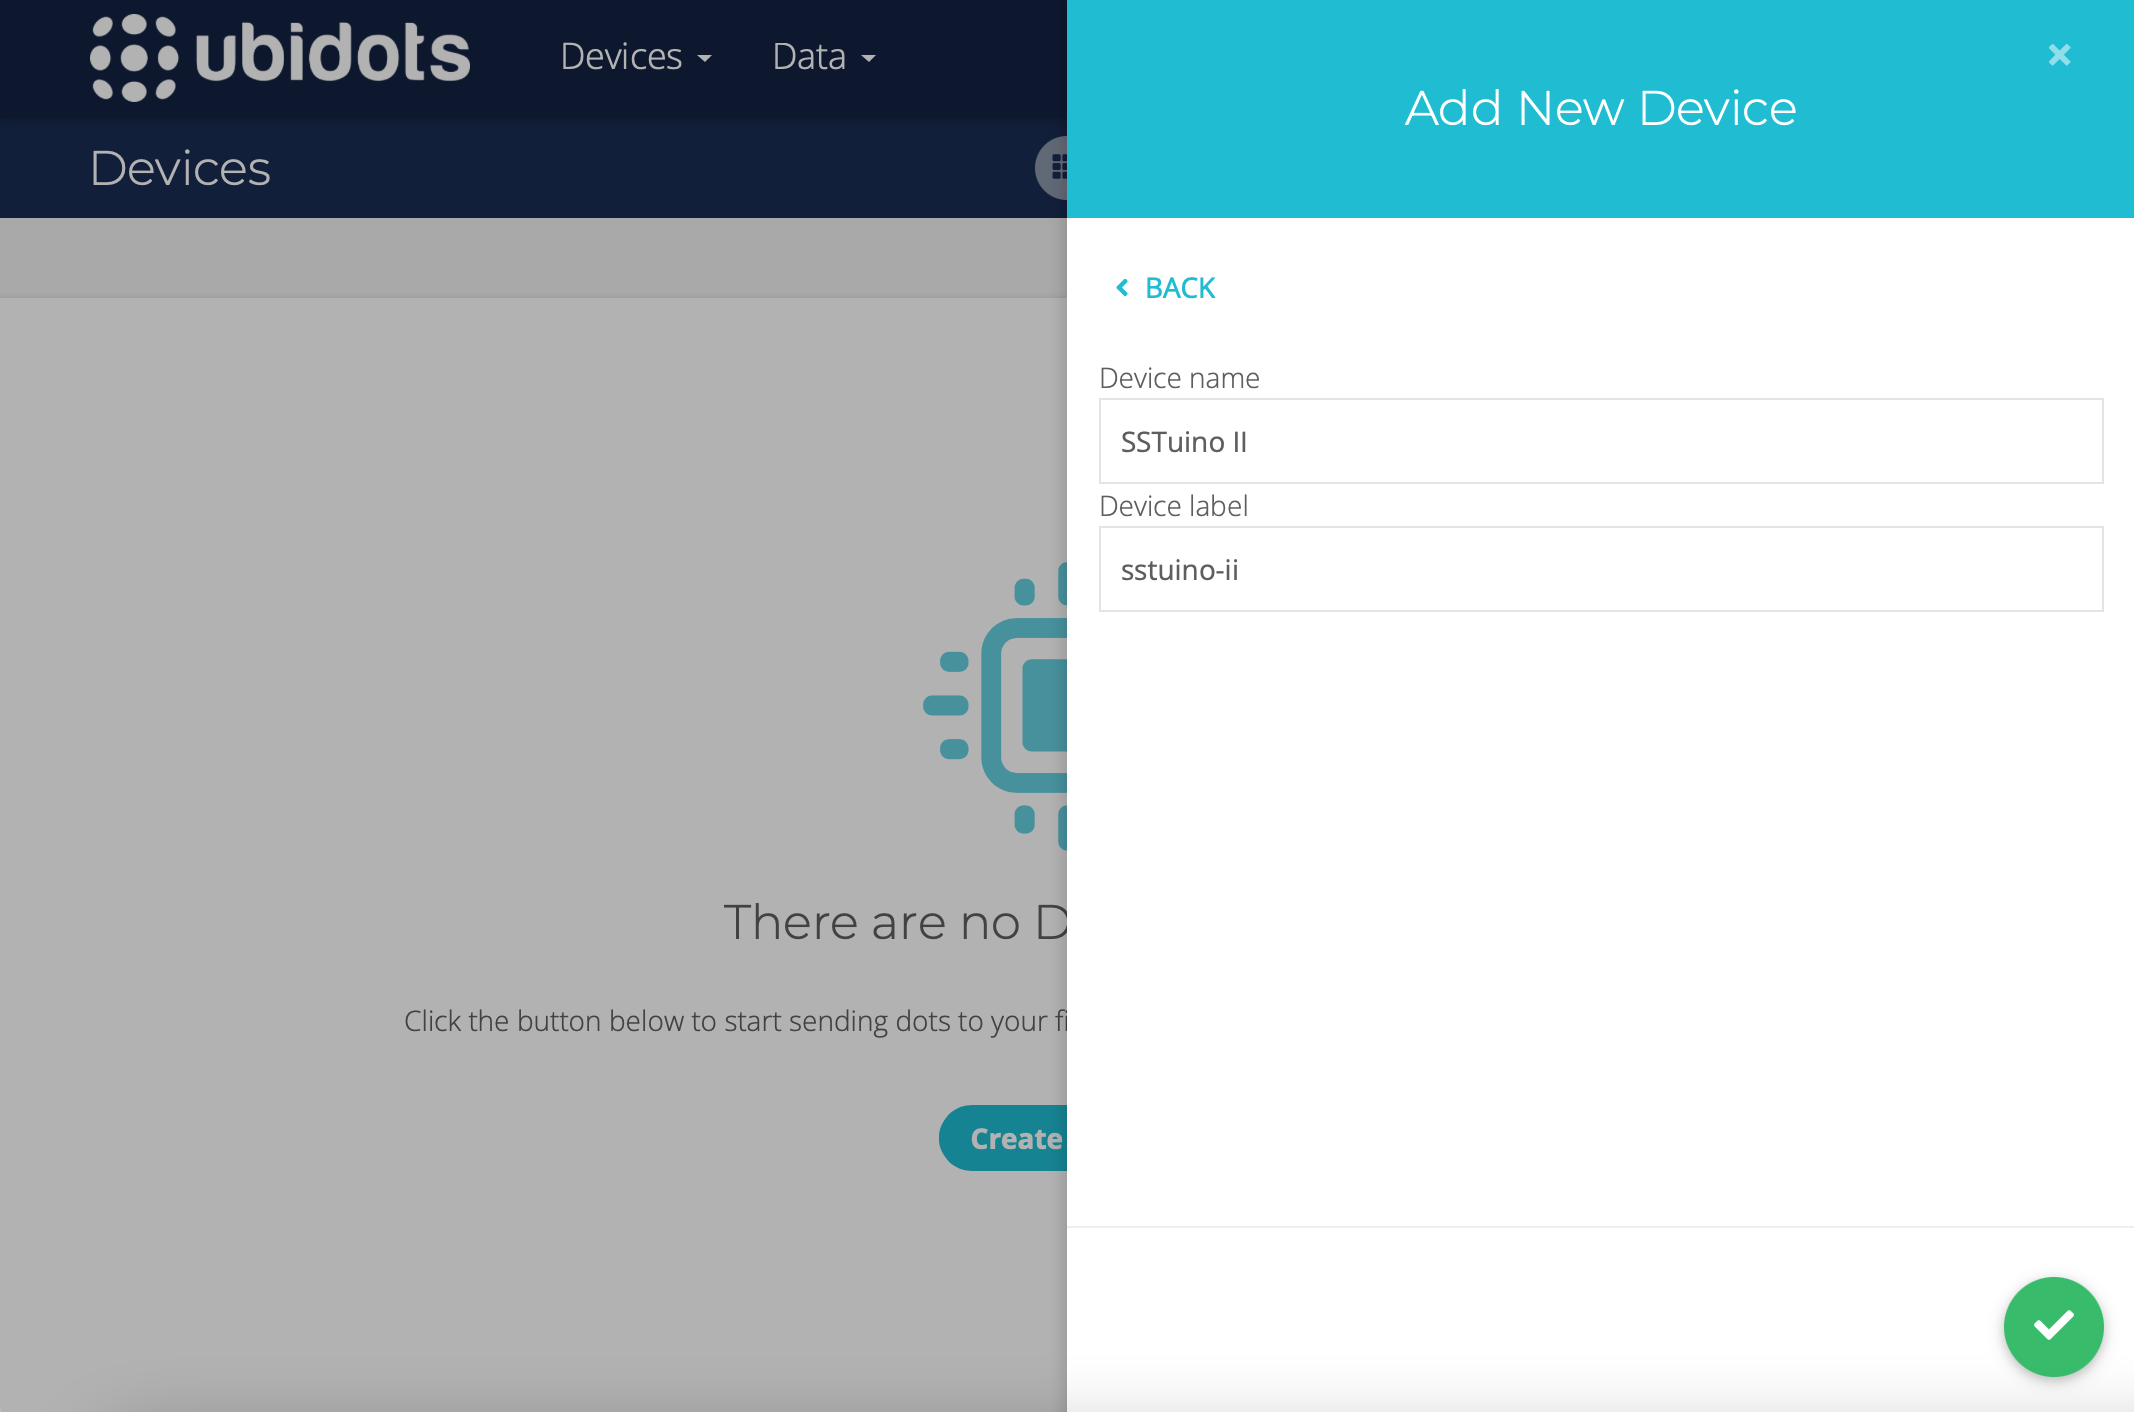
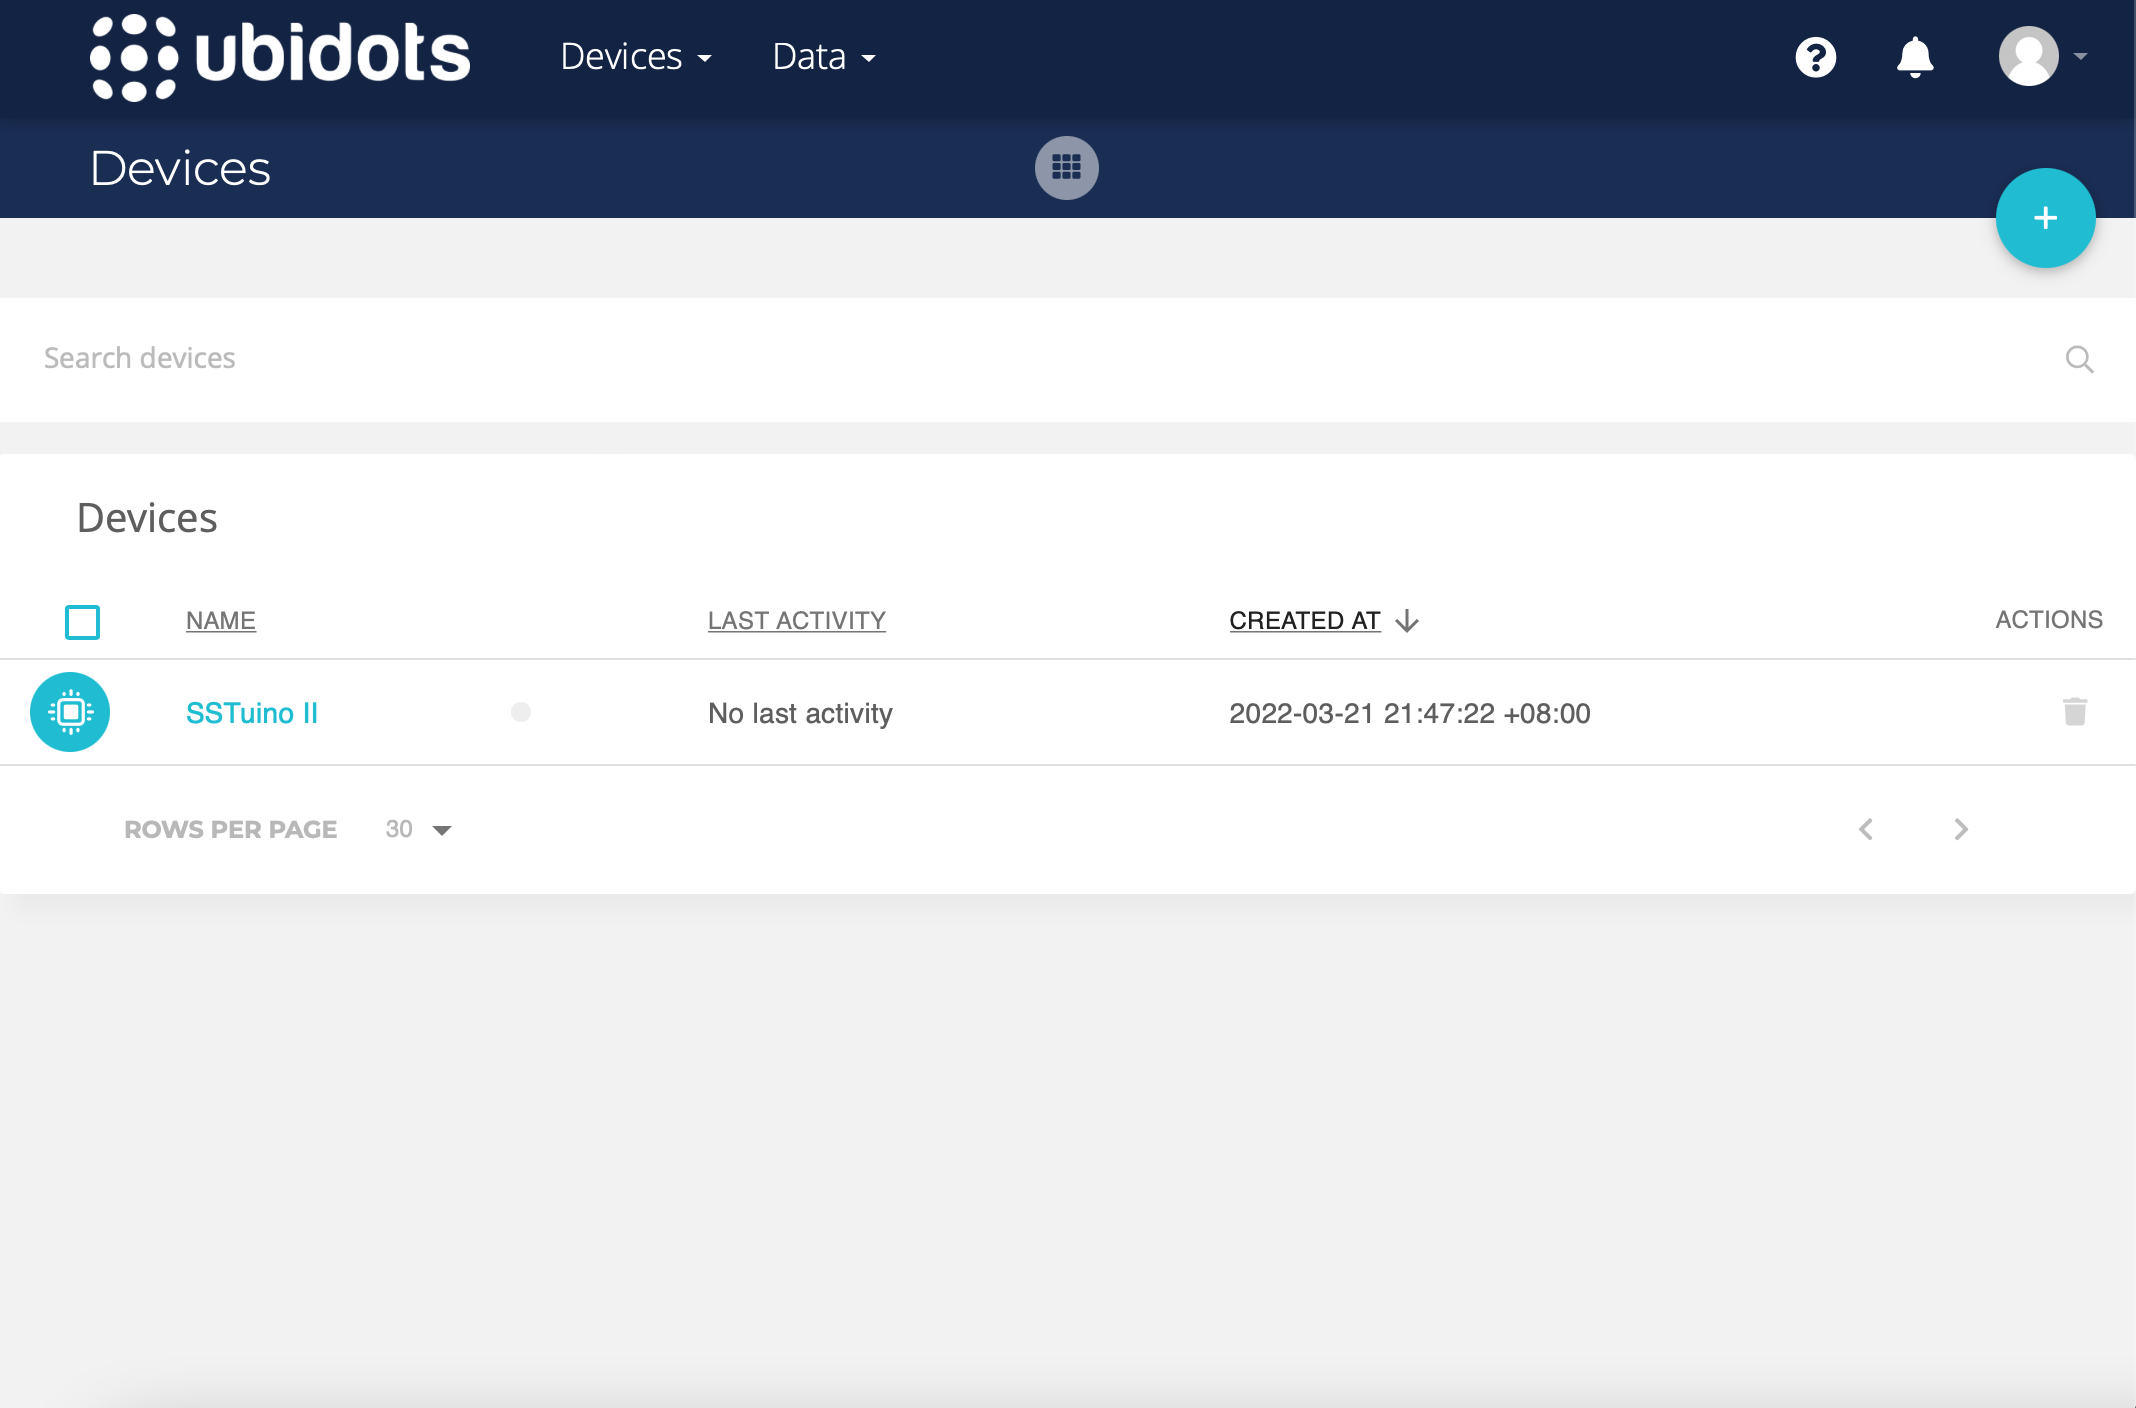
Create a Device by pressing the + button and selecting “Blank Device”. Name it something sensible, in our example, we simply name it “SSTuino II”. Now we have a device created!
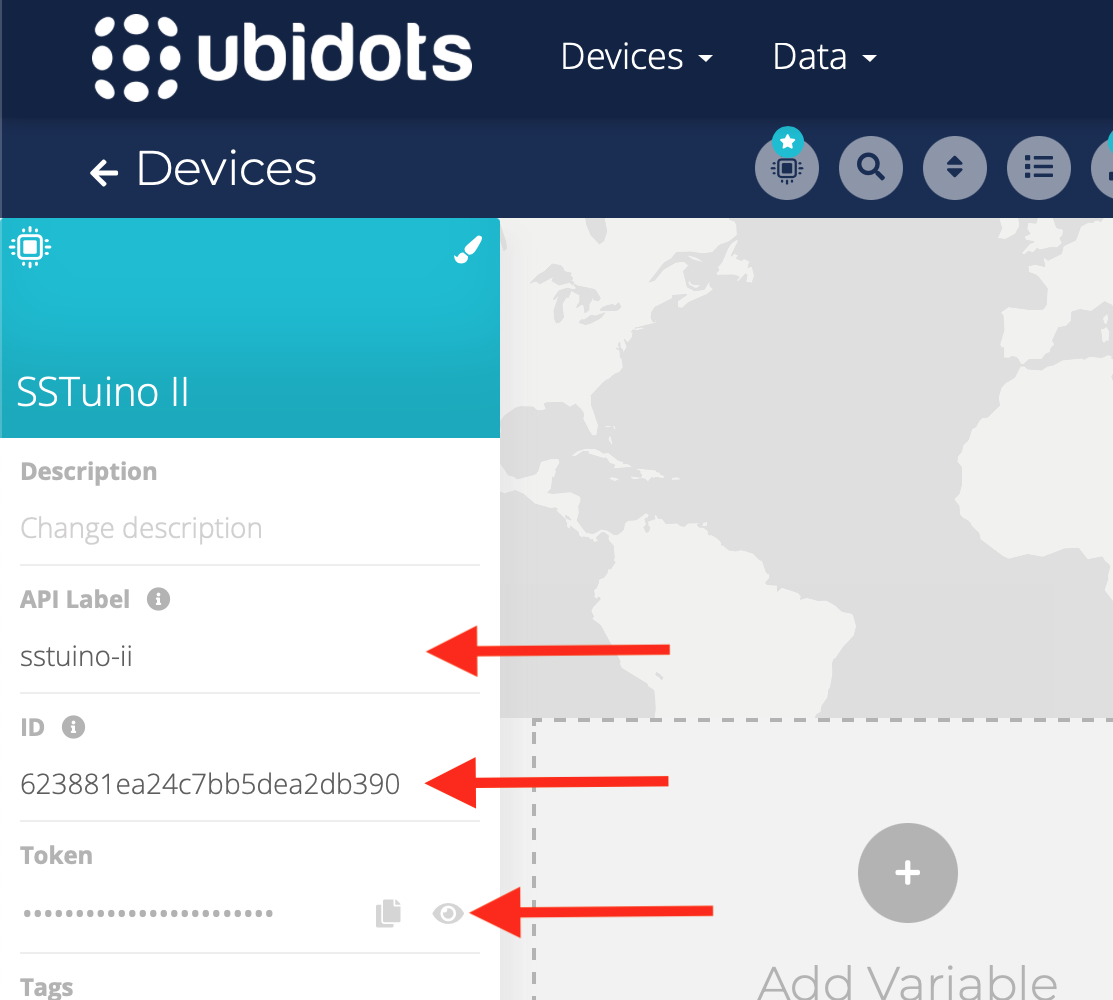
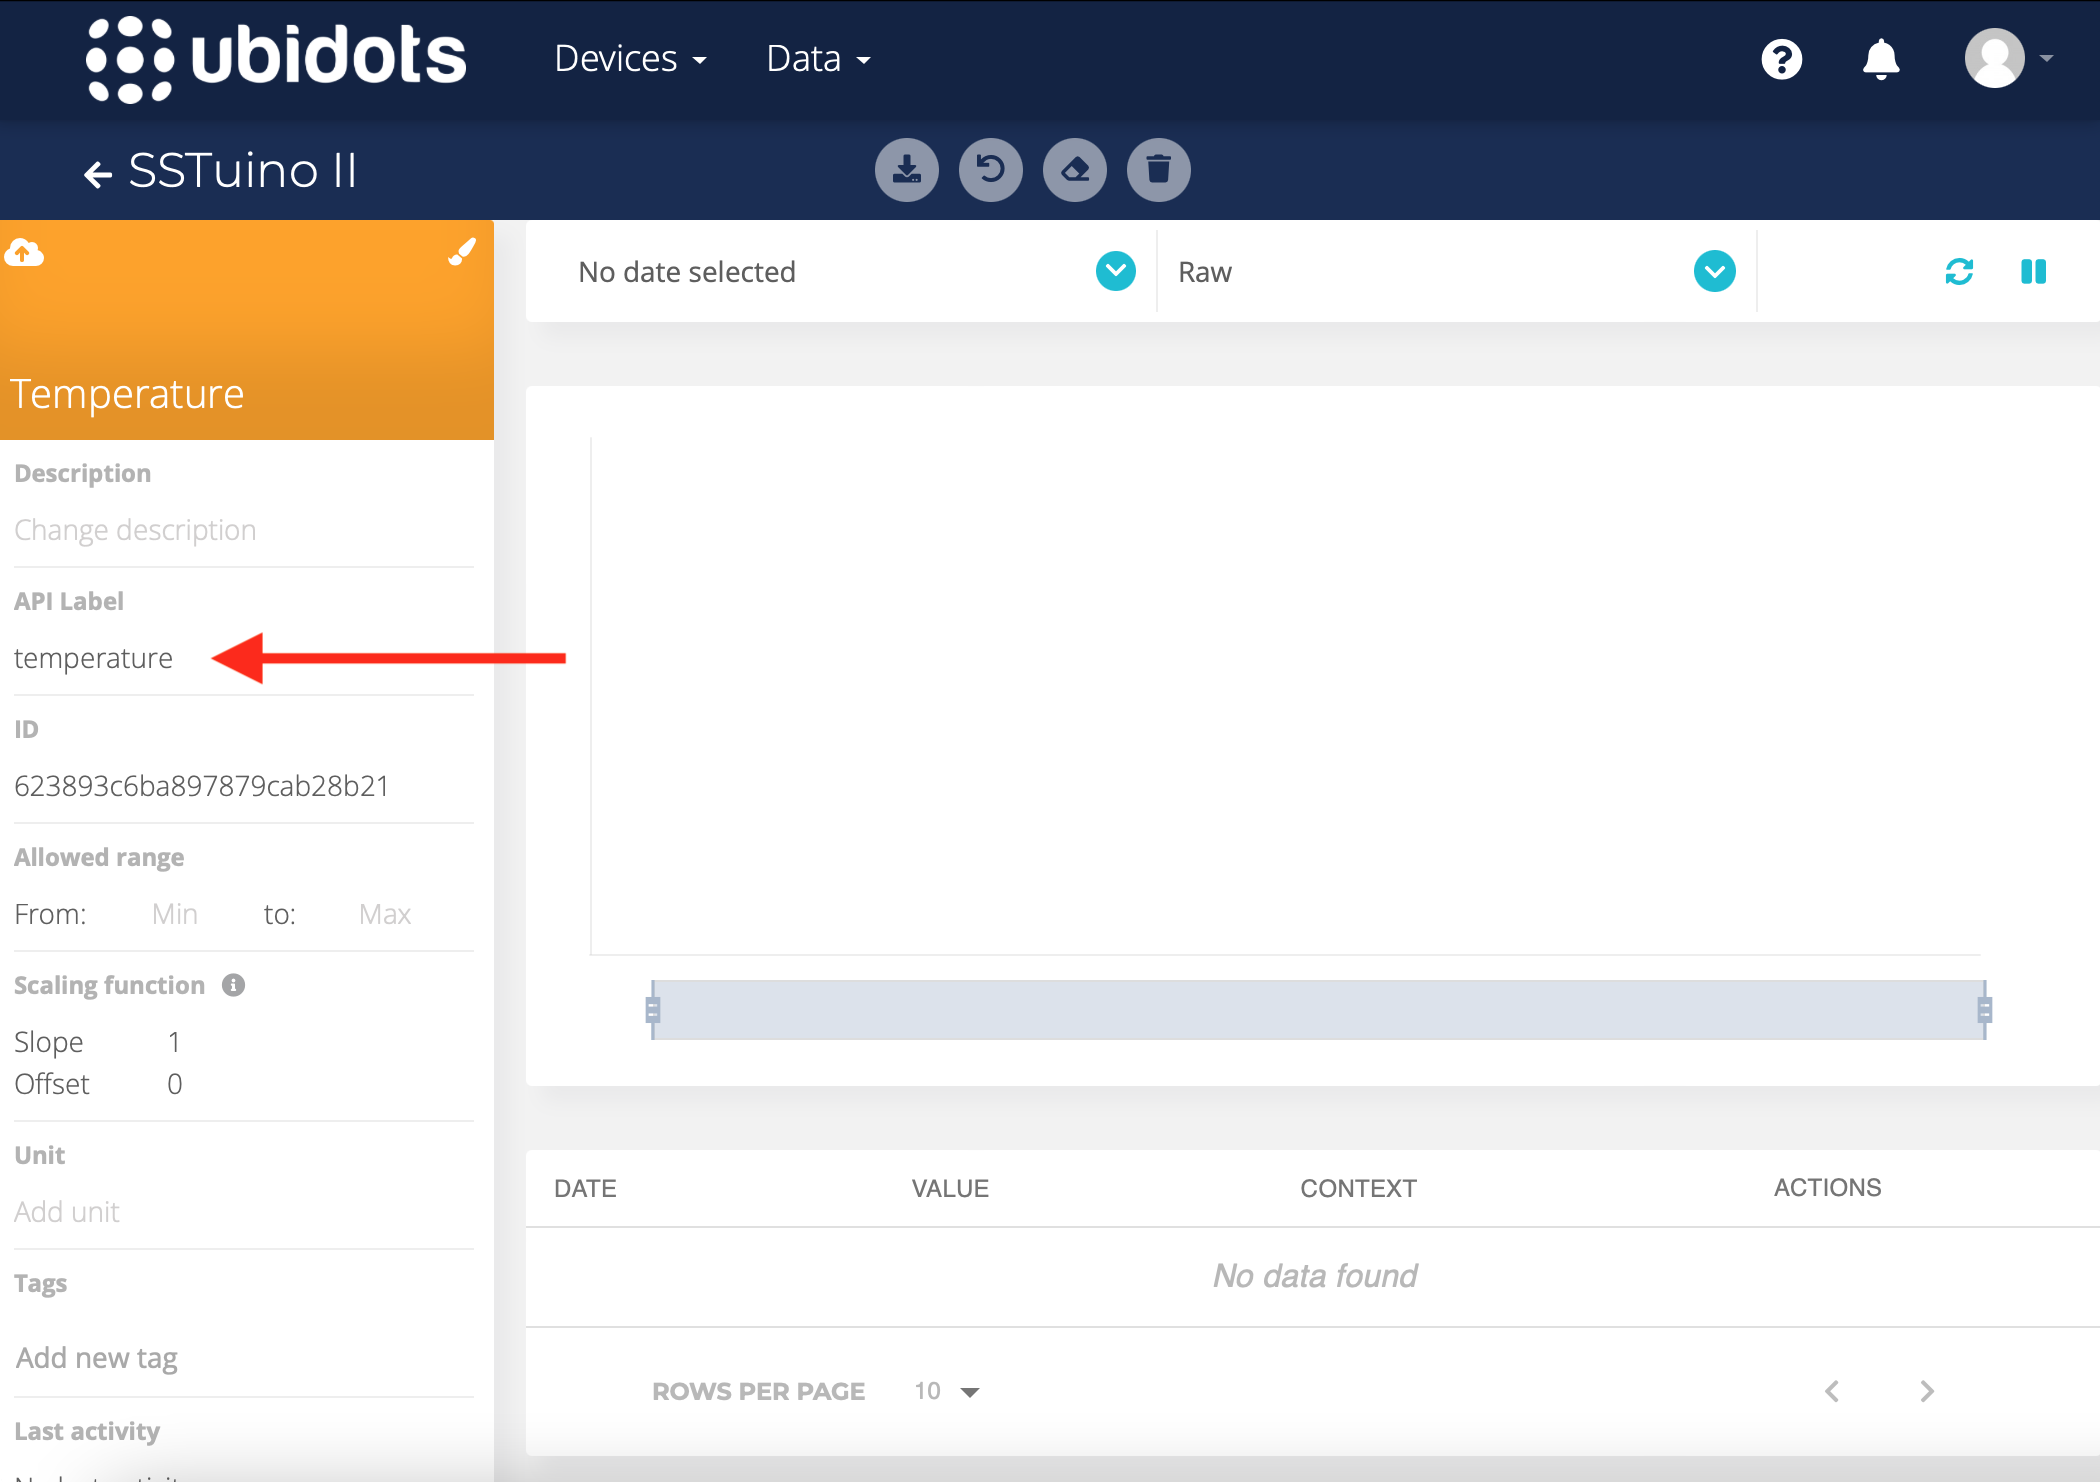
Go to your device and you will notice a few key things that you will need to take note of, namely the “API Label”, ID and “Token”.
- The API Label is the name of your device for a computer to recognise, like your name on Facebook or Instagram
- The ID is the unique ID that your device will be connecting with, a bit like a username
- The Token is the unique password of your device
Note these details down in your Notes app, because we will be using them later.
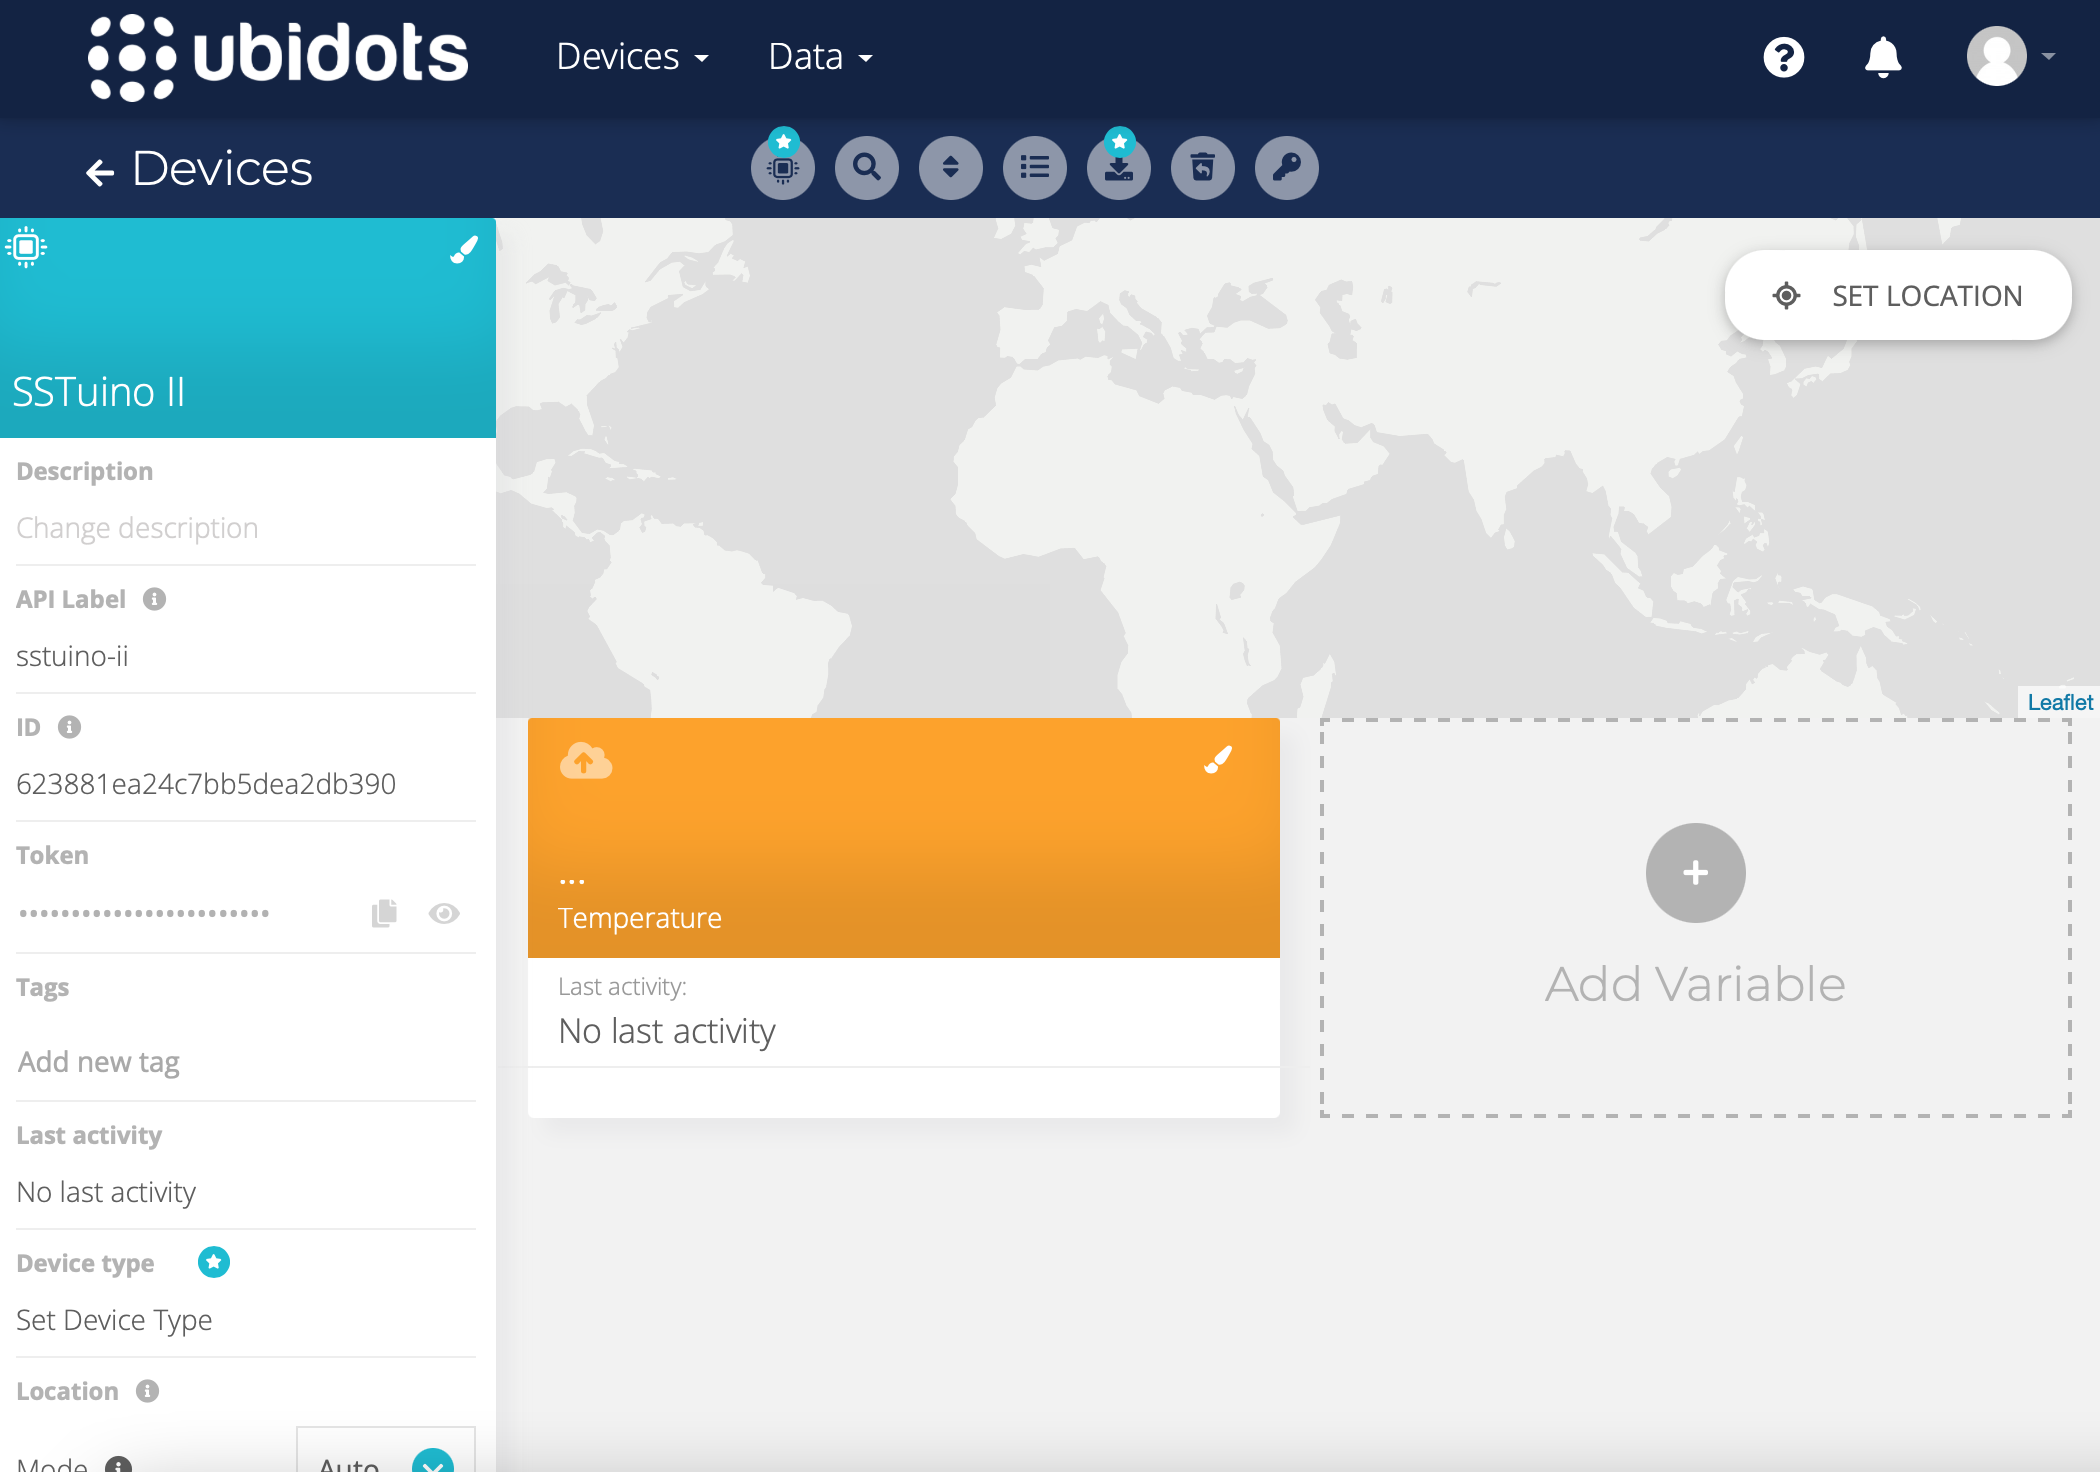
Creating a new Variable
Now that you’re done with creating a Device, it’s time to create a Variable! Press the big “Add Variable” sign in the middle of the screen and name your Variable something sensible. In our case, we are going to be measuring the temperature of the surroundings, so we will name it “Temperature”.
Warning: Do not name your Variables and Device names with anything else, as the example code provided relies on the Device being named "SSTuino II" and Variable as "Temperature"
When you click on the Temperature Variable, you can see the API Label of this variable which is temperature. Remember this name, because this is the name of this Variable for computers that need to communicate with it. You can choose to create more Variables here to suit what you need to do.
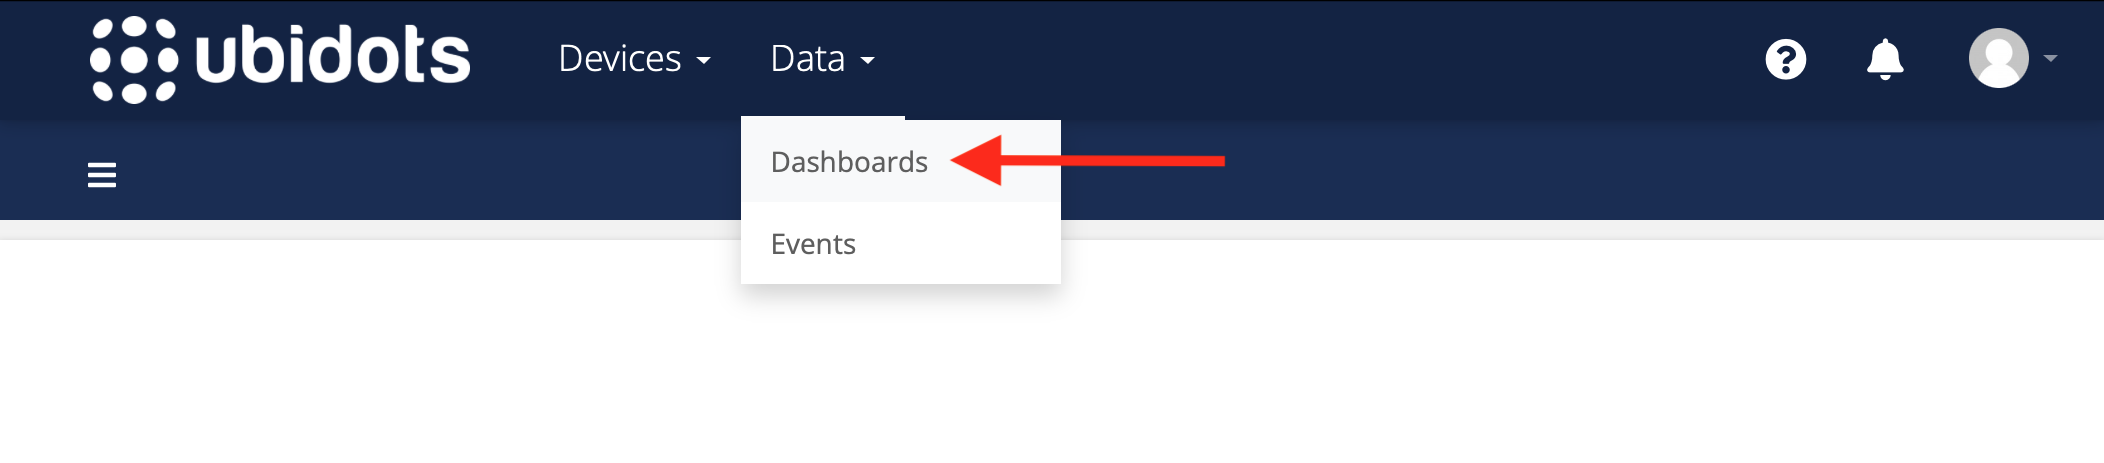
Creating a new Dashboard
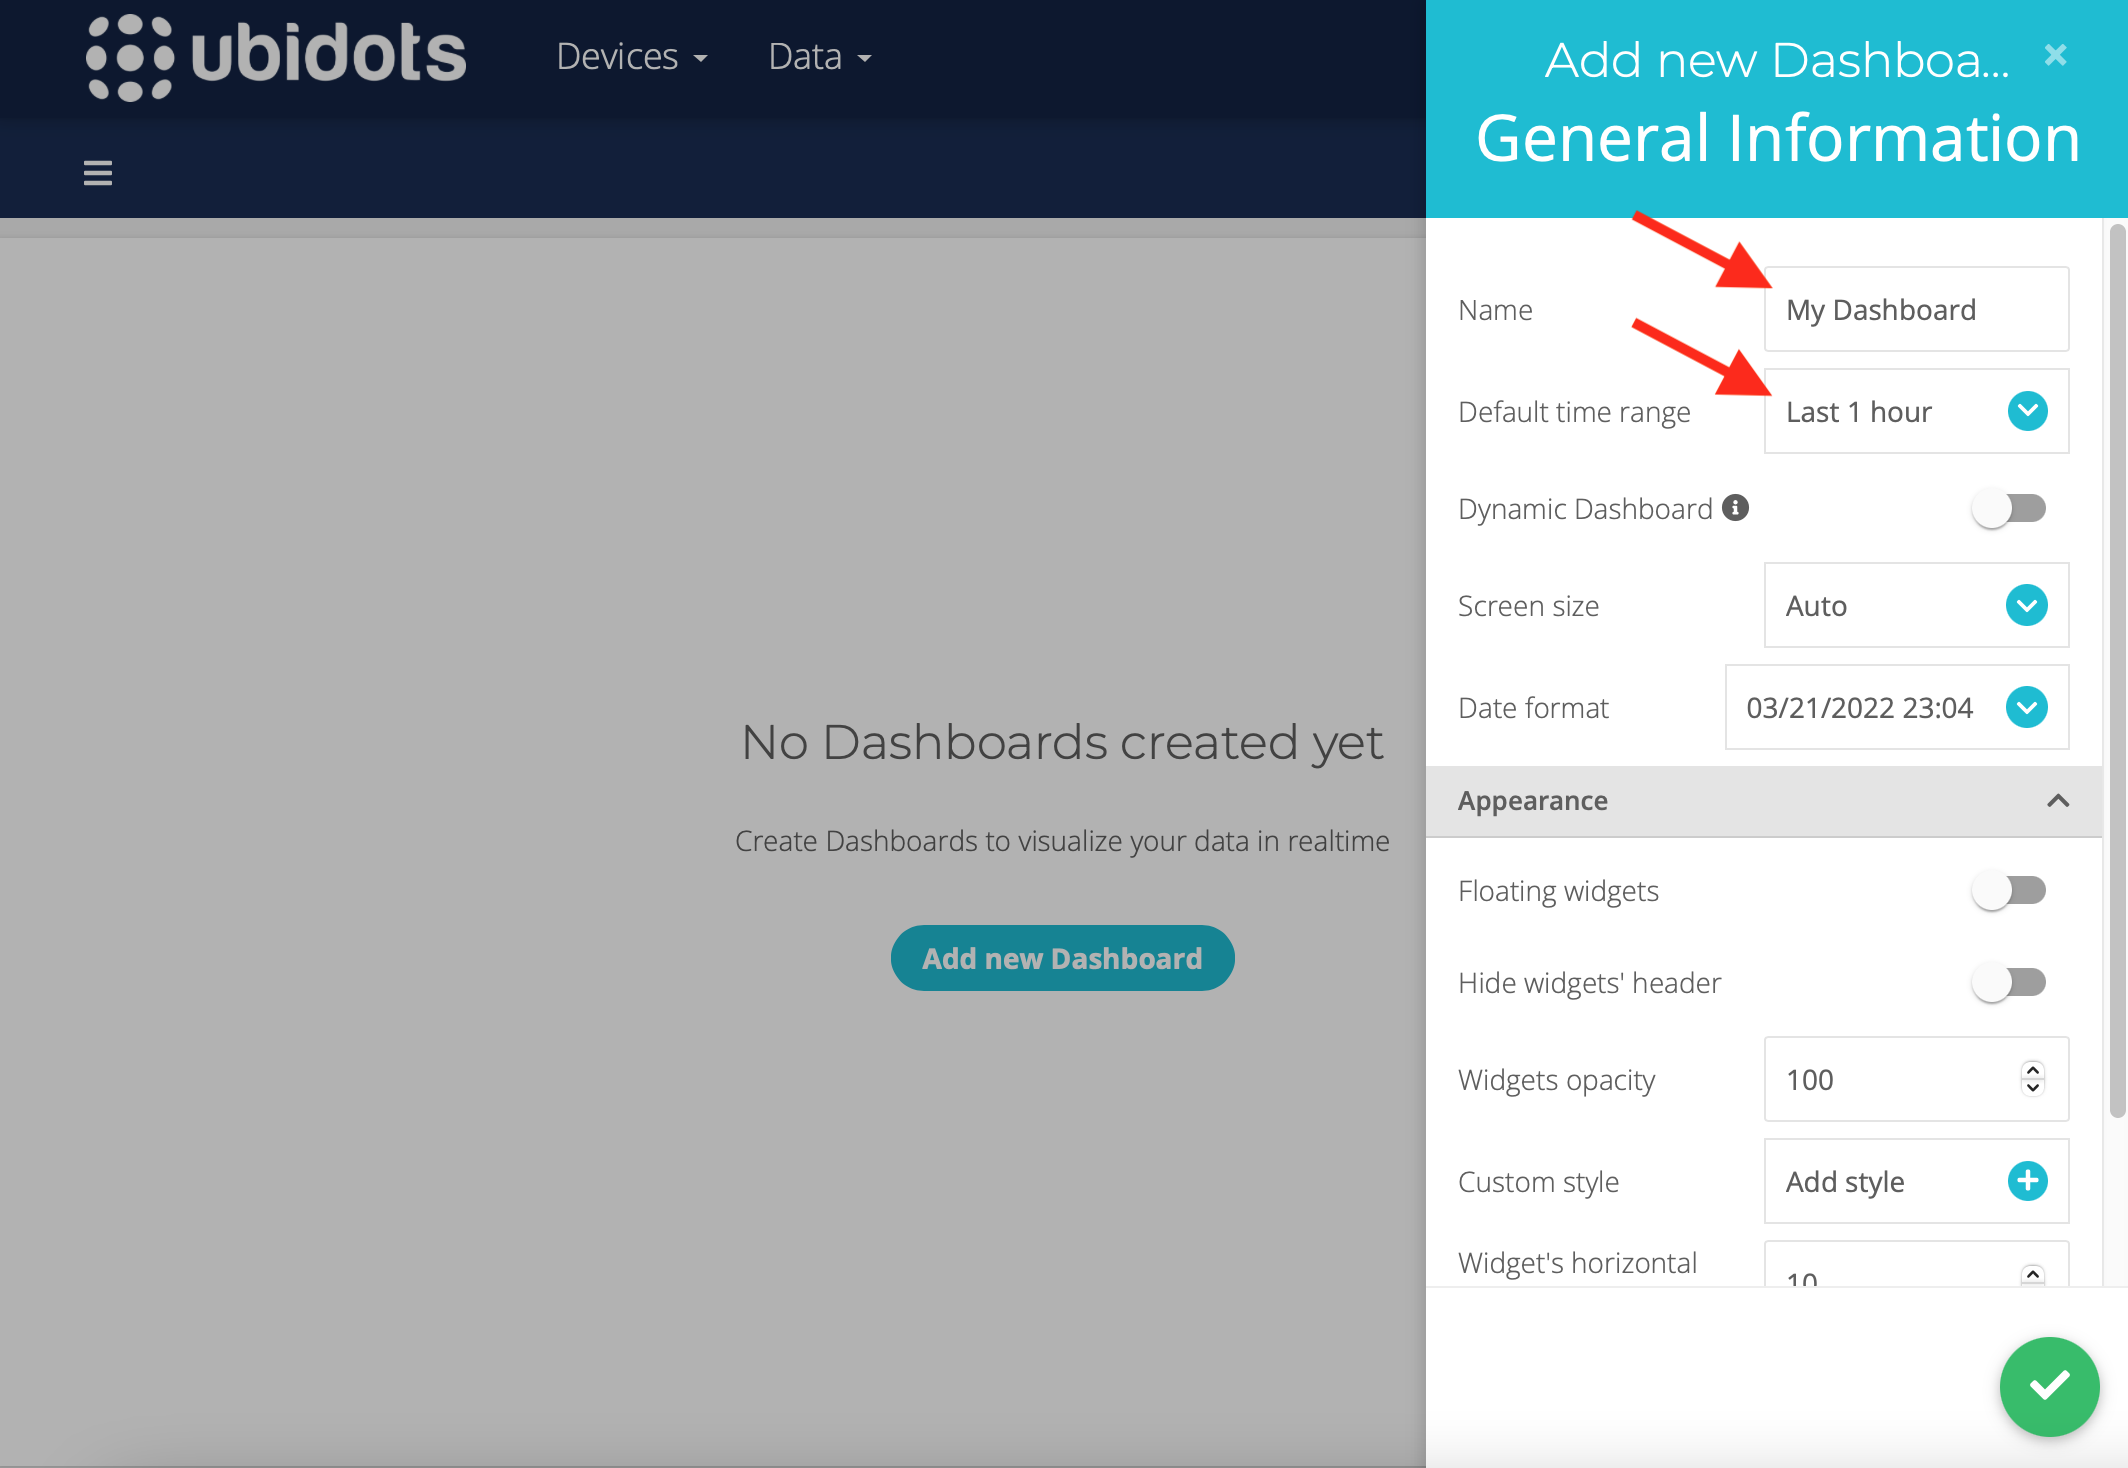
With Variables out of the way, let’s create our first Dashboard. Go to the top bar, Data > Dashboards and click “Add New Dashboard”. Give it a simple name like “My Dashboard” and set the Default Time Range to “Last 1 hour” so that the dashboard shows data generally from the last hour. Press the green arrow to add the new dashboard.
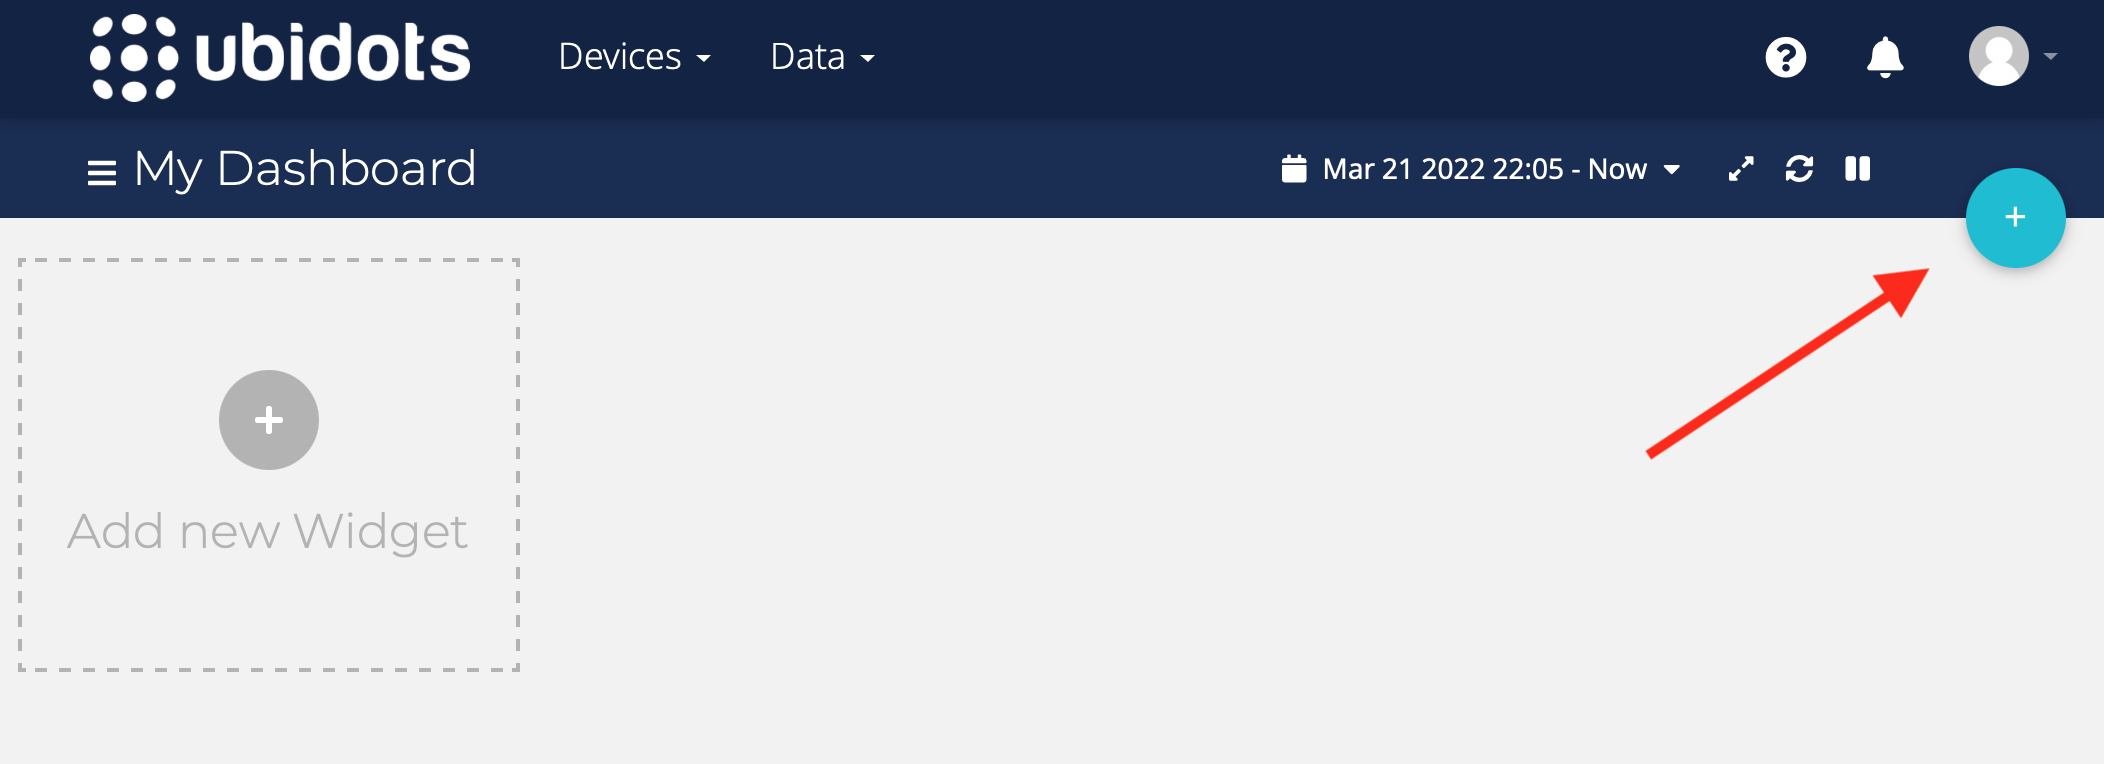
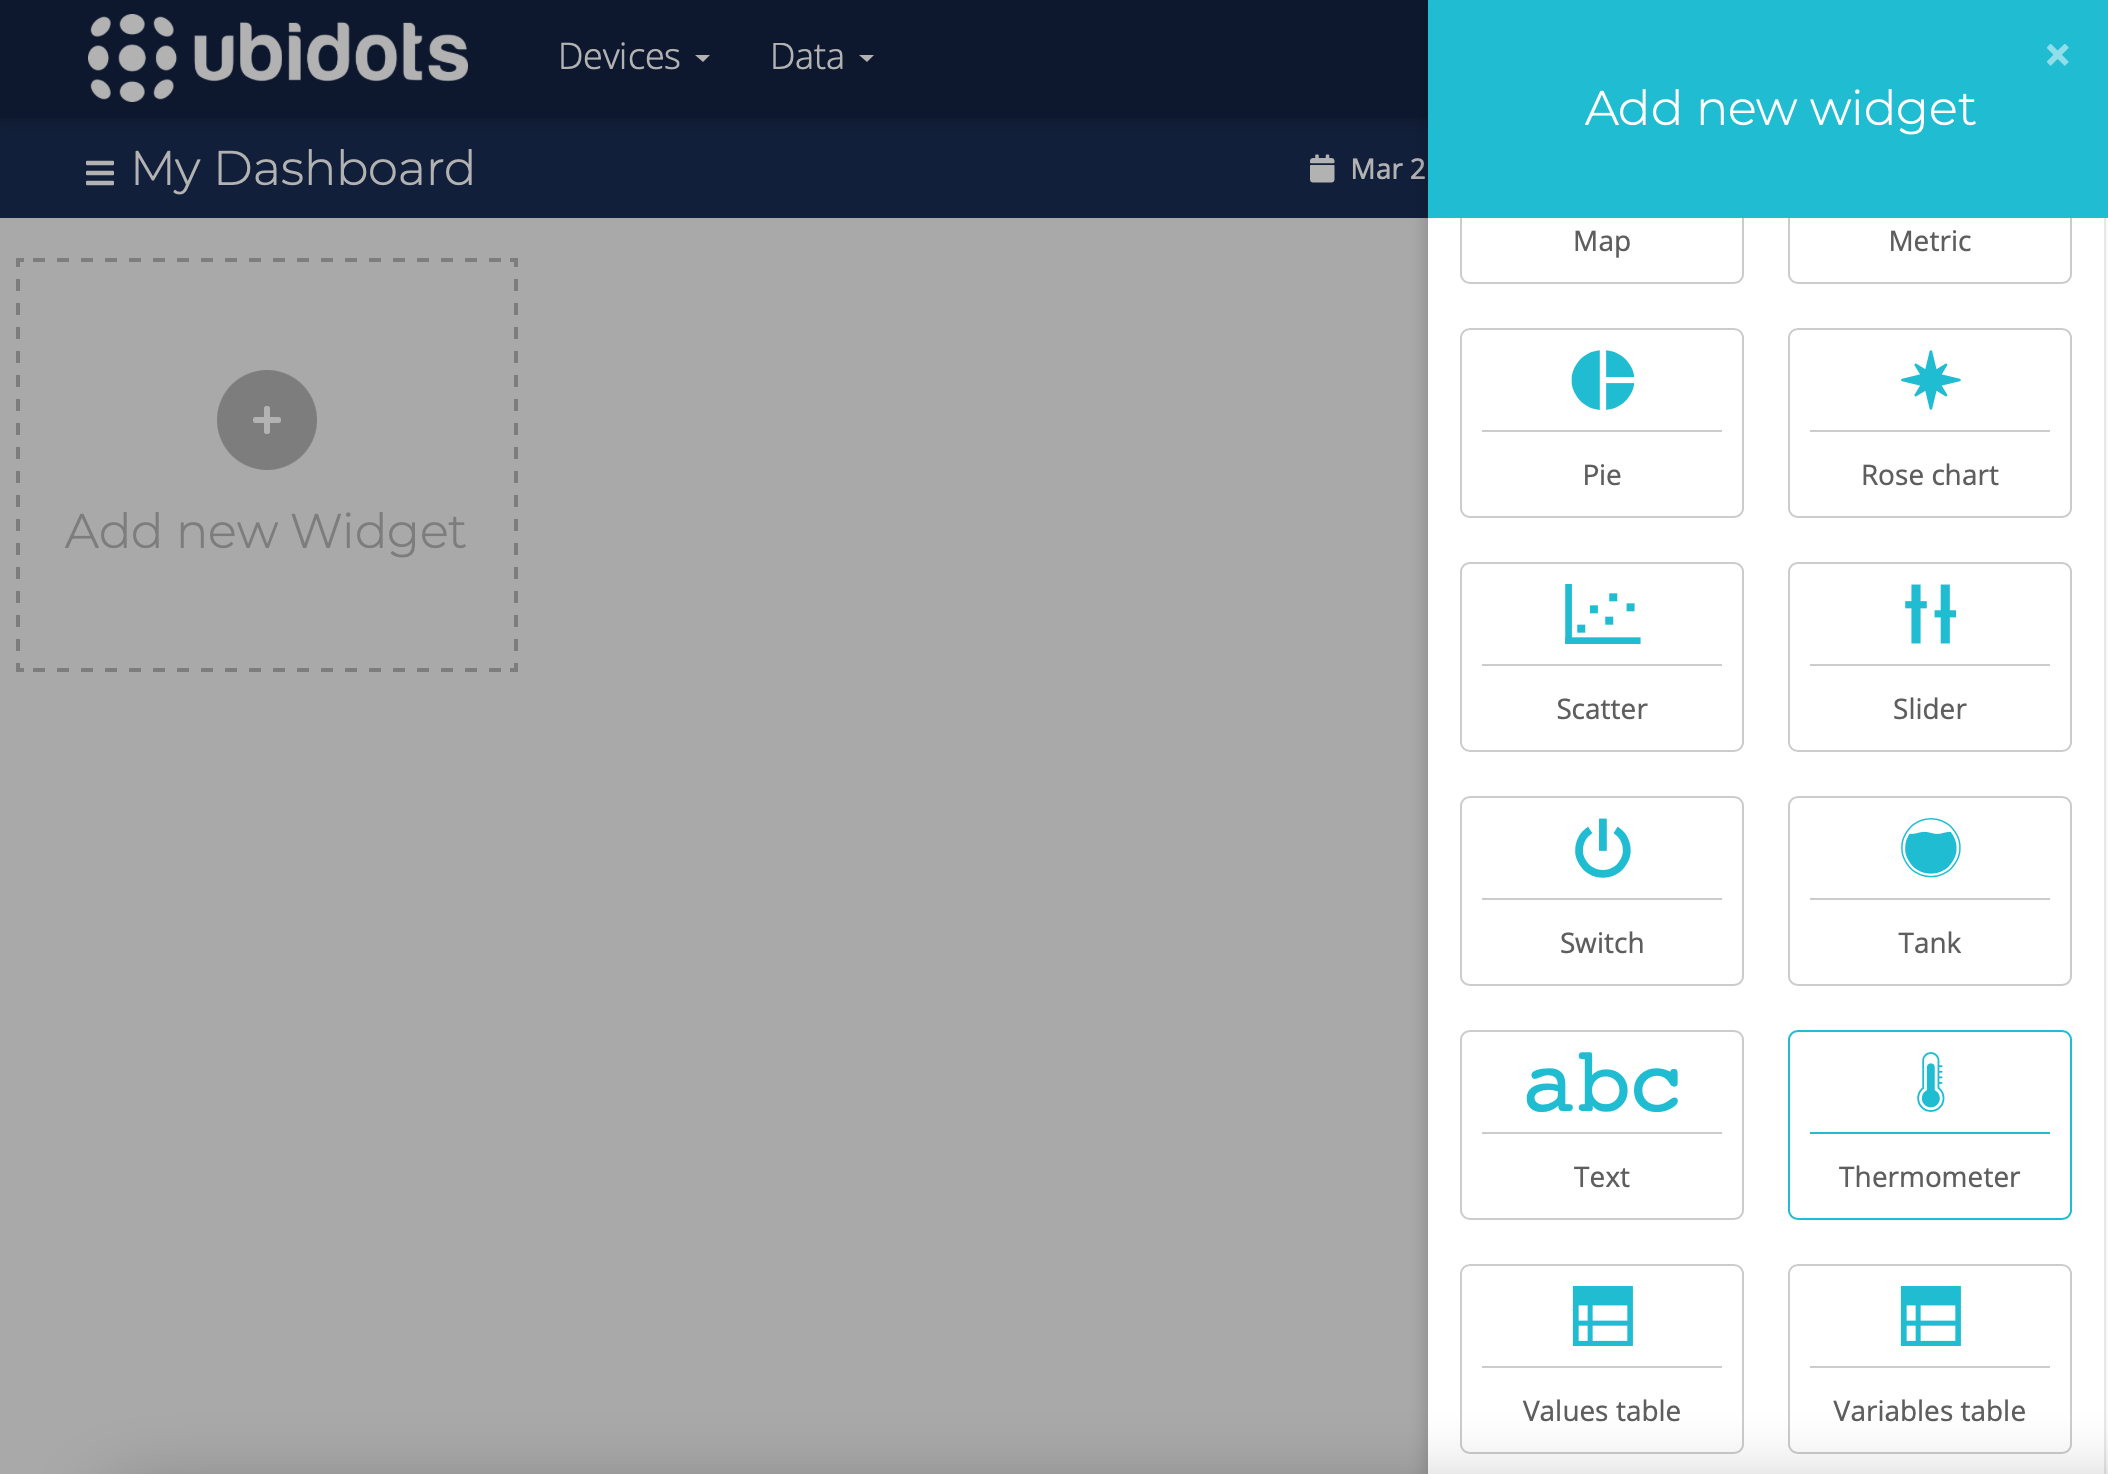
Adding a new widget to the dashboard
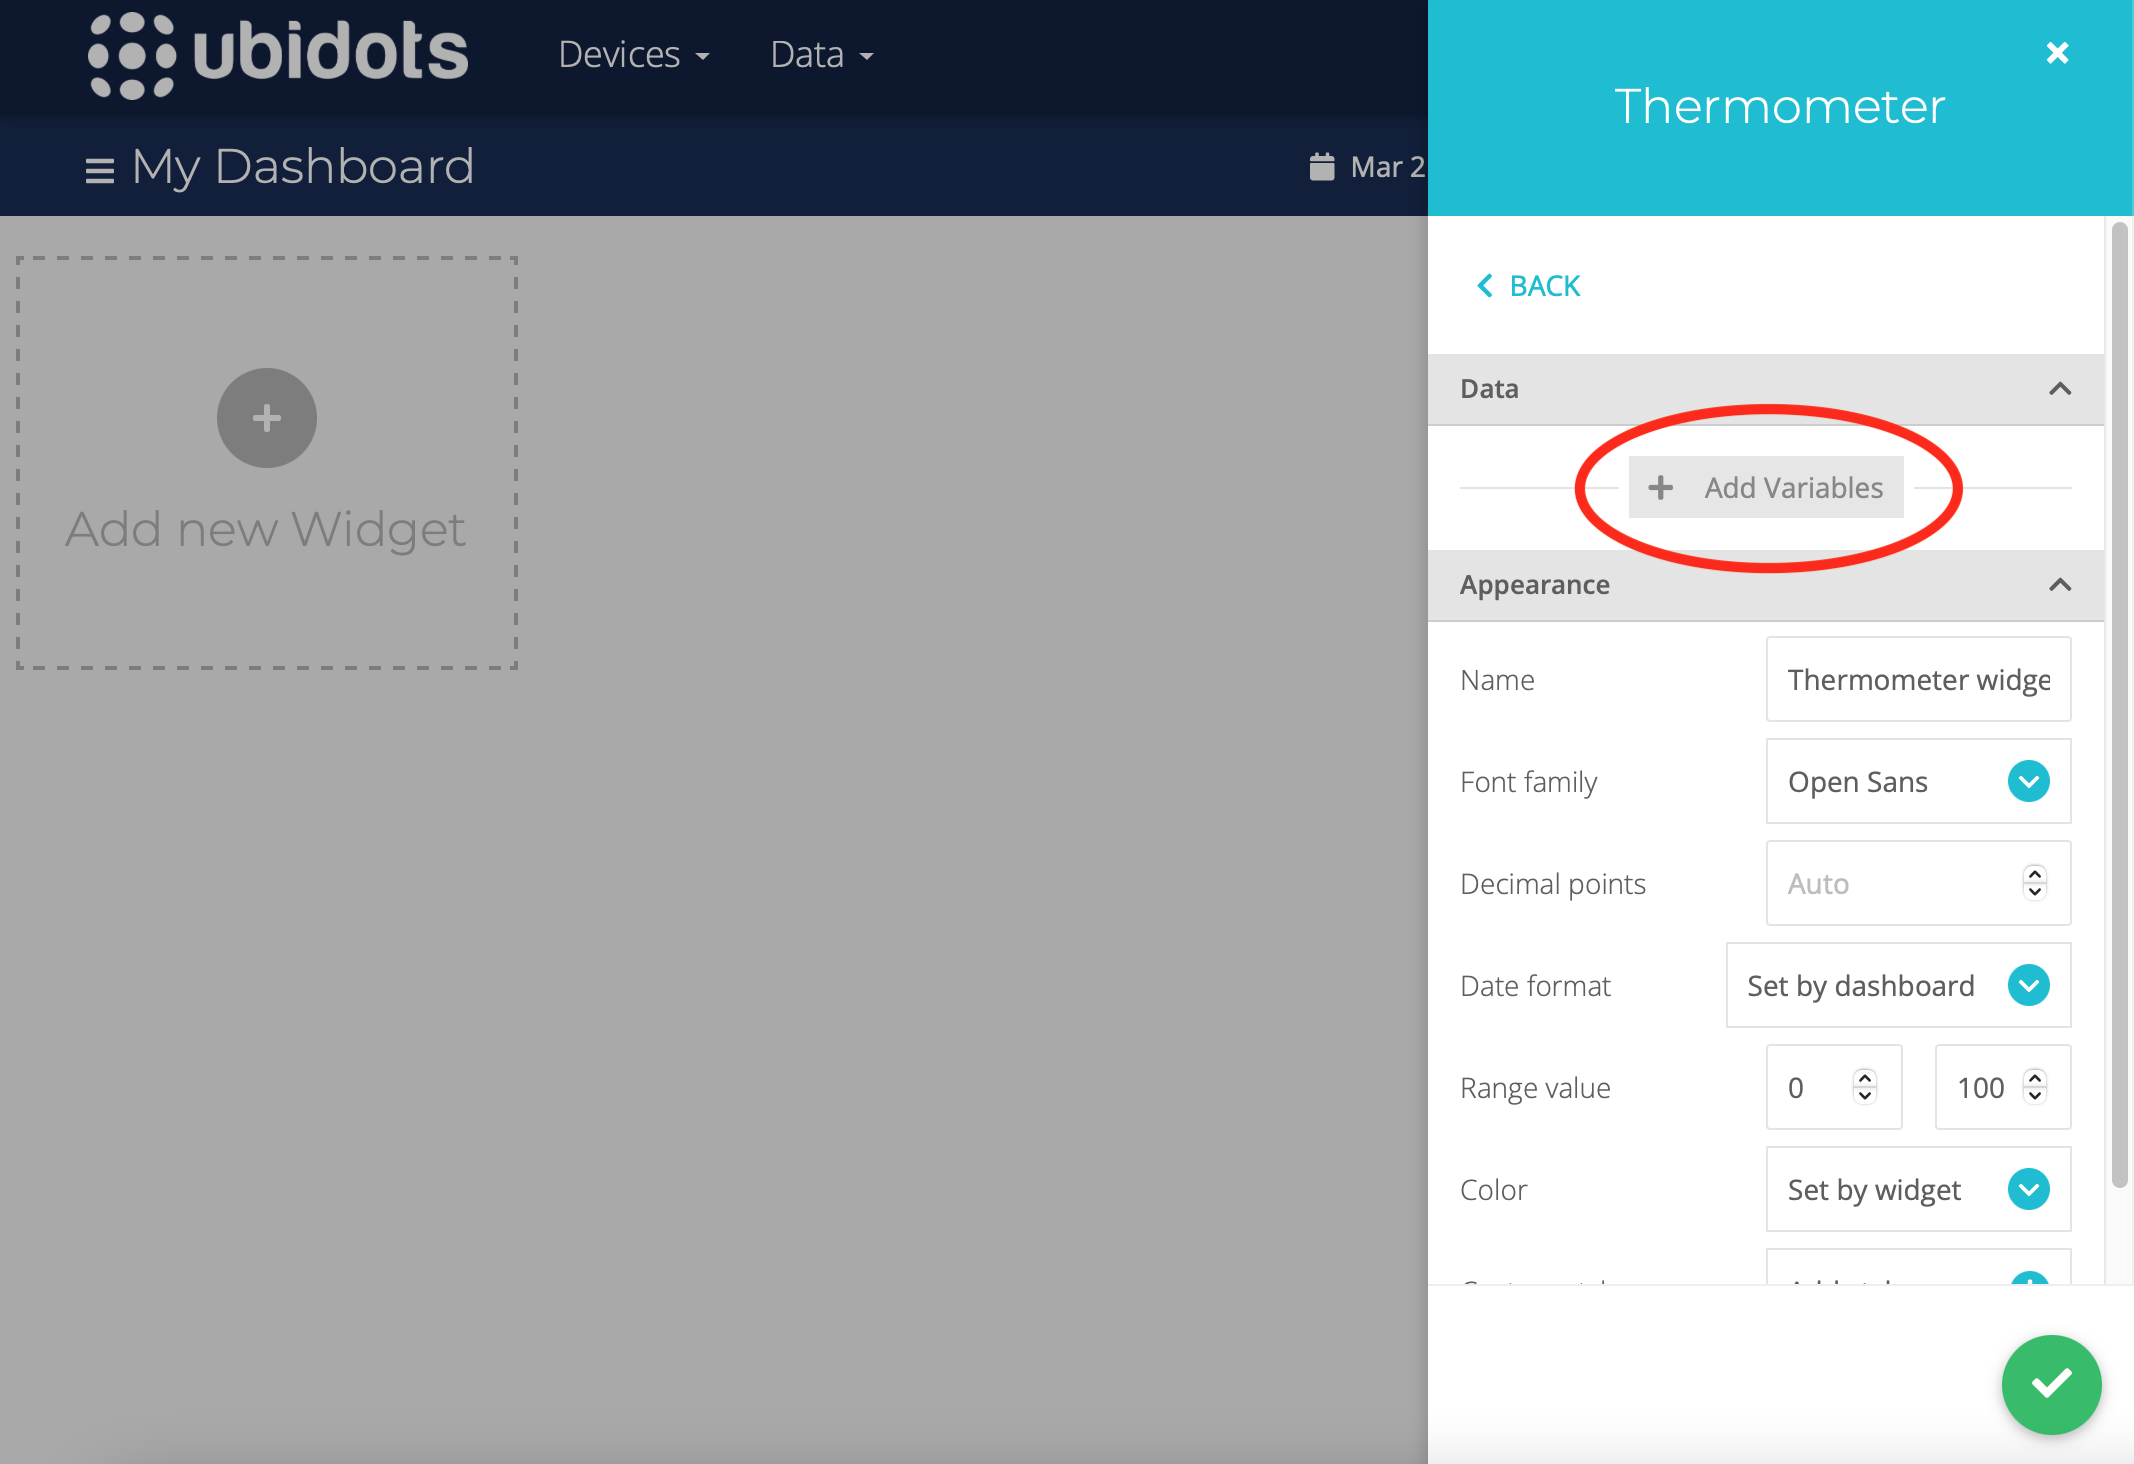
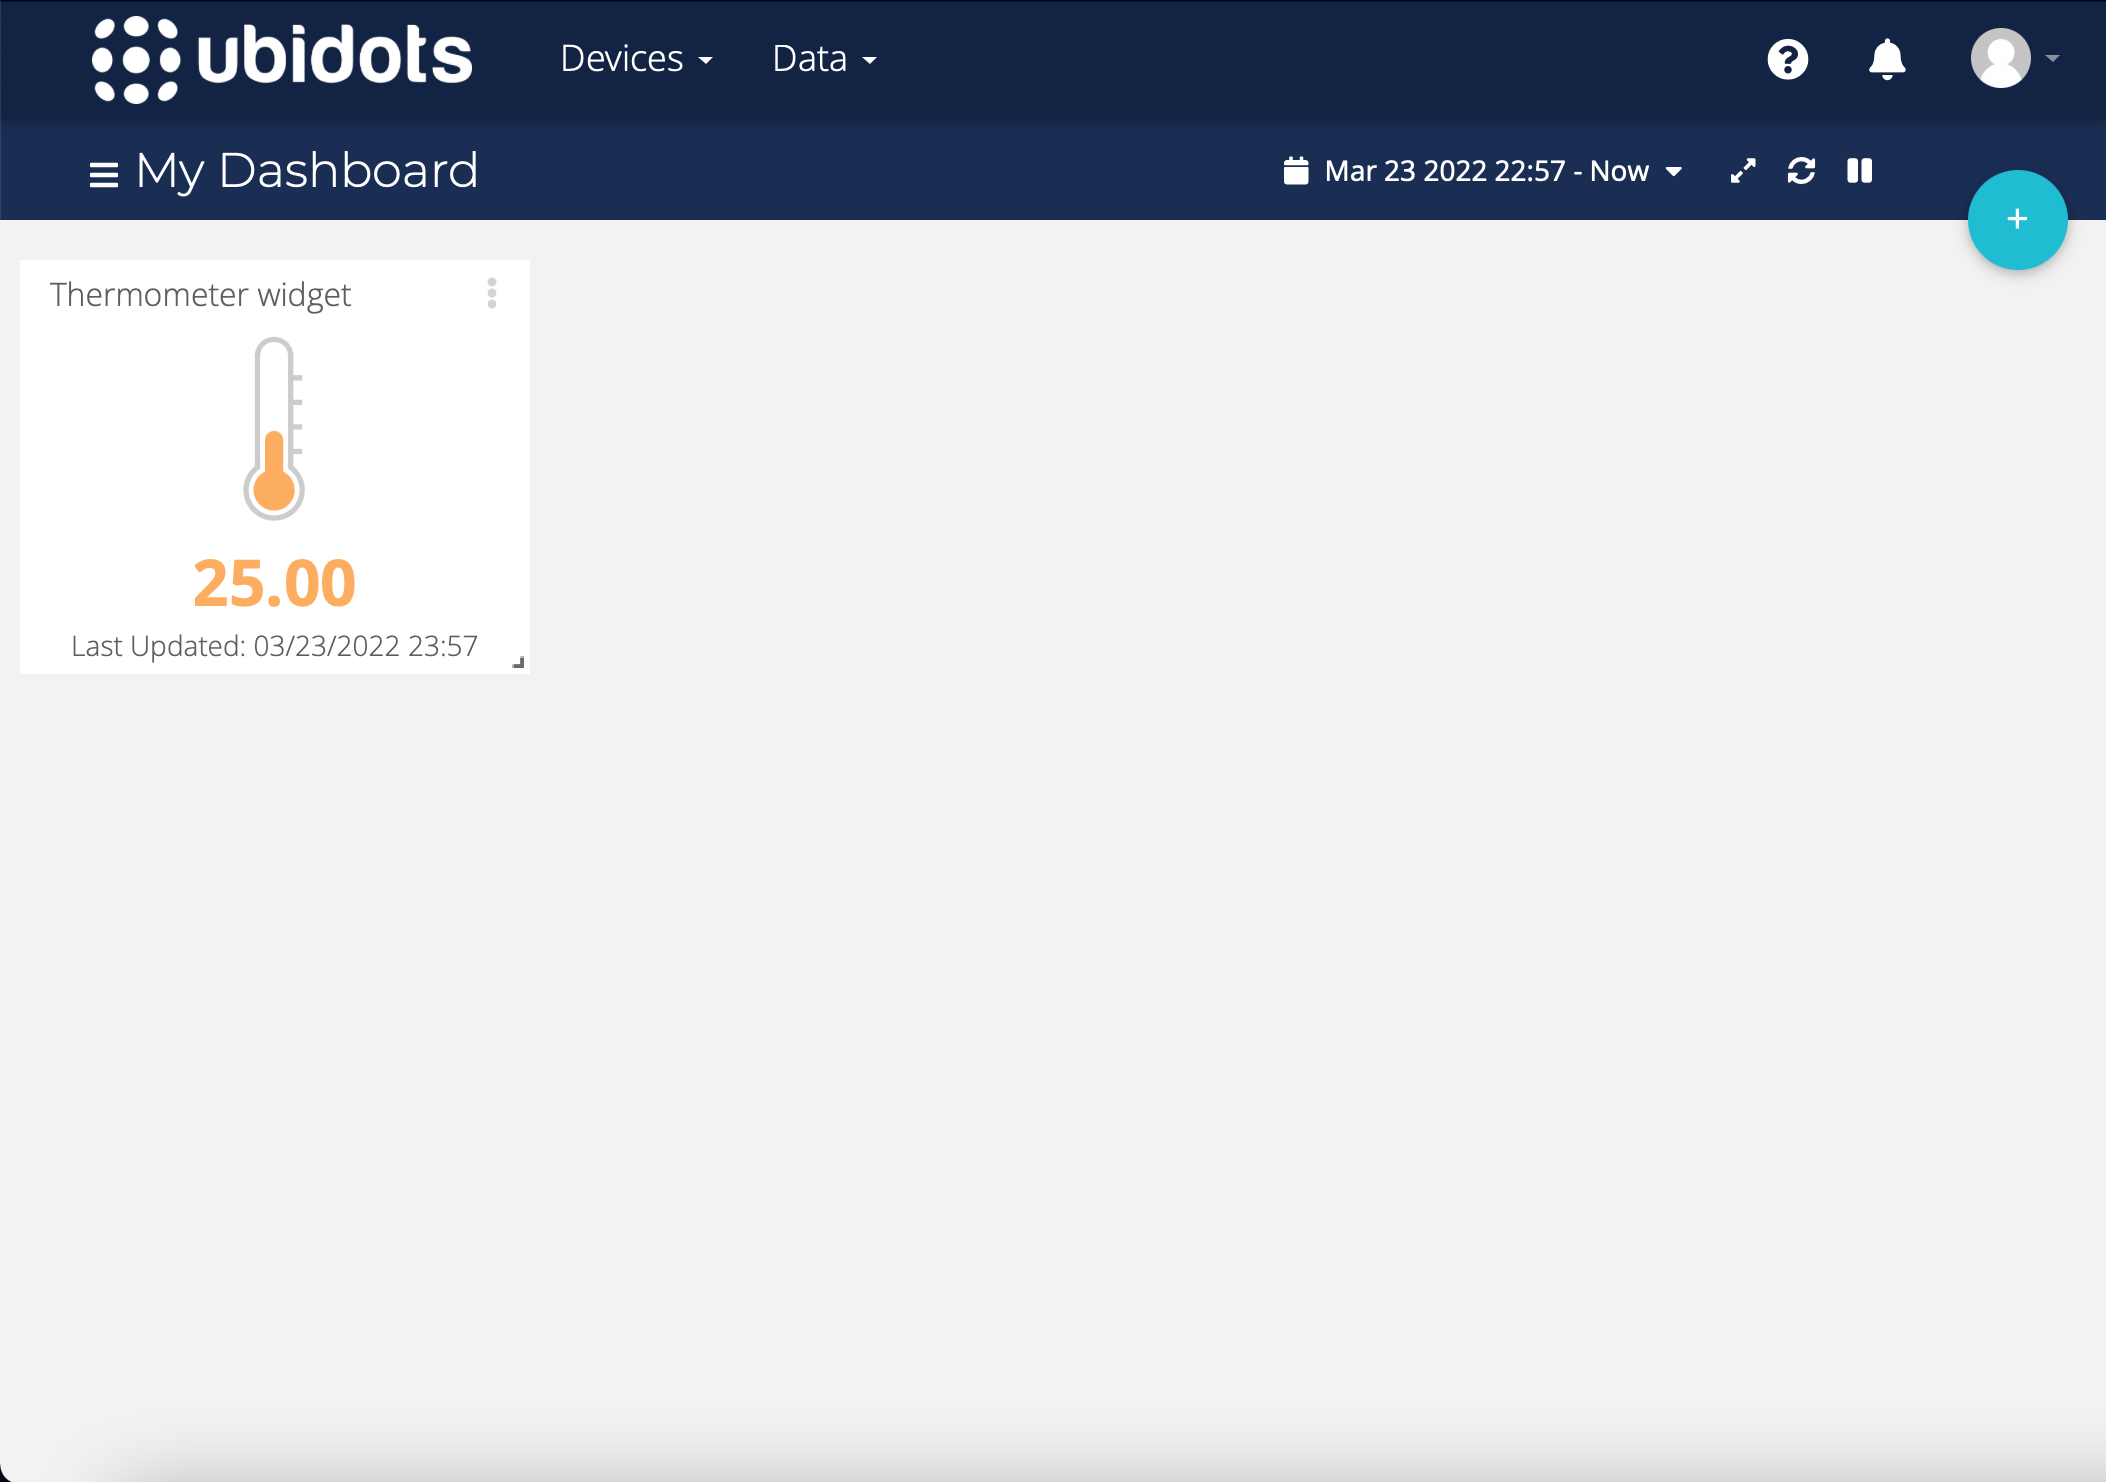
With your dashboard, you can add up to 10 widgets to monitor the status of your devices connected to Ubidots. Click “Add New Widget'' and select “Thermometer” from it. Under the “Data” section, press “Add Variables” and select your Variable from the SSTuino II device.

Connecting your SSTuino II to Ubidots
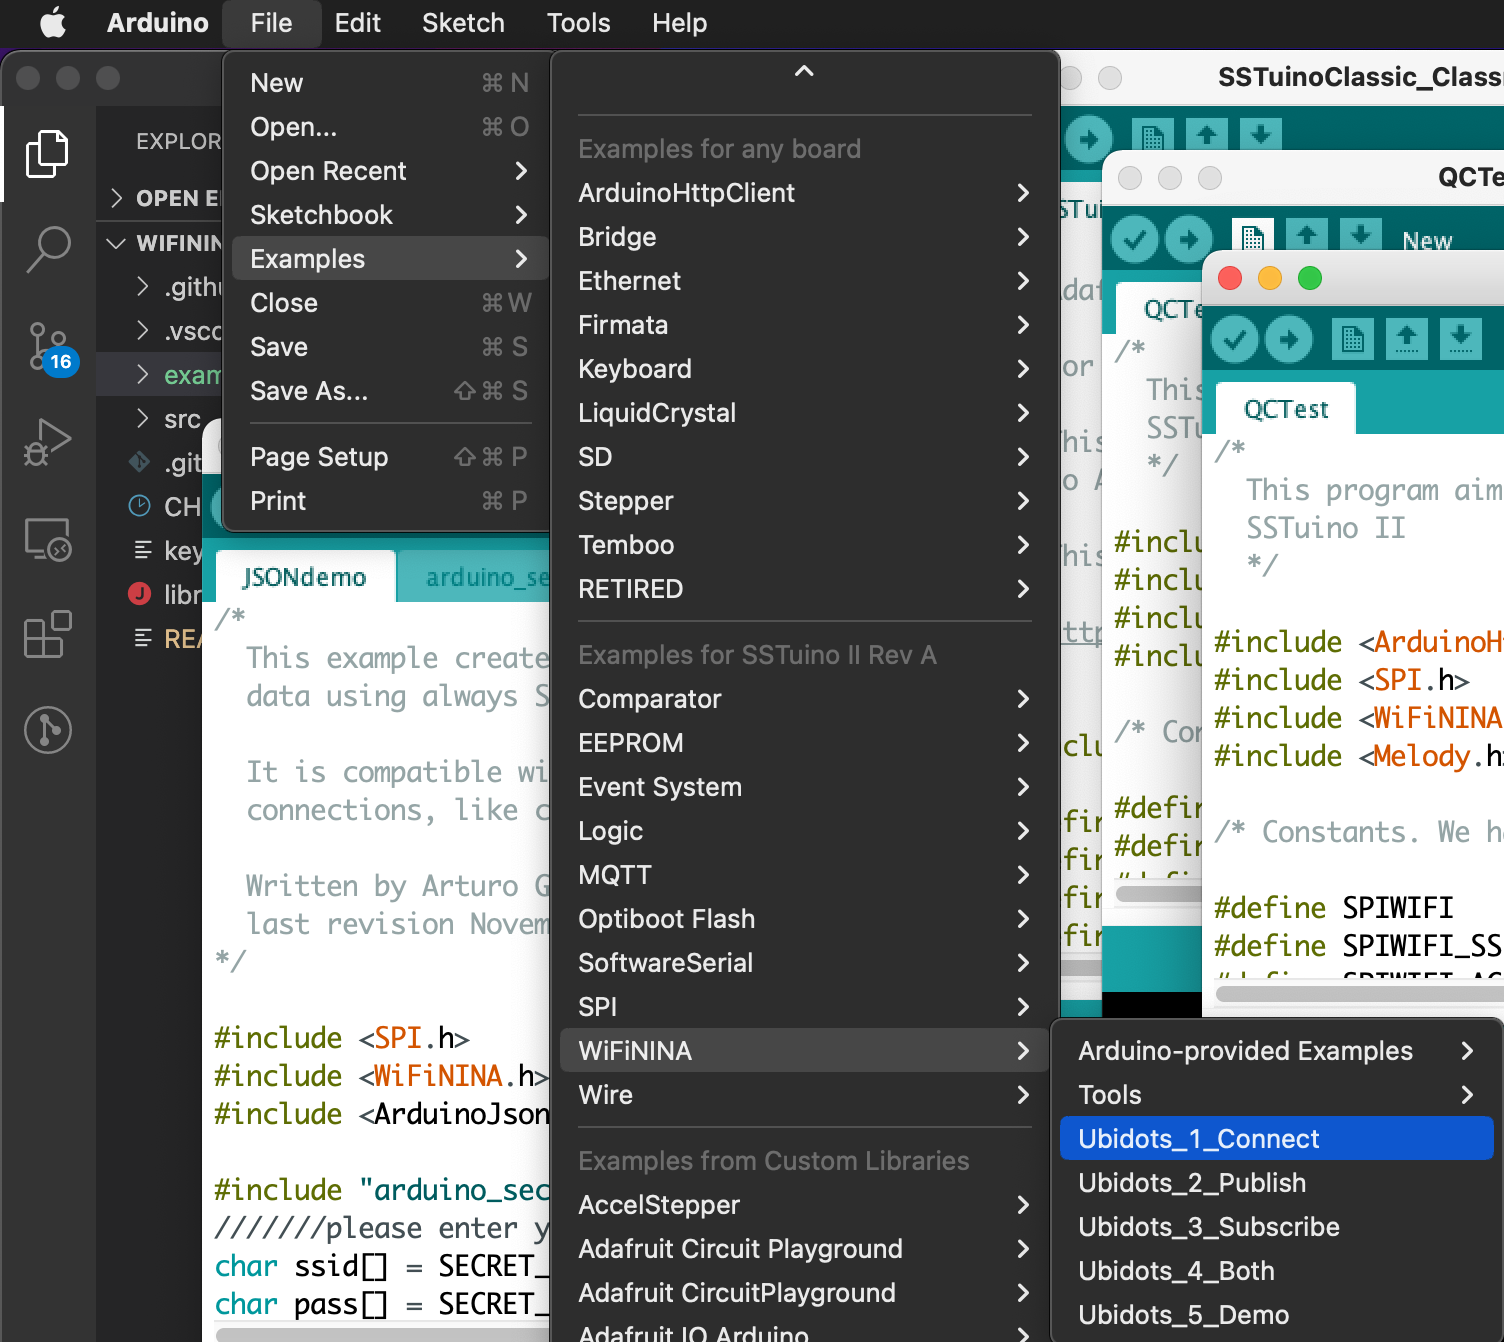
Phew, that was a lot of things to go through! Let’s start to connect your SSTuino II to Ubidots. Go to your Arduino examples and open up the Ubidots_1_Connect example by going to File > Examples > WiFiNINA > Ubidots_1_Connect.
Wow, the code looks quite scary! Not to worry, because we have placed comments to let you know where to put code and where to not place any code.
In Arduino programs, you can actually have more than one file! Go to the arduino_secrets.h tab located on the tab bar. Here is where you place all the details of your WiFi network and your Ubidots device info.
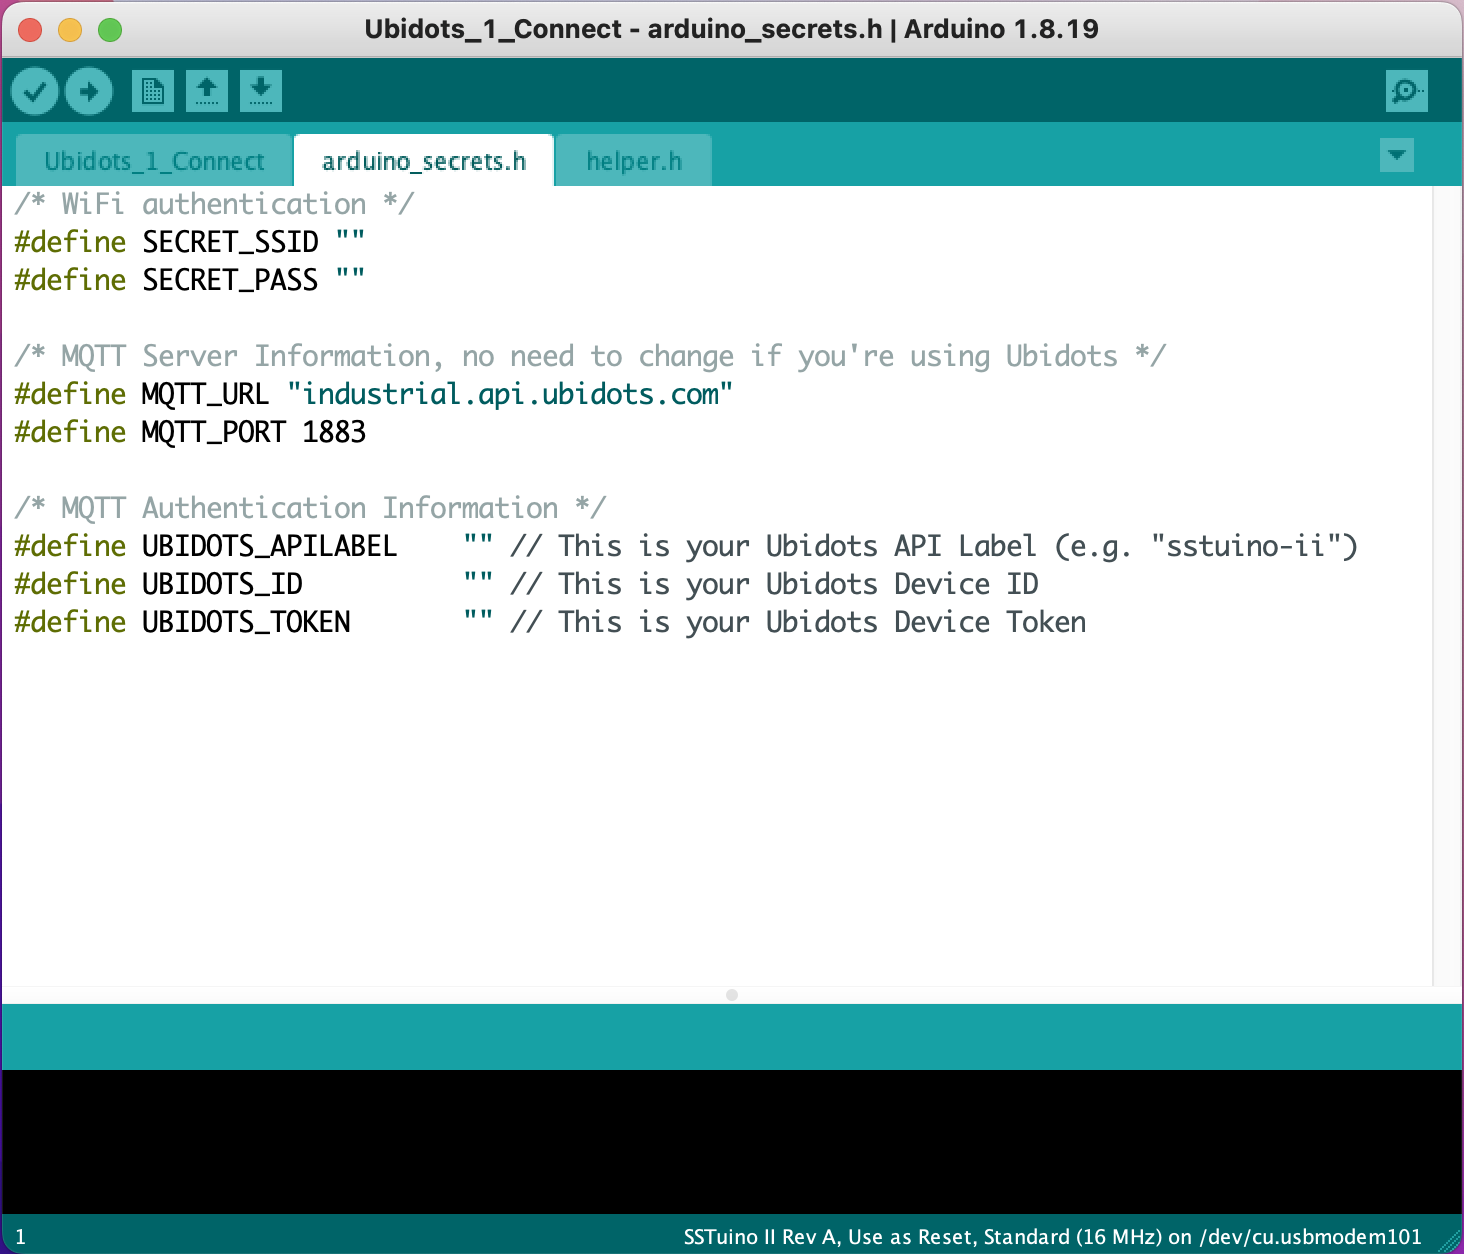
Remember the 3 things, API Label, ID and Token that you noted down when setting up Ubidots? You can now paste them into the code, in between the quotation marks.
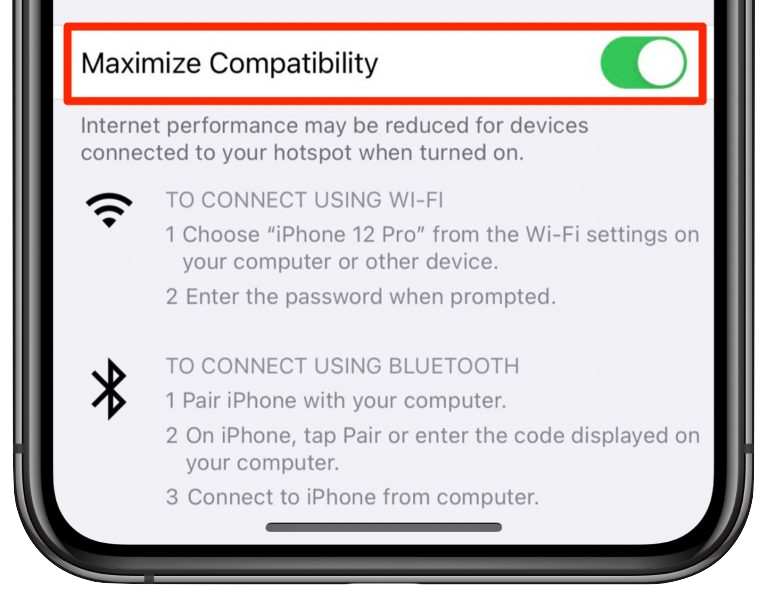
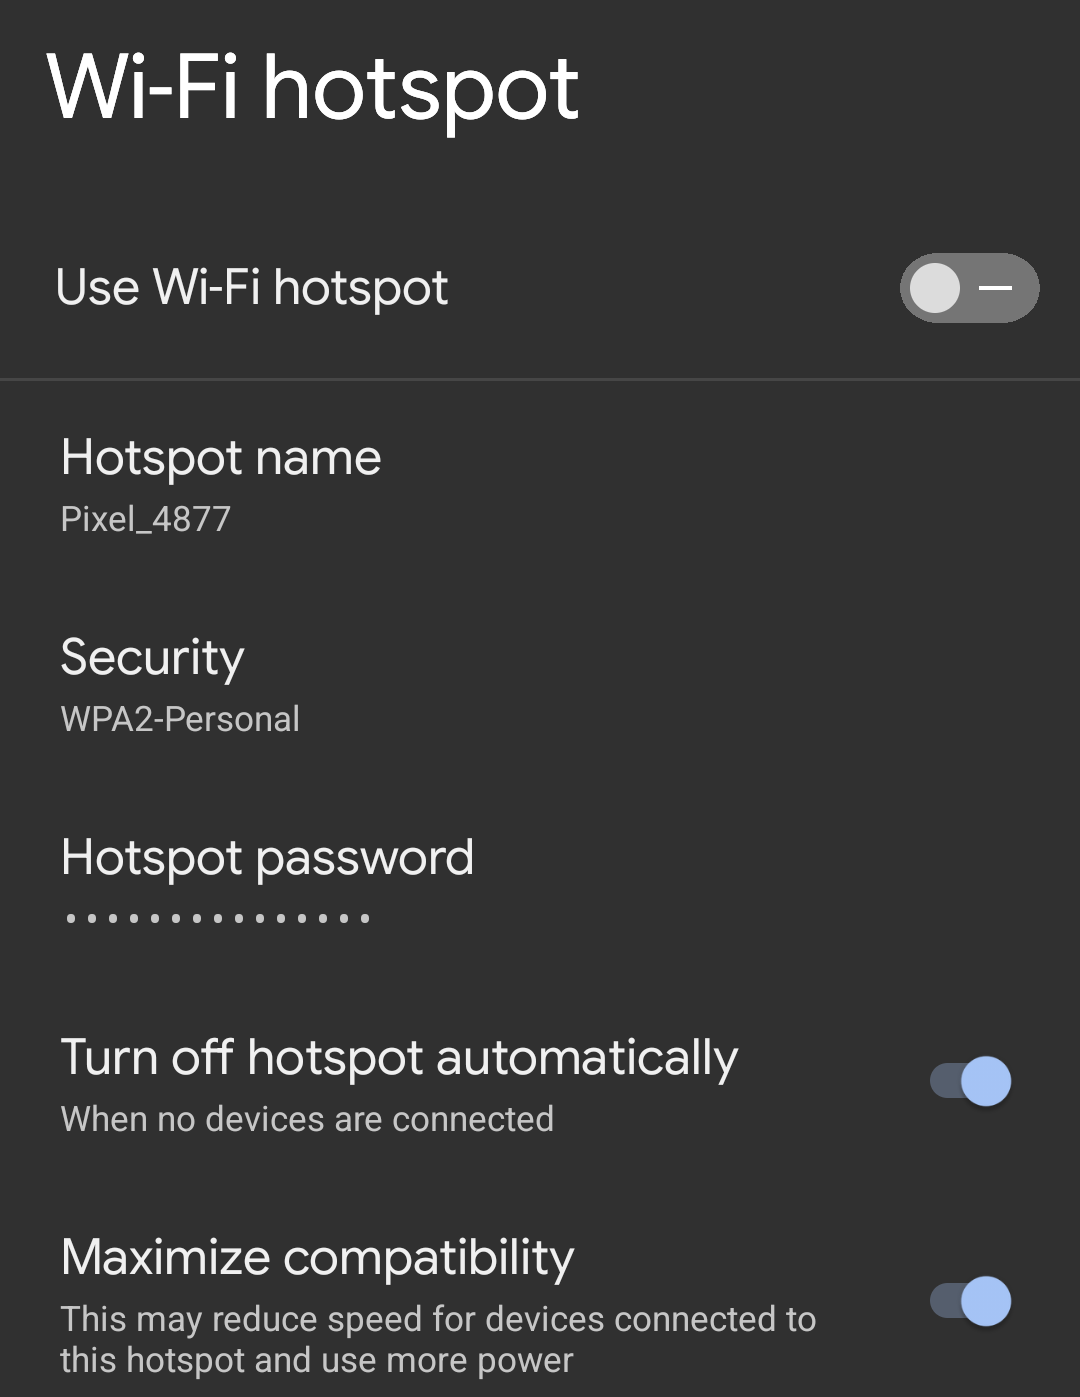
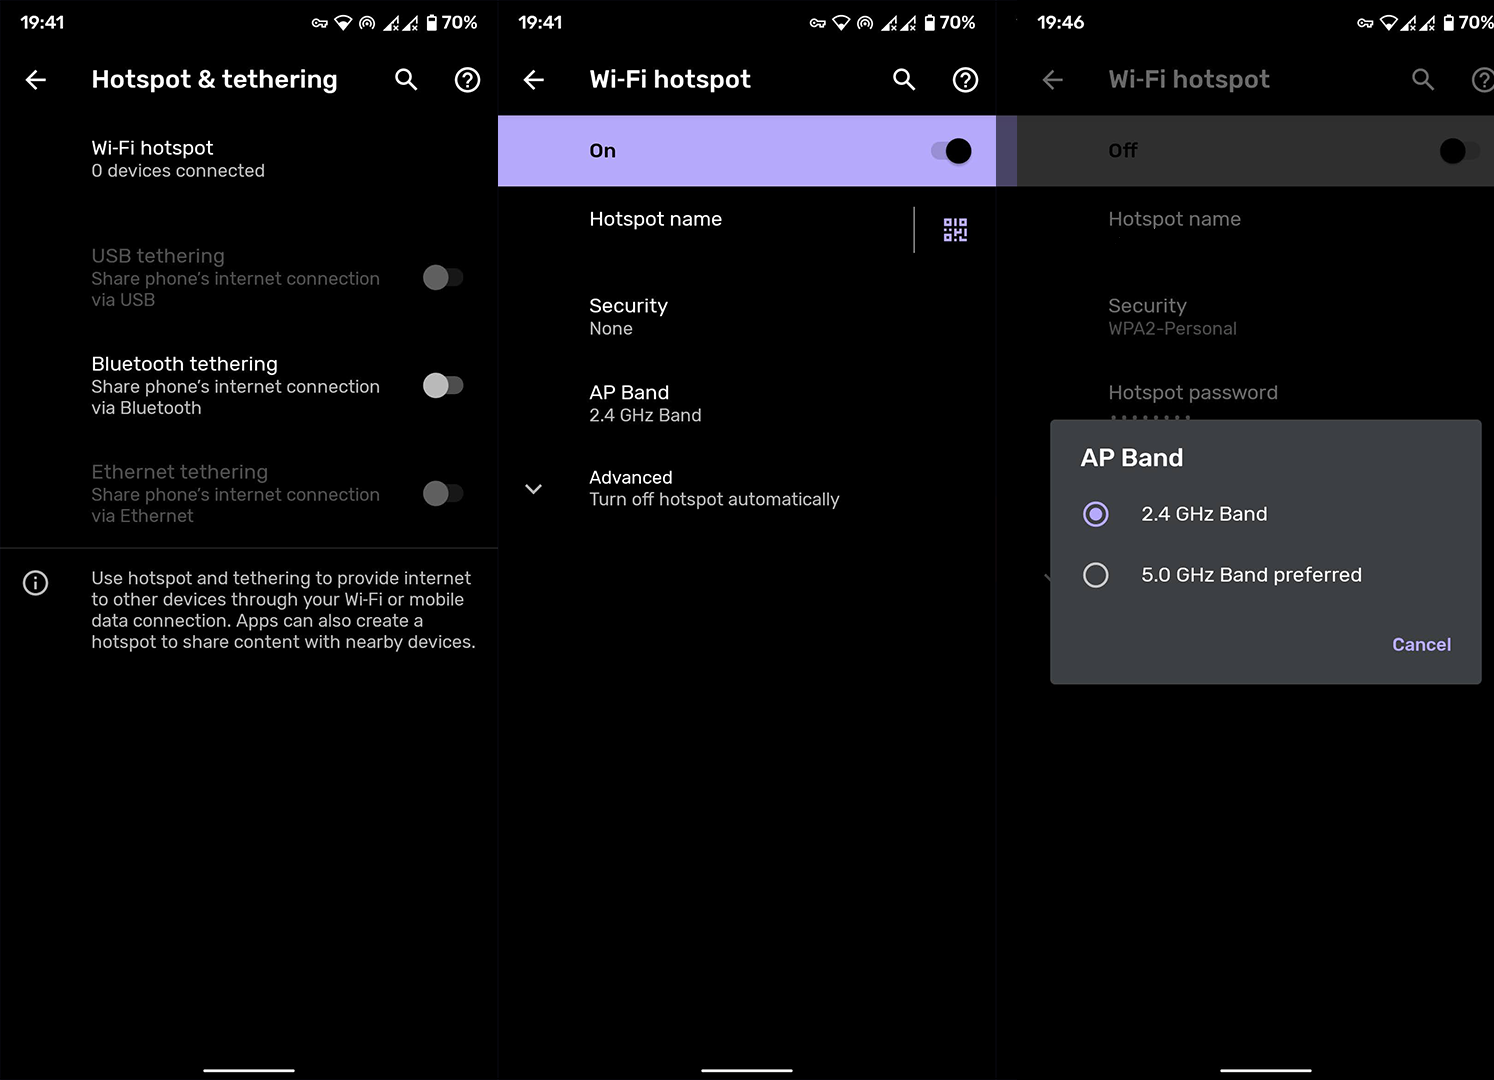
For the Wi-Fi network details, you will need to set up your own Wi-Fi hotspot using your phone, as the SSTuino does not support the higher frequency (5GHz) Wi-Fi networks used by the school.
If you have a newer phone, please enable “Maximise Compatibility” for iOS and certain Android devices, or “Advanced > AP Band: 2.4GHz” for other Android devices.
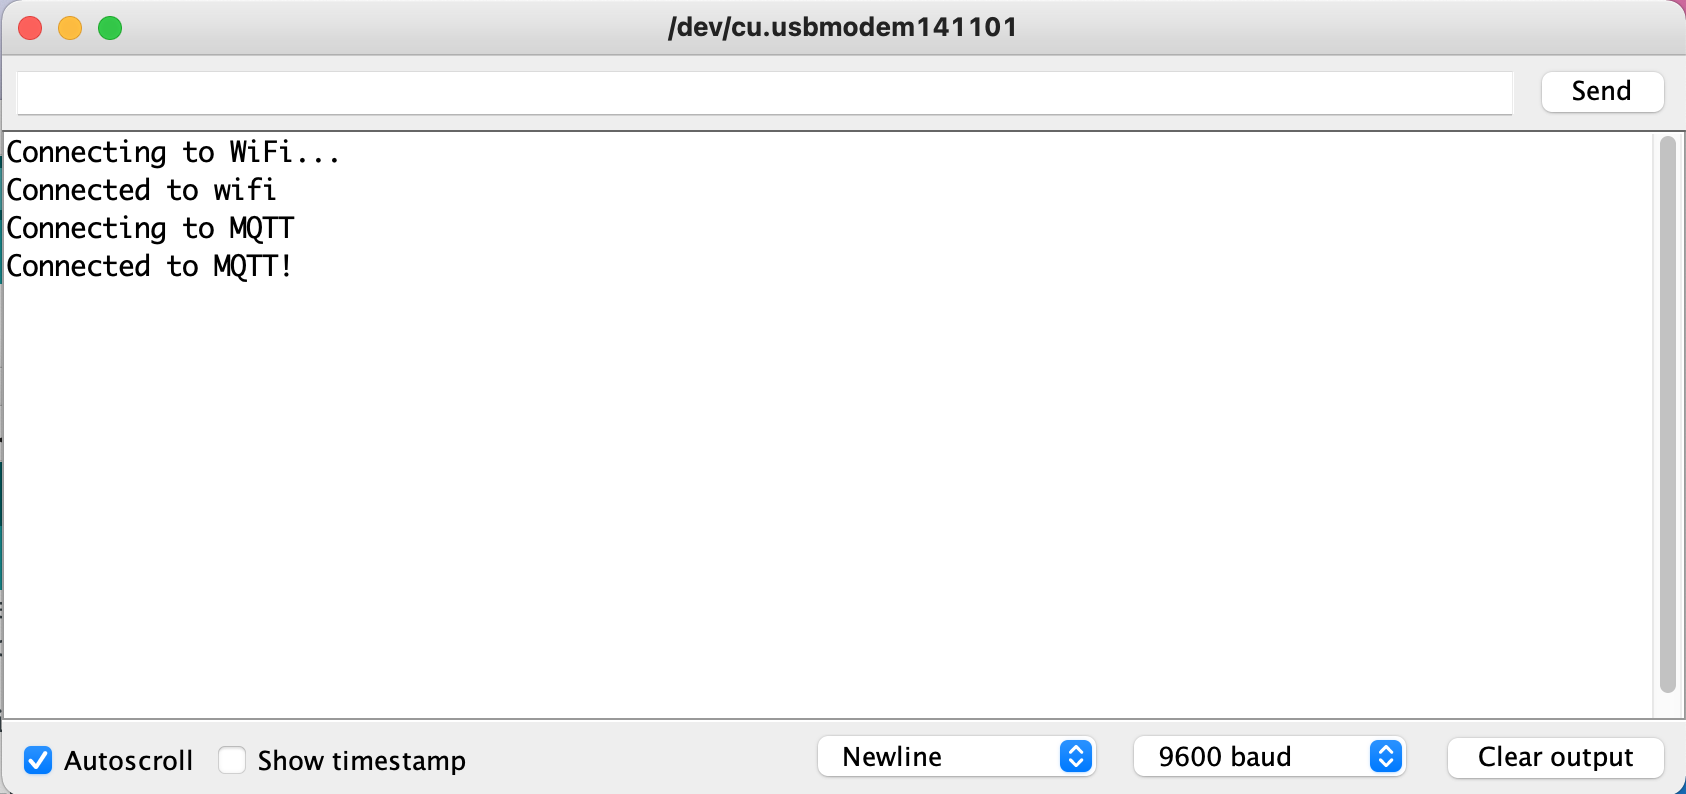
With that done, let’s upload your code. Open the Serial Monitor and see if it connects to the Internet with the sentence Connected to MQTT!. If so, congratulations! Your SSTuino has successfully connected to the Internet and Ubidots.
Don't forget to save your code to your Arduino sketchbooks folder as “Connect”. We will be using this code as our base for the next few lessons.
If your code isn’t working, check out the list below for some of the common issues:
- It’s stuck at “Retrying WiFi Connection”!: Double check if your Wi-Fi password and name are correct, and your Wi-Fi network is turned on and discoverable. For iPhones, you have to keep the Personal Hotspot page in settings open for the network to be discoverable.
- “Connecting to MQTT…….” keeps having more dots but never connects: There is a network issue with your Wi-Fi hotspot. It might be possible that your mobile signal is bad in the classroom. Try using someone else’s hotspot that is known to be working.
- An error code appeared during “Connecting to MQTT”!: Check out the “Quick Status/Error Codes Reference” section at the bottom of the
helper.hfile tab.
Resources and Going Further
If you are interested to learn more about the inner workings of MQTT, and how it came about, check out these two excellent articles made by Adafruit.