Transmit and Receive
In this lesson, we will be learning how to send and receive data to and from Ubidots. Let’s go!
Table of Contents
"Publishing" Data to Ubidots MQTT
Let us send (“publish”) some data to Ubidots! We will be sending the ambient temperature to Ubidots with our TMP36 temperature sensor.
Open the previous Arduino code where we went through all the Wi-Fi passwords and Ubidots tokens (you should have saved it as “Connect”), and save it as a new project (name it something like “Publish”).
Arduino Hookup
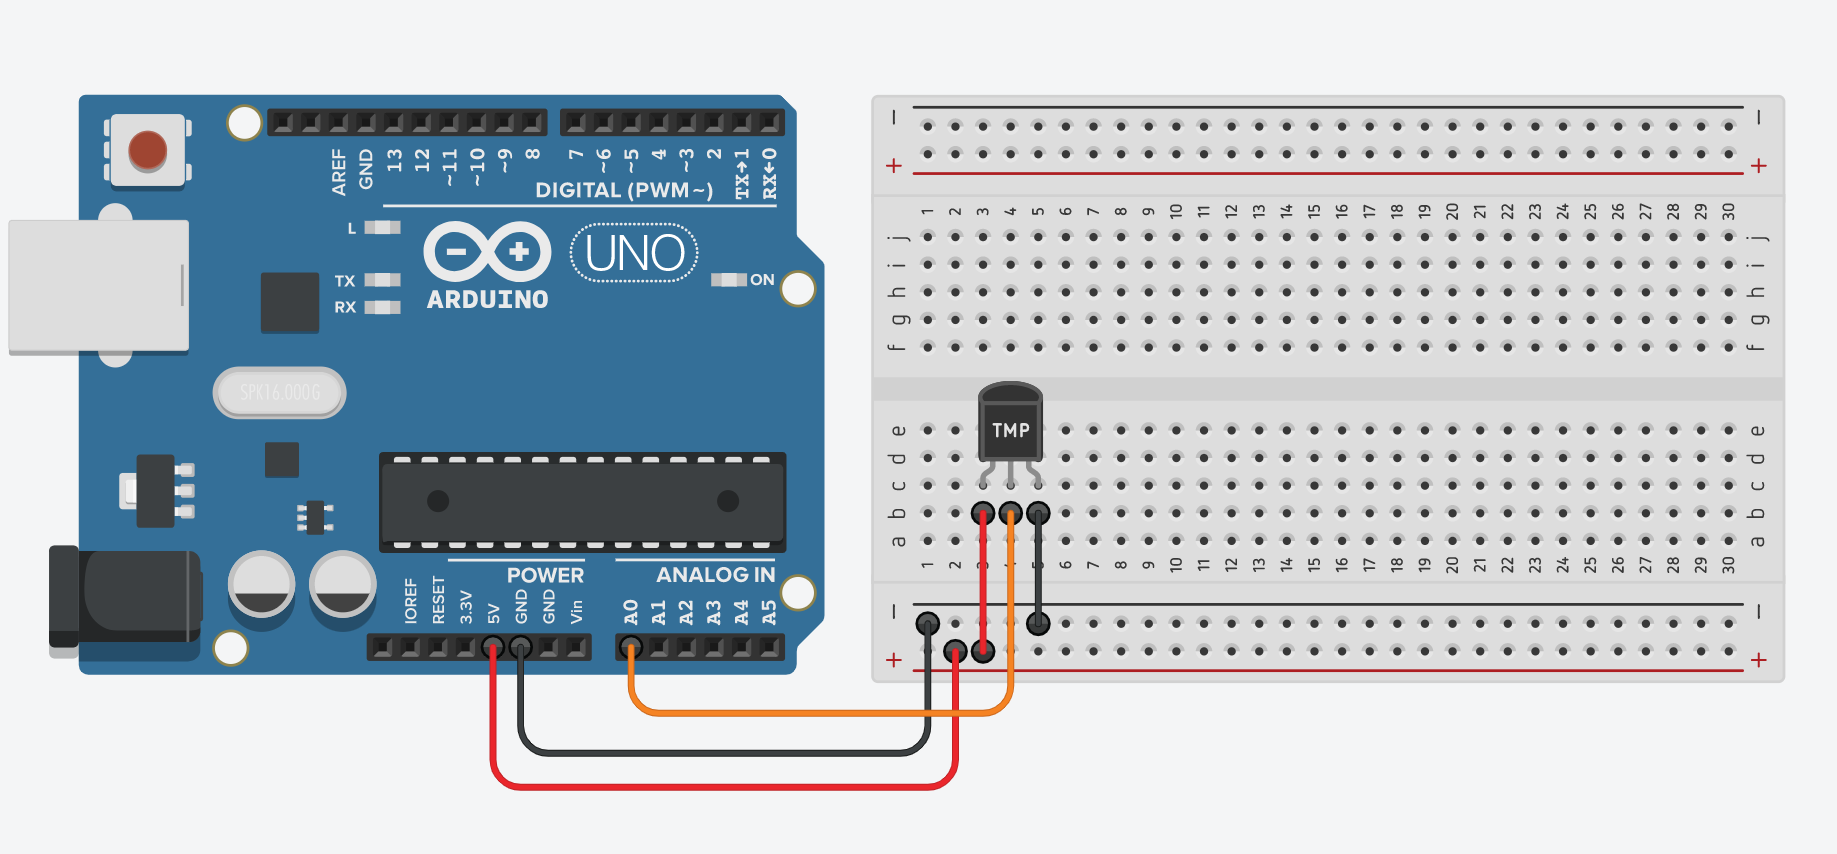
You will need to connect your SSTuino according to the diagram above, with the TMP36 sensor's output connected to Analog In A0.
Transplanting Code
Now, let’s look at the TMP36 code that we built previously in TinkerCAD. It should look something like this:
// C++ code
//
int temp = 0;

void setup()
{
  pinMode(A0, INPUT);
  Serial.begin(9600);
}

void loop()
{
  temp = (-40 + 0.488155 * (analogRead(A0) - 20) + 0);
  Serial.println(temp);
  delay(10); // Delay a little bit to improve simulation performance
}
Based on what we have learned in From Blocks To Code - Part I, we will be transplanting the 3 important sections of this code to the IoT template that we are using to connect: Declaration, Setup and Loop. Transplanting code is easy because the example has already marked out where to put your code 😄. Find the parts marked by /********* This is where you put your own code *********/.
Step 1: Declaration
The first part to transplant would be the variable temp for temperature so that we have this variable in our IoT code.
…
WiFiClient network;
MQTTClient client;

// declaration

/********* This is where you put your own code *********/

// Timer for multitasking. Default is 10000 ms (10 seconds)
RBD::Timer timer(10000);
int temp = 0;

/**************** End of your own code *****************/
…
Step 2: Setup
The second part would be our setup() function, to set Analog Pin A0 as an input. We can ignore the Serial.begin safely as we already set up our Serial connection in the example, so we only need to copy over pinMode().
…
void setup()
{
  Serial.begin(9600);

  /********* This is where you put your own code *********/

  pinMode(A0, INPUT);

  /**************** End of your own code *****************/

  connectToWiFiAndMQTT(network, SECRET_SSID, SECRET_PASS, client, subscribe, messageReceived);
}
…
Step 3: Loop
The third part is the loop() function, to calculate the temperature from the voltage. We only need to transplant the 1st line to our IoT example code, underneath This is where you put your own code and add a timer to only publish the value every 10 seconds. timer.onRestart() is the code used to check if the timer has reached 10 seconds, and also resets the timer once the time limit is reached.
…
void loop()
{
  connectionCheck(client, subscribe); // Check if connection is ok, must run on every loop

  /*
    If you need to publish data here, a publish is called
    with a timer like this:

    if (timer.onRestart())
    {
      String dataString = String(data);
      publishUbidots(client, "topicName", dataString);
    }

    The value passed to publishUbidots must be a String
  */

  /********* This is where you put your own code *********/

  // Publish every 10 seconds
  if (timer.onRestart())
  {
    // Read the temperature
    temp = -40 + 0.488155 * (analogRead(A0) - 20);
  }

  /**************** End of your own code *****************/
}
…
Great, now we are done with our transplanting and we are ready to write our first IoT code!
If you check out the file tab named ‘helper.h’ on the tab bar, you will find that we have written a lot of functions to make your life easier. Here’s a rundown of all the functions that you can use throughout your IoT programs:
connectToWiFi(SSID, password): Connects to Wi-Fi, and automatically reconnects if the Wi-Fi disconnectspublishUbidots(client, topic, message): Publishes an MQTT message on a topicsubscribeUbidots(client, topic): Subscribes to an MQTT topic. You should only use this function at the last part of theconnect()functiontopicMatches(shortTopic, longTopic): Checks if your topic matches the topic sent by Ubidotsconnect(client, subscribe): Connects to MQTT and automatically subscribes to topics designated in thesubscribe()function
Since MQTT only allows us to publish the data in the form of Strings, we need to convert our temperature number into a String. Make a new String variable called temperatureString with temp (recall lesson From Blocks to Code - Part I).
…
  temp = -40 + 0.488155 * (analogRead(A0) - 20);

  // Convert the temperature to a String
  String temperatureString = String(temp);
…
Step 4: Publish
Publishing to Ubidots using MQTT is as simple as calling the publishUbidots() function like so: publishUbidots(client, “temperature”, temperatureString);.
The code between the /****/ in loop() should now look something like this:
…
void loop()
{
  …

  /********* This is where you put your own code *********/

  // Publish every 10 seconds
  if (timer.onRestart())
  {
    // Read the temperature
    temp = -40 + 0.488155 * (analogRead(A0) - 20);

    // Convert the temperature to a String
    String temperatureString = String(temp);
    publishUbidots(client, "temperature", temperatureString);
  }

  /**************** End of your own code *****************/
}
…
Before you upload your program, don't forget to double-check the 'arduino_secrets.h' file to ensure that you have the correct Wi-Fi password and Ubidots account details.
Video coming soon! Thank you :) Use your finger to manually raise the temperature of the TMP36
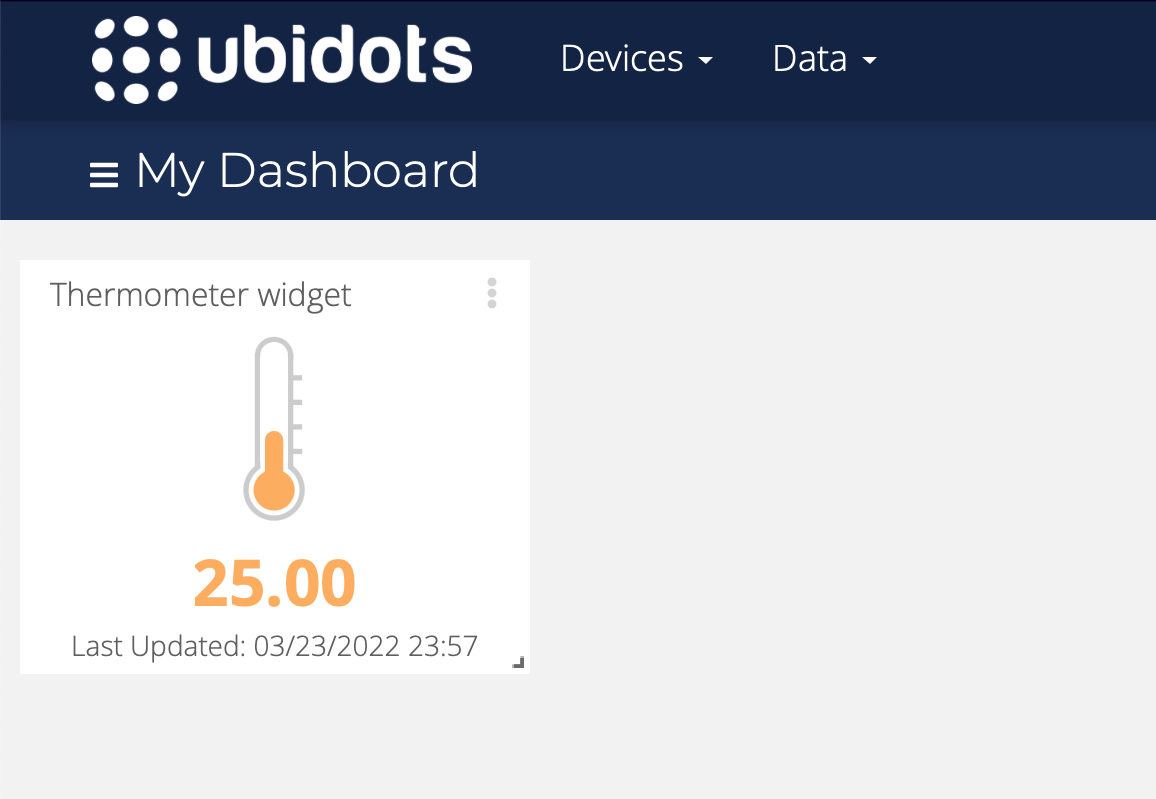
Connect your SSTuino, upload your program, open your Serial Monitor and go to your Ubidots dashboard. You can now see the current temperature on the dashboard!
Well done, now you have made your first Internet-connected temperature sensor in 4 steps (Declaration, Setup, Loop, Publish). This simple example can be extended to many other sensors that you may want to build, like motion detectors, air quality sensors, and so on.
"Subscribing" data from Ubidots MQTT
Now that we have sent, or “published” data to Ubidots, let’s try receiving data by “subscribing”!
We will be making a very simple example: a smart light switch. Arduino represents a HIGH signal with the number 1, and a LOW signal with the number 0, which means that we can simply represent the state of the light switch as 0s and 1s. Our light switch will use one of the debug lights on the board, meaning that you do not need to connect anything externally for it to work.
Ubidots Setup
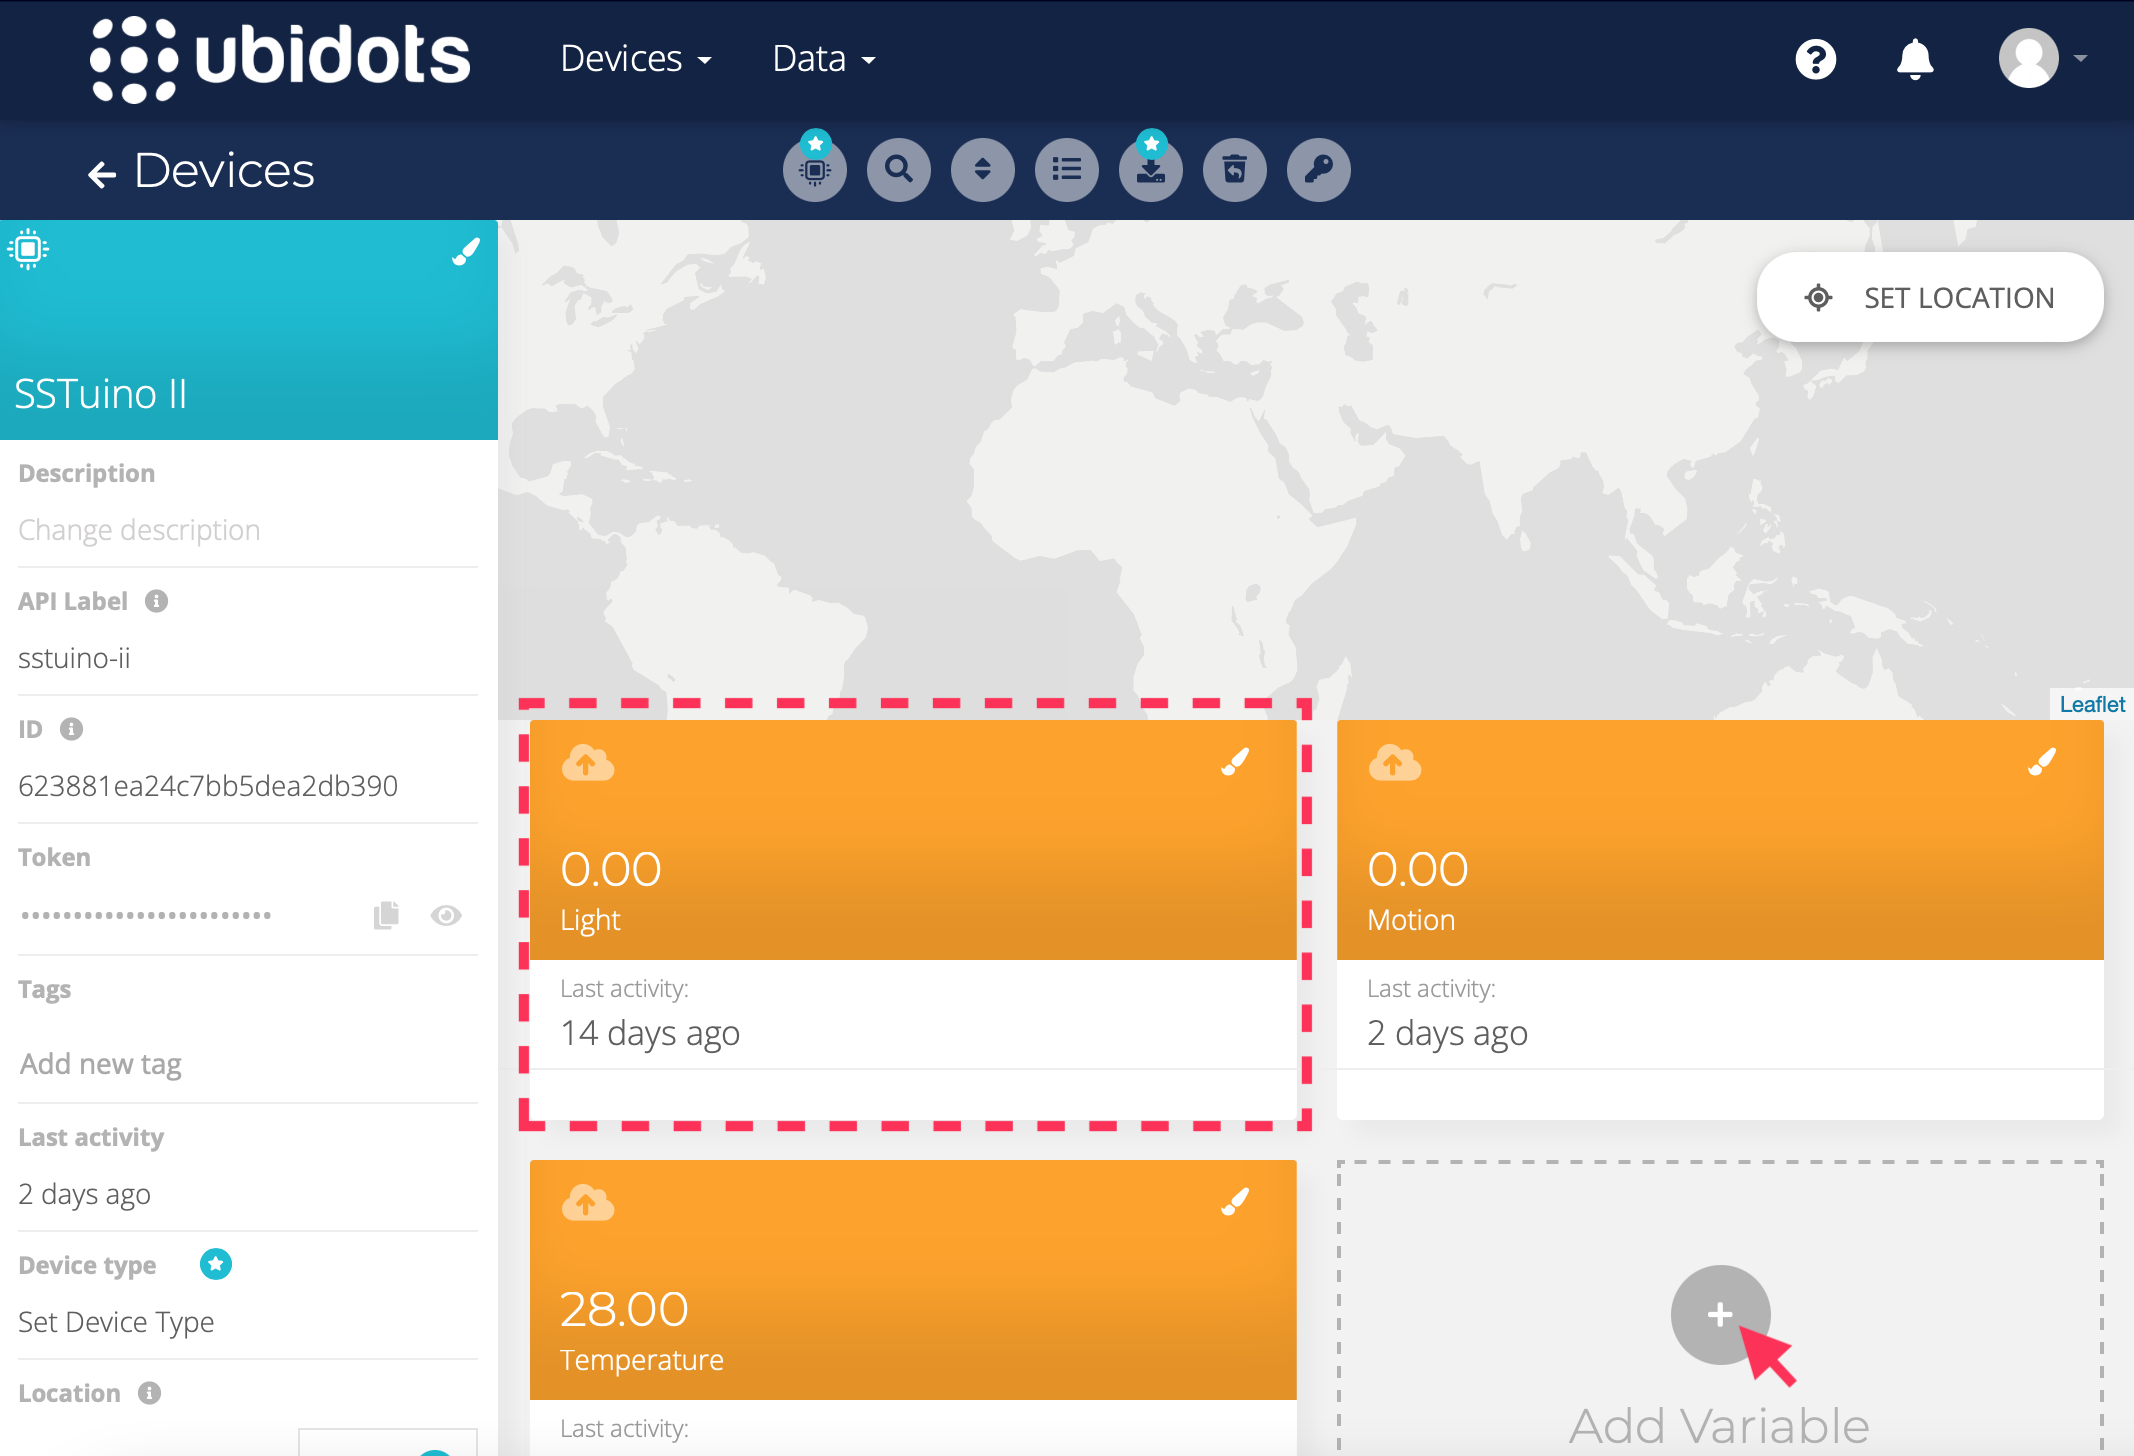
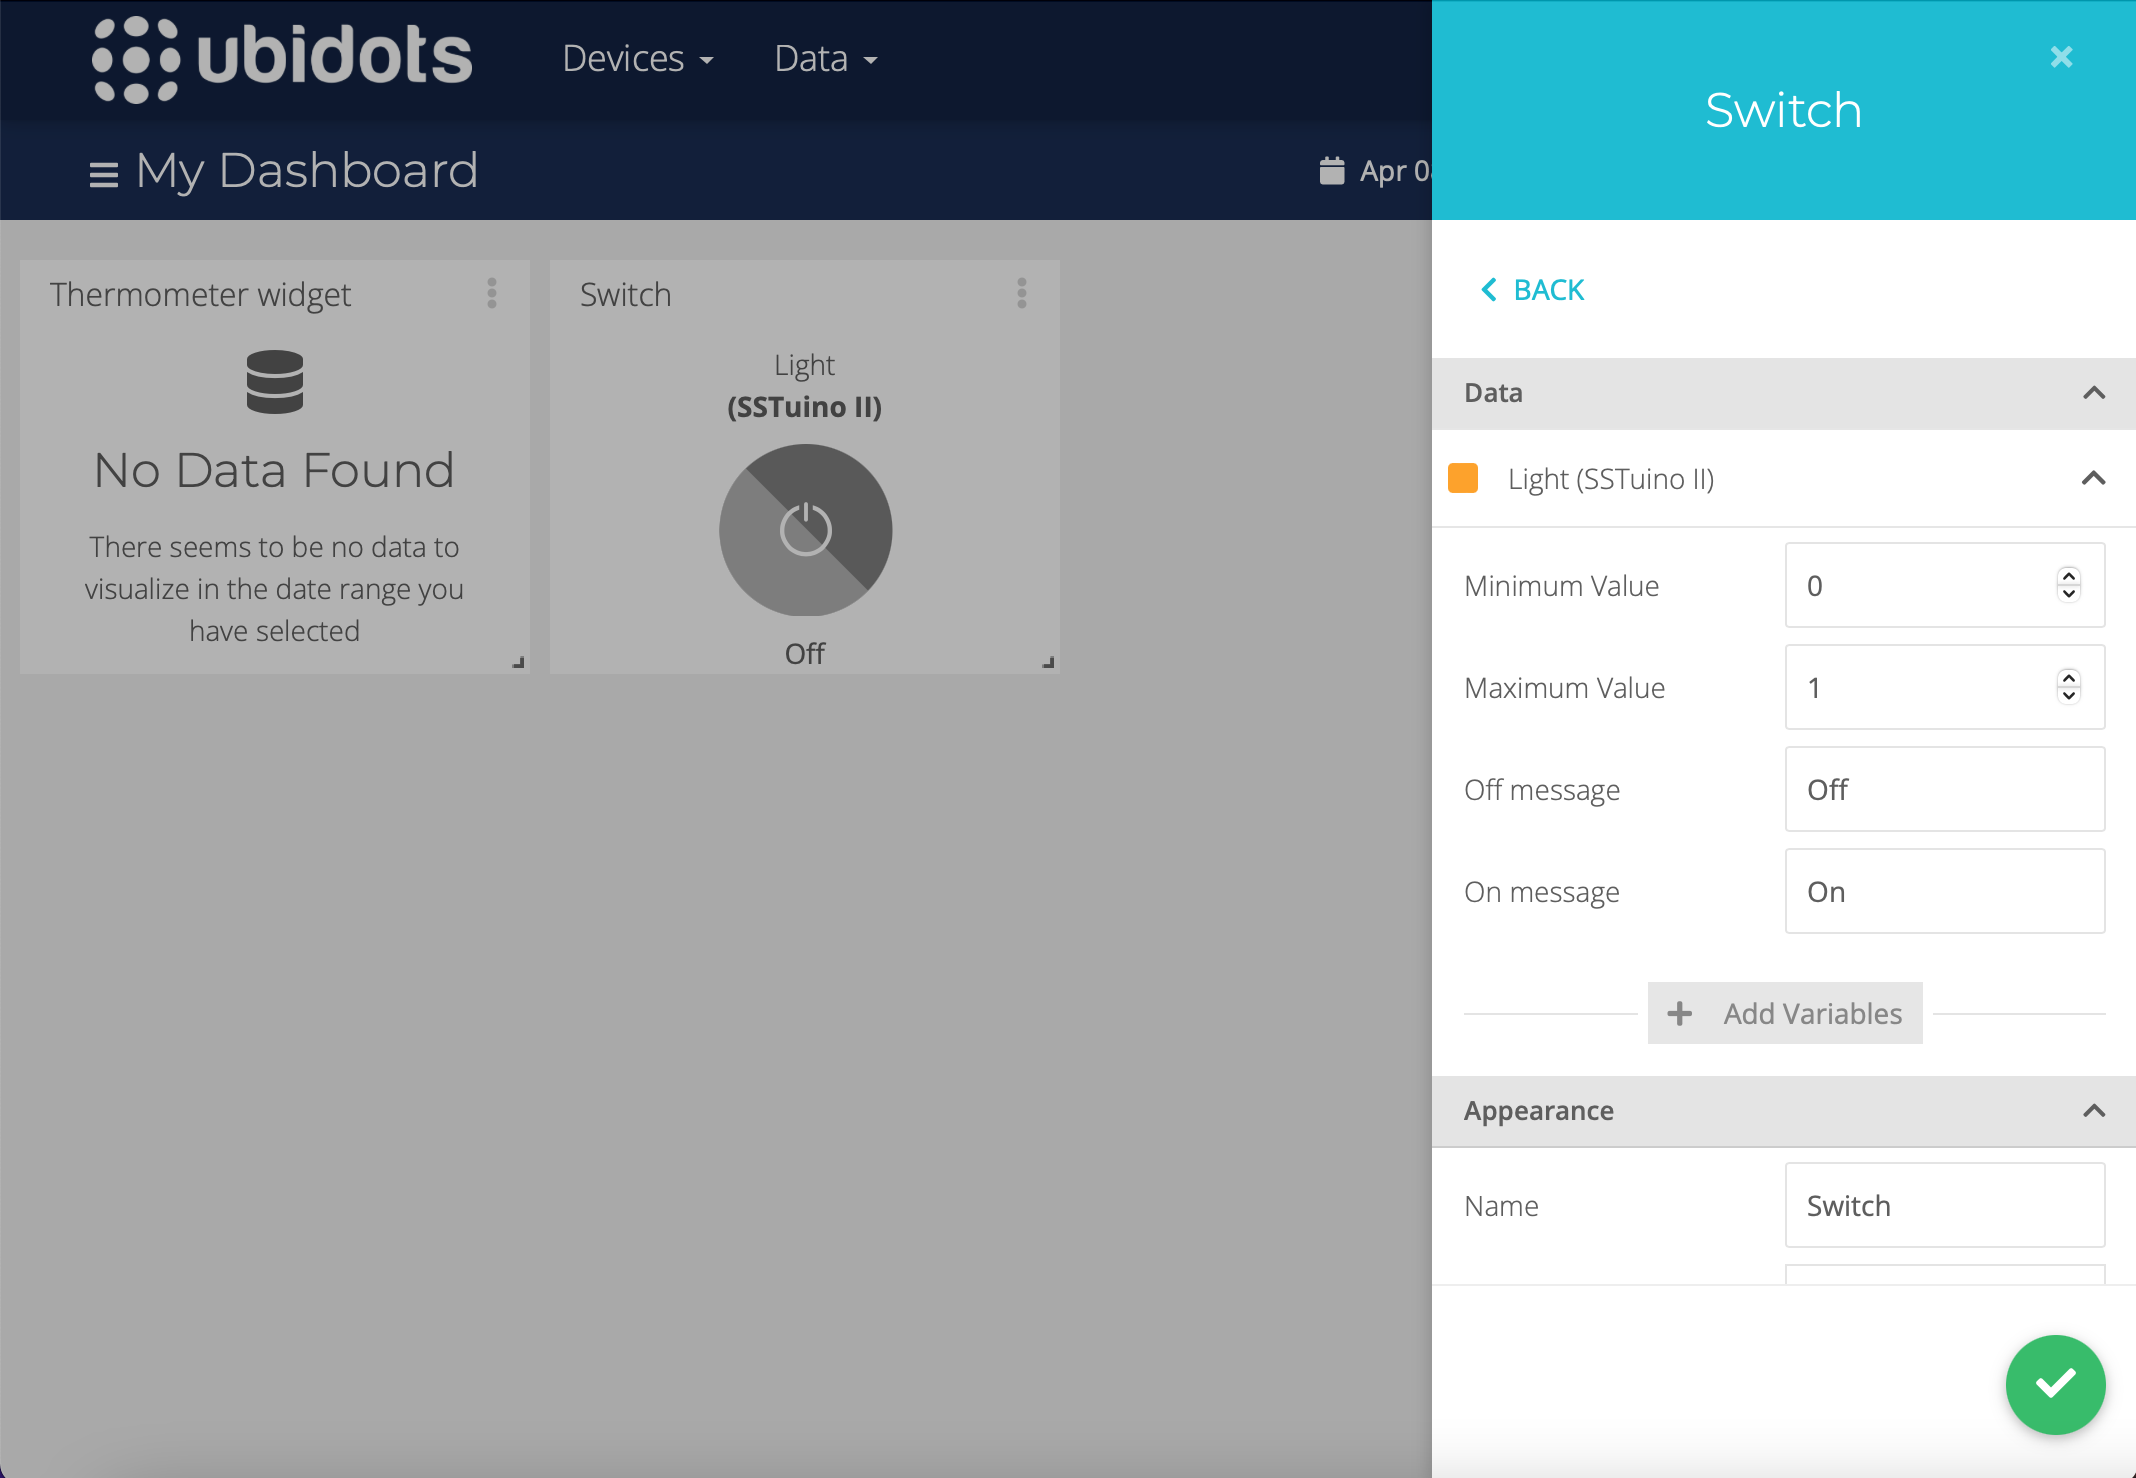
Get started by creating a new Variable under your existing Device with the name “Light” as shown:
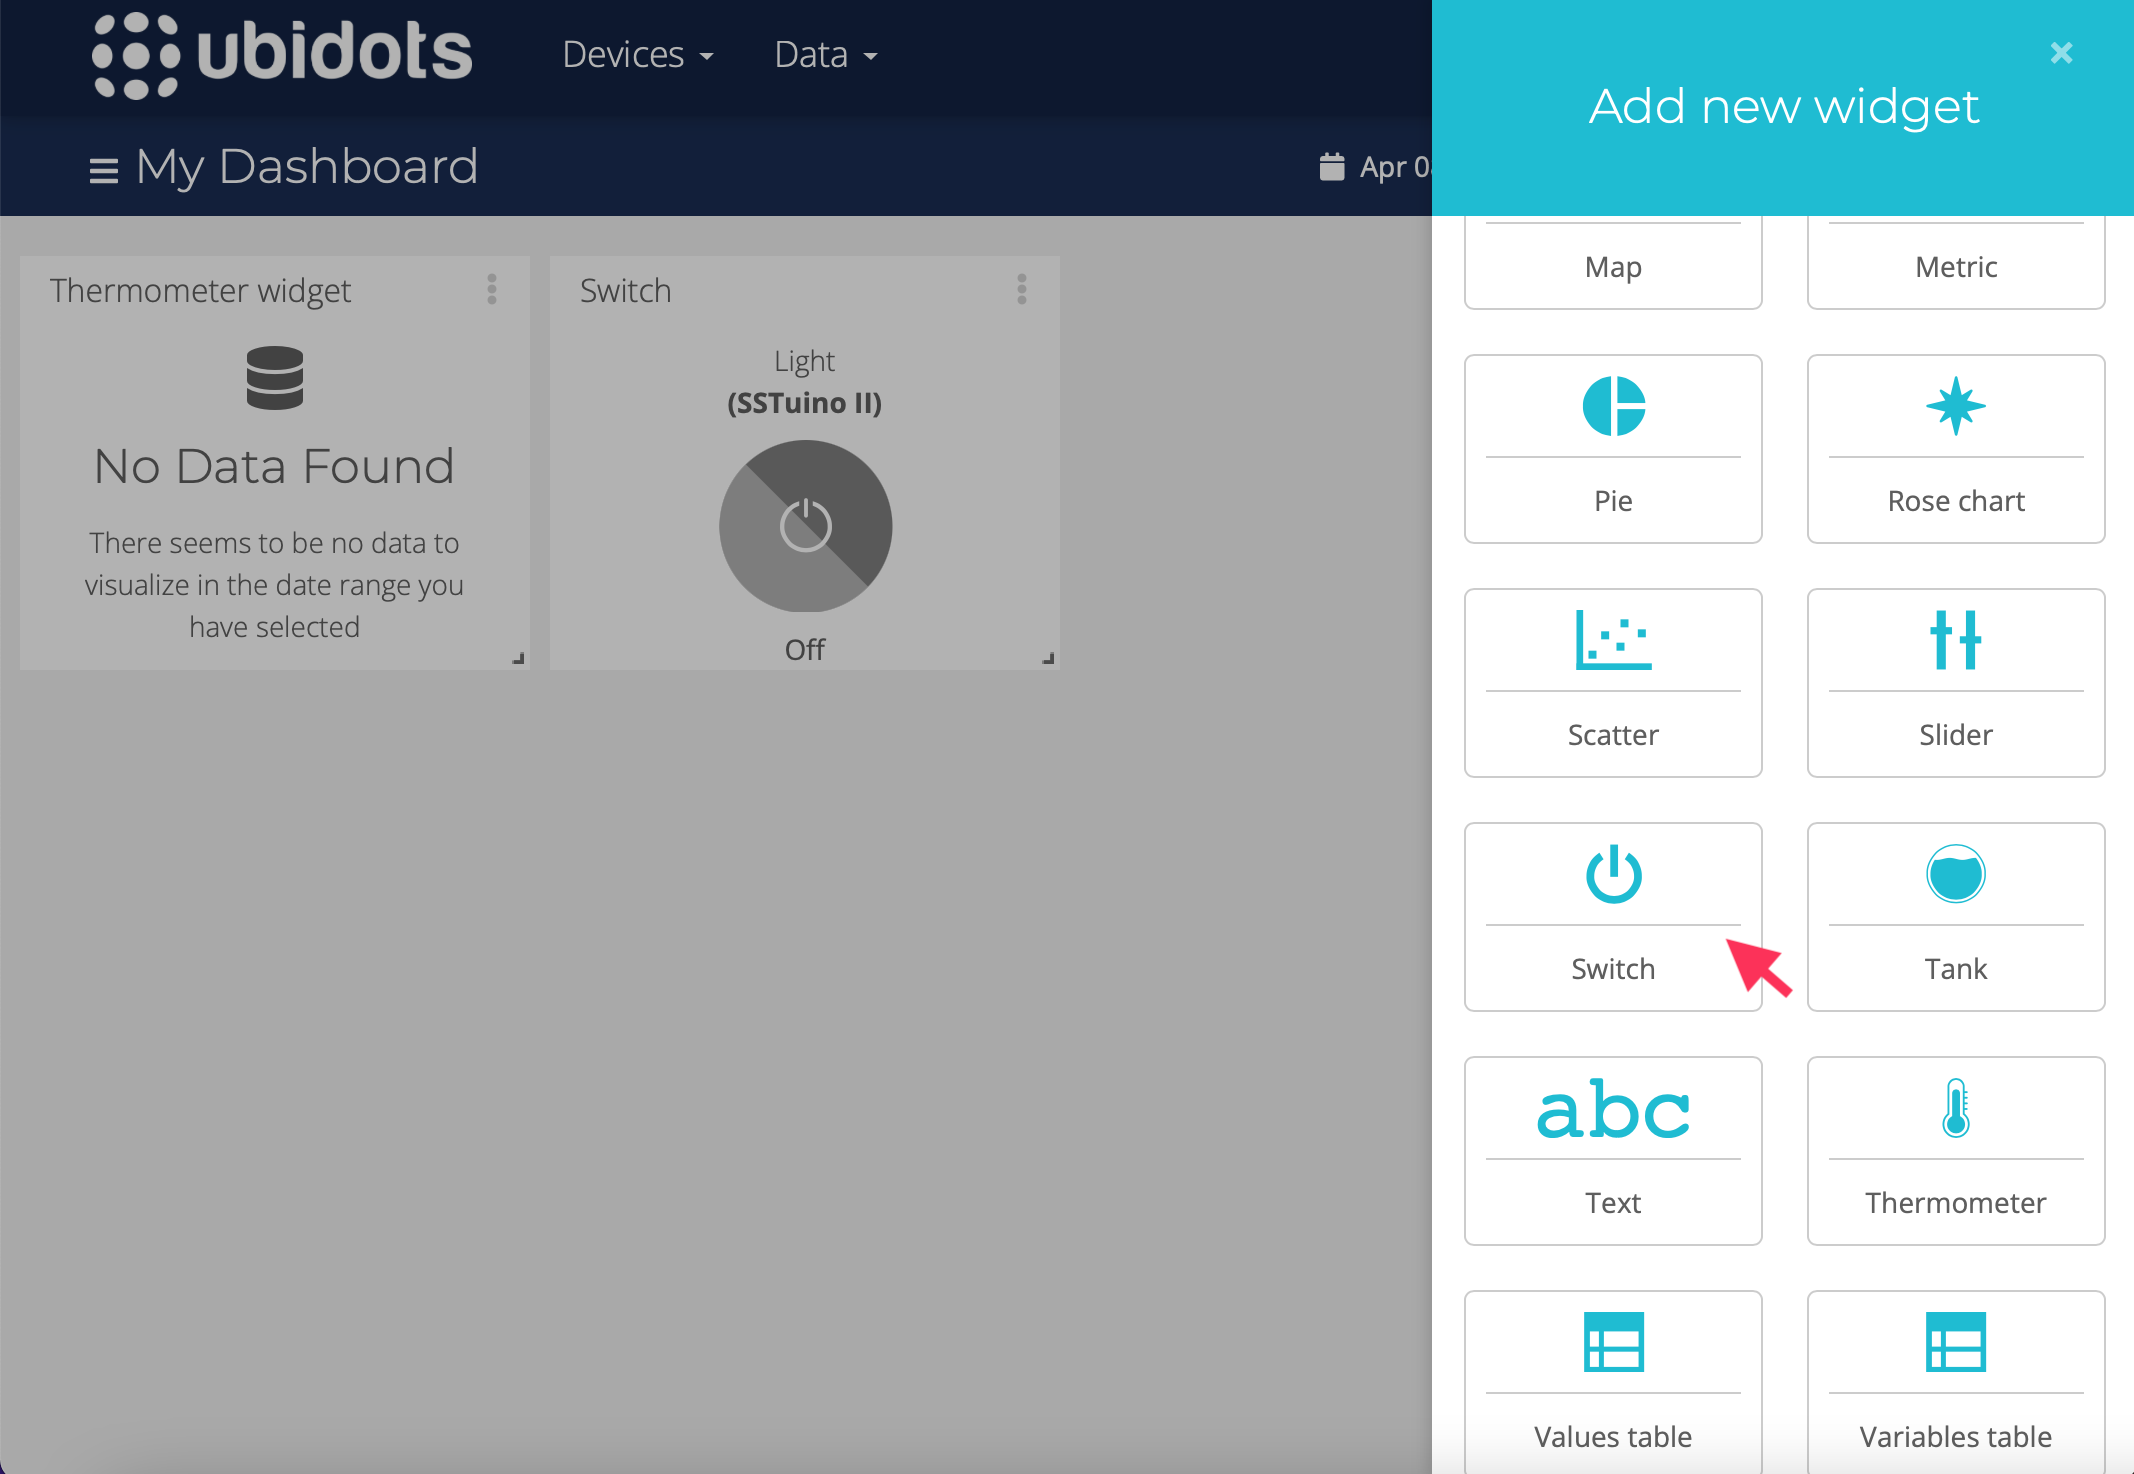
Next, let’s create a switch on our dashboard so that we can control this light switch. Press the + button on top and create a new switch, then link it to the “Light” Variable of your device.

We are now done with Ubidots.
Code
We can open the code that we used to connect to MQTT previously (should be named Connect) and save it as a new project (name it something like “Subscribe”). You can also open the Publish code you just built as a side-by-side reference if you need to.
We can now start building our code for subscribing with 5 major steps: Declaration, Setup, Loop, Message Received and Subscribe. Compared to the previous Publish example, it has 1 extra and 1 changed step.
Step 1: Declaration
You will first need to store the state of the light, in other words, whether it is on or off (in Arduino terms, HIGH or LOW). Make an integer variable called light and set it to LOW initially.
…
WiFiClient network;
MQTTClient client;

/********* This is where you put your own code *********/

// Timer for multitasking. Default is 10000 ms (10 seconds)
RBD::Timer timer(10000);

// Variables
int light = LOW;

/**************** End of your own code *****************/

void setup()
…
Step 2: Setup
In our setup, we need to tell our SSTuino that the pin that we want our light to be an output. We will use Pin 2 in our case as it’s the first pin with an LED. Use pinMode to set Pin 2 as an output.
…
void setup()
{
  Serial.begin(9600);

  /********* This is where you put your own code *********/

  pinMode(2, OUTPUT);

  /**************** End of your own code *****************/

  connectToWiFiAndMQTT(network, SECRET_SSID, SECRET_PASS, client, subscribe, messageReceived);
}
…
Step 3: Loop
Inside the loop, we have to respond to changes to the light variable by properly toggling the light on pin 2 on or off. Whenever a message from the subscribed topic comes in, another function will change the light variable, and over here, we need to “apply” this change by actually using the digitalWrite() function.
…
void loop()
{
  …

  /********* This is where you put your own code *********/

  digitalWrite(2, light);

  /**************** End of your own code *****************/
}
…
Step 4: Message Received
Inside this special function is where the MQTT subscribe message is actually received. We have to check if it’s really the correct message by checking the topic, and then changing the value of light based on the value received.
We do this check by using the topicMatches(shortTopic, longTopic) helper function, which breaks down Ubidot’s long and hard-to-understand topic format of /v1.6/devices/{API LABEL}/{VARIABLE}/lv into just {VARIABLE}.
If the topic is the one we want (i.e. outcome of this function is true), we will change the light variable based on the payload of the message. To do that, we have to convert the payload from a String to an integer. Recall the From Blocks to Code lesson, where we converted data from one type to another. To convert a String to int, we just need to use .toInt() behind the String!
…
void messageReceived(String &topic, String &payload)
{
  Serial.println("Incoming data: " + topic + " - " + payload);

  /*
    All the messages your MQTT service receives can be
    loaded here. You should check if the message is the
    correct topic and convert the message from String
    to the data type you need

    For example:
    if (topicMatches("light", topic) == true)
    {
      light = payload.toInt(); // convert incoming message from String to int
    }

    *NOTE*: Do not use this function to publish, subscribe
    or unsubscribe as it may cause deadlocks
  */

  /********* This is where you put your own code *********/

  if (topicMatches("light", topic) == true)
  {
    // You can do something with the payload, which is a String
    light = payload.toInt(); // convert the incoming message from String to int
  }

  /**************** End of your own code *****************/
}
…
Step 5: Subscribe
At long last, we have come to the last part we have to change: the subscribe() function. This function is responsible for subscribing to the topics that we want to receive messages from.
Simply call the subscribeUbidots() function from the helper by coding subscribeUbidots(client, "light"); and you’re done!
…
void subscribe()
{
  /*
    For example, a subscribe is called like:
    subscribeUbidots(client, "light");
  */

  /********* This is where you put your own code *********/

  subscribeUbidots(client, "light");

  /**************** End of your own code *****************/
}
…
All 5 steps are done now, so it’s time to run your project. Plug in your SSTuino, upload this code, open the Serial Monitor and let it connect. Once it is fully connected, you can try press the switch on your Ubidots dashboard to see the LED on Pin 2 light up!
Video coming soon! :) Simply press switch on Ubidots and pin 2 should light up
Both at the same time!
Now that we have both Publish and Subscribe, let's try to do both at the same time. Use the Save As function to make a copy of your "Publish" project and name it "Both". Keep the Subscribe project on one side of your screen so that you can always refer to it.
Arduino Hookup
This practise will use the exact same circuit as the Publish example.
Code
We are going to walk through this tutorial the same way as we did for Subscribe, which is to break it down into 5 steps: Declaration, Setup, Loop, Message Received and Subscribe.
In addition, as our program is now time-sensitive, we will need to multitask our Arduino! To make things simpler, a 10 second (10000 millisecond) timer has already been created for you with the line of code RBD::Timer timer(10000);.
Step 1: Declarations
Firstly, you want to merge the variables at the top of the code above setup(), having both temp and light for temperature and light switch respectively.
…
WiFiClient network;
MQTTClient client;

// declaration

/********* This is where you put your own code *********/

// Variables
int temp = 0;
int light = LOW;

// Timer for multitasking. Default is 10000 ms (10 seconds)
RBD::Timer timer(10000);

/**************** End of your own code *****************/
…
Step 2: Setup
Next, within the setup() function, add another function call to pinMode so that you designate Pin 2 (the same pin that we used in our Subscribe example) as an output pin.
…
void setup()
{
  Serial.begin(9600);

  /********* This is where you put your own code *********/

  pinMode(A0, INPUT);
  pinMode(2, OUTPUT);

  /**************** End of your own code *****************/

  connectToWiFiAndMQTT(network, SECRET_SSID, SECRET_PASS, client, subscribe, messageReceived);
}
…
Step 3: Loop
Within the loop() function, we have to periodically set Pin 2’s signal to be on/off, depending on what the variable light is at the moment. We will do this with a digitalWrite(2, light).
Notice how that the digitalWrite function is outside the if (timer.onRestart()) brackets that are responsible for checking if the delay time has passed, which means that it will be called every single time when the loop is run, instead of every 10 seconds.
Here's the code for the loop() function in full:
…
void loop()
{
  connectionCheck(client, subscribe); // Check if connection is ok, must run on every loop

  /*
    …
  */

  /********* This is where you put your own code *********/

  // Publish every 10 seconds
  if (timer.onRestart())
  {
    // Read the temperature
    temp = -40 + 0.488155 * (analogRead(A0) - 20);

    // Convert the temperature to a String
    String temperatureString = String(temp);
    publishUbidots(client, "temperature", temperatureString);
  }

  digitalWrite(2, light);

  /**************** End of your own code *****************/
}
…
Step 4: Message Received
In the messageReceived() function, we have to check for our incoming message just like what we did previously. Copy from the beginning to the end of the if statement and paste it between This is where you put our code markers.
…
void messageReceived(String &topic, String &payload)
{
  Serial.println("Incoming data: " + topic + " - " + payload);

  /*
    …
  */

  /********* This is where you put your own code *********/

  if (topicMatches("light", topic) == true)
  {
    // You can do something with the payload, which is a String
    light = payload.toInt(); // convert the incoming message from String to int
  }

  /**************** End of your own code *****************/
}
…
Step 5: Subscribe
Finally, don’t forget to actually subscribe to the topic in question, which should be named light, in the subscribe() function.
…
void subscribe()
{
  /*
    For example, a subscribe is called like:
    subscribeUbidots(client, "light");
  */

  /********* This is where you put your own code *********/

  subscribeUbidots(client, "light");

  /**************** End of your own code *****************/
}
…
With all of the code done, it’s time to plug in your SSTuino and upload the code. Try playing around with the switch on your dashboard to see if the debug LED on Pin 2 turns on and off.
Video coming soon! Thank you :)
If everything works out, awesome! You have successfully made an IoT controller for a smart home, with a temperature sensor to tell you how hot or cold your room is, and an internet-controlled light that you can trigger using other Internet controlled functions. You can explore how to integrate this with IFTTT (If This Then That) or other smart solutions to link your existing devices like a Google Home Mini with your SSTuino based IoT controller.
In the next lesson...
In our next two tutorials, we will be building a mobile app with Thunkable, a “code-lite” mobile app creator. It is highly recommended that you watch some of Thunkable’s tutorials at home, as well as try out the next tutorial (Mobile Apps, Part 1). All of these videos are bite-sized, 1-2 minute videos so it’s really quick to get up to speed with how Thunkable works! The next tutorial will only cover a shortened version to get you up to speed.
Essential Tutorials:
- Introduction to Drag and Drop
- Build a Translator App with Thunkable
- How Screens and Navigation works in Thunkable
- Using App Variables
- Using Functions
Optional Tutorials: