From Blocks to Code, Part I
This tutorial aims to teach you the basics of text coding, using the Arduino IDE. We started using the IDE to edit code frequently and will be using it to program increasingly complex projects in the future.
Table of Contents
Basic Building Blocks
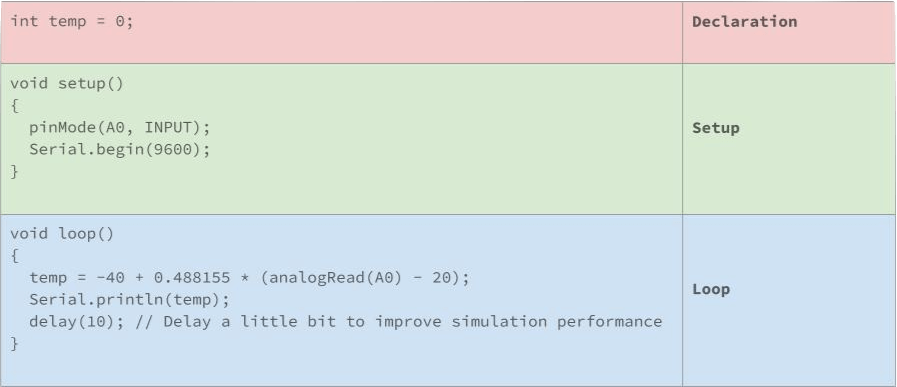
Declaration - Used to declare the libraries and variables used in the code. For example, the variable temp is declared as an integer and has the starting value of 0.
Setup - Code that is run once to set up your SSTuino. For example, the Serial.begin(9600); tells it to start the serial monitor with a baud rate (speed) of 9600bps (bits per second)
Loop - Code that is repeated forever, when the microcontroller is powered. For example, the code inside the example tells it to output temperature data using the serial monitor every 10 milliseconds.
Data Types
In programming, there are various data types. Some are used to store text, and others are used to store more complicated types of data. The common data types include:
- String (
String) - a combination of characters on the keyboard (letters, numbers symbols) - Character (
char) - single letters like'a' - Integer (
int) - whole numbers ranging from -32,768 to +32,767 - Float (
float) - numbers that contain decimal points like 25.6 - Boolean (
bool) - eithertrueorfalse. Can also be used to represent a pin state likeHIGHorLOW.
In many programming languages, variables must be declared before they can be used. Here are some examples that are used in Arduino:
String password = "hello world";
int temp = 0;
bool logicStatement = false;
bool ledState = HIGH;
float temperature = 25.6;
Conversion of Data Types
There are expressions that contain variables and constants of different data types. If you need to calculate the expressions, they will need to be converted to the same data type. Below are some common conversion types to help you.
String to Int
toInt() - Converts String to Integer. The input string should start with an integer. If the string contains non-integers, the function will stop performing the conversion. In the event where the conversion could not be performed as the String does not start with an integer, a zero (data type: long) is returned.
Example Code
void setup()
{
    Serial.begin(9600);

    String myString = "20";
    int myInt = myString.toInt(); // This is where the toInt() Function is used
    Serial.println(myInt);
}

void loop()
{
}
You can copy this code to your Arduino IDE and try it out!
String to Float
toFloat() - Converts String to Float. The input string should start with a digit. If the string contains non-digits, the function will stop performing the conversion. In the event where the conversion could not be performed as the String does not start with a digit, a zero (data type: float) is returned.
Example Code
void setup()
{
    Serial.begin(9600);

    String myString = "20.56";
    float myFloat = myString.toFloat(); // This is where the toFloat() Function is used
    Serial.println(myFloat);
}

void loop()
{
}
You can copy this code to your Arduino IDE and try it out!
Converting different data types to String
The below code section shows how different data types can be converted to String.
String stringOne = "Hello String";                    // using a constant String
String stringOne = String('a');                       // converting a constant char into a String
String stringTwo = String("This is a string");        // converting a constant string into a String object
String stringOne = String(stringTwo + " with more");  // concatenating two strings
String stringOne = String(13);                        // using a constant integer
String stringOne = String(millis(), DEC);             // using a long and a base
String stringOne = String(5.698, 3);                  // using a float and specifying 3 decimal places
Resources and Going Further
For the more experienced programmers amongst you, do keep in mind that Arduino uses variables in the same way C and C++ do. You can have special variables like unsigned variables (e.g. unsigned int) to represent positive-only numbers, as well as character arrays (e.g. char myString[] = "string here";) to represent a string instead of using Arduino's String object.
In addition, it is also possible to convert integers into Strings with different bases such as base 16 (hexadecimal, HEX) or base 2 (binary, BIN).
String stringOne = String(analogRead(0), DEC);        // using an int and a base
String stringOne = String(45, HEX);                   // using an int and a base (hexadecimal)
String stringOne = String(255, BIN);                  // using an int and a base (binary)
For more information on the intricacies of C and C++ style data types, you can refer to this link below for Sparkfun's take on this issue: